Monday, May 31, 2010

Field Bakery


Prussian field bakery scratch built by Ed Phillips. Minden Pioneers are shown in the foreground. Buildings were made by Herb Gundt of H.G.Walls. The Alter Friz Gasthaus is the name of an actual gasthaus in the town of Hochkirk, Germany,

Someone had asked me about information on 18th Century field bakeries and I promised to post a picture of the generic field oven that Ed Phillips made. I was lucky to be the first one to see Ed as he unwrapped his collection of scratch built buildings and vignettes at this year's SYW Association convention. Little did I realize that these were all for sale (sort of like a bring and buy in the UK). So I snapped up the bakery and several supply wagons that Ed had also scratch built using balsa wood, bass wood, card stock and some Old Glory artillery wheels for the carts.

In the 18th century, the armies would transport wagon load of the black metal bands that you see in the picture above. Then they would build the oven either from local materials or bricks that they had carried along with them for that purpose. My thinking is that they used local materials rather than hauling heavy wagons full of bricks around the countryside. So the open top wagons carried the metal braces, probably covered with canvas to protect the metal from the weather.


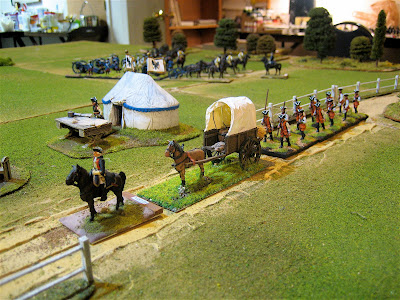
A company of Prussian pioneers marching into the camp. RSM general, Stadden dismounted Seydlitz in the camp background, scratch built wagon by Ed Phillips, and Minden pioneers. Tent vignette by HG Walls.

The Minden pioneer figures look like they will be useful for a variety of functions, aside from their intended use as pioneers. You have seen how I have converted them into artillery crew in previous blog postings. I could also see them as part of the bakery crew. The fellow with the shovel could be holding a large spatula full of bread, with a simple conversion of the shovel with some green stuff.


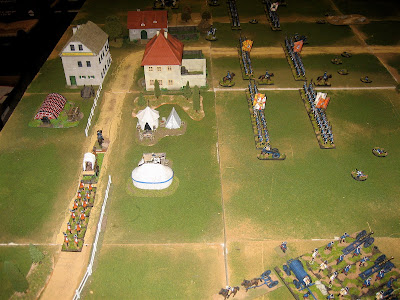
An aeriel view snapped by Baron von Munchausen in his hot air balloon (no, I don't have one. Yet. I hear that Eureka is going to make the Baron's balloon in resin one of these days).

Today was Memorial Day in the United States. That means that I get to stay up late the night before and paint, then sleep in late on Monday. Nice! Lady Emma Cuddlestone-Smythe was having some of her ladies over for tea, so Mrs. Fritz suggested that it was high time for Myself to tear down the wargame table that I had set up in her half (the larger half) of the basement and move all of my gear back into the smaller half, where we had the flood earlier in the year.

This project took several hours and I have to say that it brought a tear to my eye to have to take down the 6ft by 18ft table that was set up in Lady Emma's play room. The picture above shows my table back in its old room, with a smaller 6ft by 12ft table. I set up the 2ft square terrain tiles that I had made a few years ago and placed my Minden Prussian camp on the table. This will be the eventual size of the table that I will use for my Minden Project games at conventions, so it is good to see how many battalions and cavalry regiments I can fit on this table.

Herself did allow me to keep my painting table upstairs in the generally unused Dining Room, albeit with the table area tidied up quite a bit. So I cleaned off the painting table after finishing the basement cleaning project. Since I was on a roll by now, I decided to clean out the garage for good measure. I think that earned me some bonus points with Herself. I was generally pleased with the day's efforts.

Finally, we all gathered around the television this evening to watch the Stanley Cup Finals between the home town Chicago Blackhawks and the Philadelphia Flyers. I am really learning a lot about ice hockey as I watch more and more games, and I especially love the song "Chelsea Daggers" (or is that the name of the group) which is played everytime the Hawks score a goal. This is the same music used in the Amstel Light Beer commercials on television. The Hawks won 2-1 in a hard fought game and now lead the series 2-0. We are pleased in Hesse Seewald.


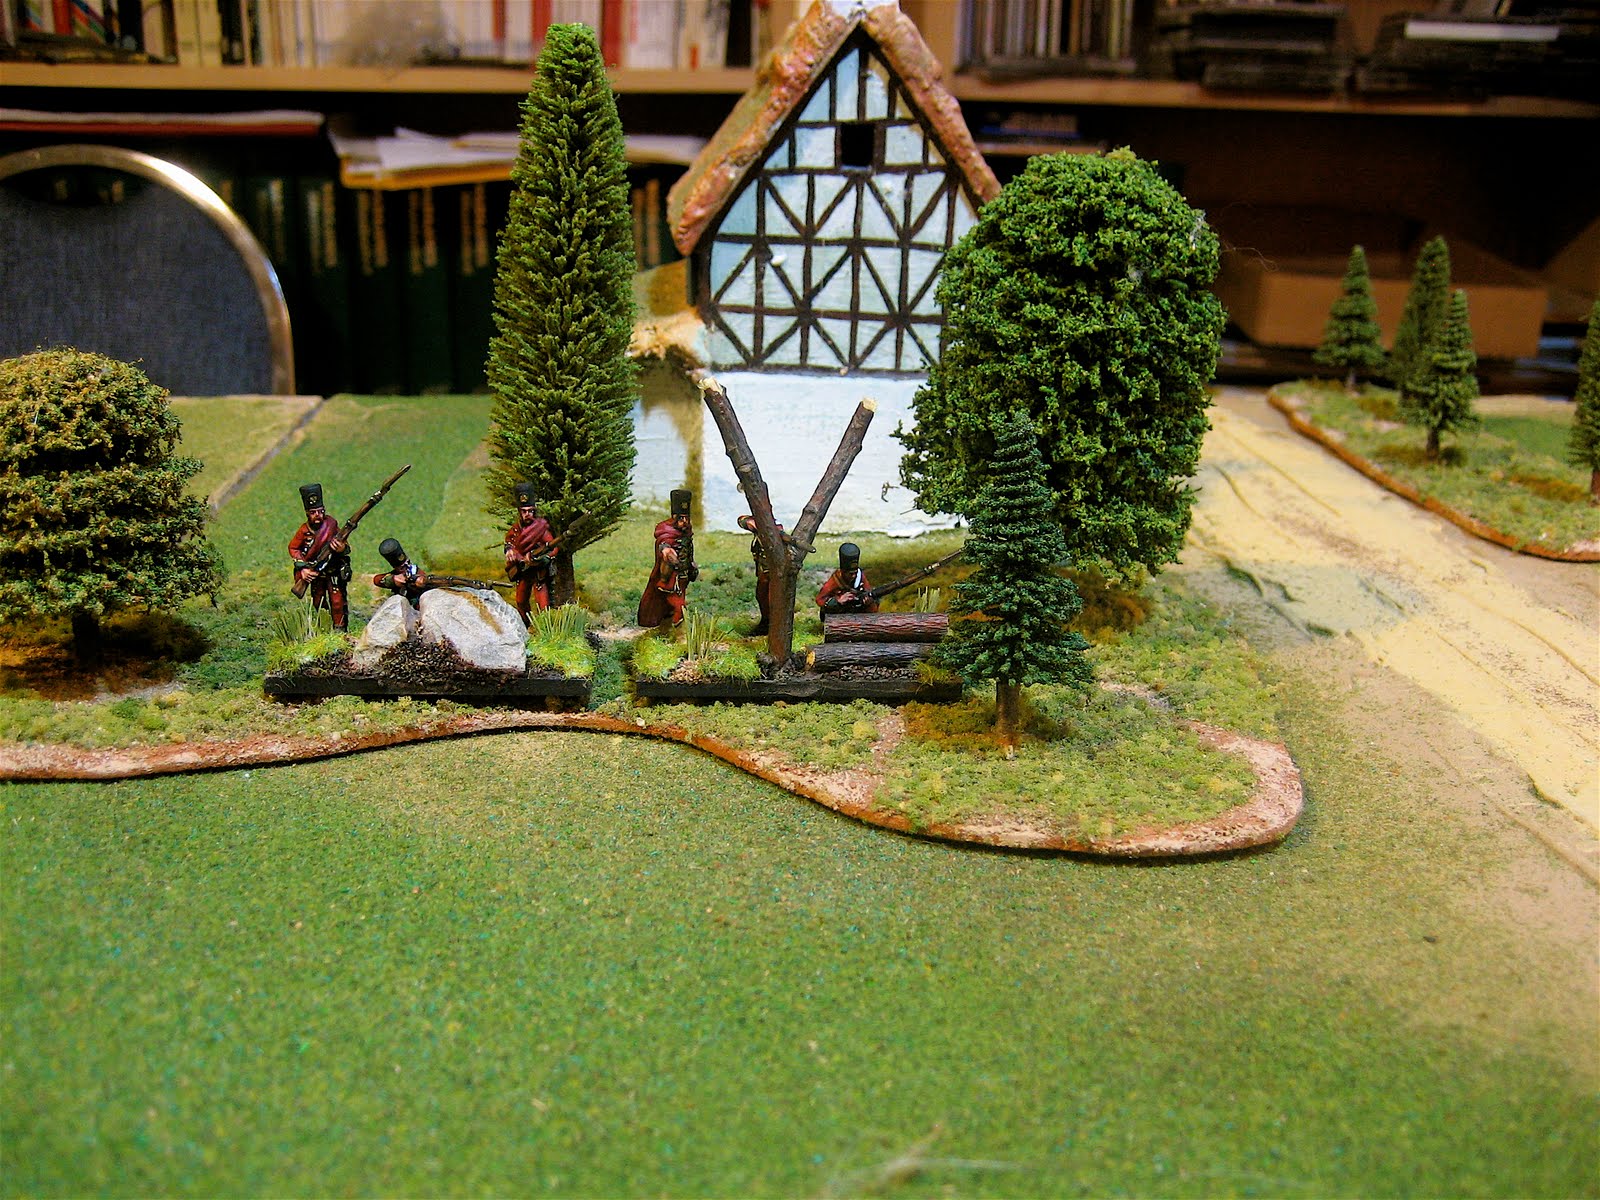
Carlstadter Liccaner Croats - Minden Miniatures - guard an Ian Weekley building.

And finally, I was able to finish the terraining of my two Croat bases this evening and have posted a picture above. They look much better once the stand is inked and the static grass is added. As I said in yesterday's posting, I 'm looking forward to completing the unit. I checked my inventory of Minden Austrians and found that I have enough figures for 2 Croat battalions, 1 grenadier battalion, and 2 musketeer battalions (with 2 more in transit right now).

I also plowed my way through a dozen Black Hussars, doing the Van Dyking of the shabraques this afternoon. This is the tedious part of painting hussars, but it should be clear sailing after this and I should be able to have the first dozen hussars done towards the end of this week. I think that I may have figured out a short cut for the shabraques: paint the "tooth" completely white and then come back and paint in a red diamond rather than painting the red diamond first, like I did, and then trying to edge the red tooth with thin white lines. It is the lining that drives one crazy. This other method would eliminate the lining step. We shall see how it works.

Sunday, May 30, 2010

Those Pesky Croats


Minden SYW Croats "in situ" where they are most likely to be found: in cover.

I started on my Austrian army today by painting six Minden Croats from the Ottokaner Liccaner regiment. I had been painting the Prussian hussars and getting a little bit bleary eyed painting the shabraque Van Dyking, so I thought that I would take a short break and paint one Minden Croat. It was the fellow standing firing and I liked him so much, that I painted the officer with the cane and the kneeling loading fellow as well. That was enough for one stand, but wouldn't two stands look even better? Well, yes - so now I have six Croats in my Austrian army.


A view of the Minden Croats from the rear - click the pix to enlarge the view.


A side view of the Croats so that you can see the fellow behind the tree.


A close up view of the Croats.

I plan to return to the Black Hussars tomorrow, now that I've sort of gotten the Croat bug out of my system. However, I am really looking forward to finishing this battalion with 30 figures.

As for painting, I used a grey primer this time because the uniforms are predominantly red, and red doesn't cover black primer very easily. Once the figures were primed, I slapped on a coat of Reaper Paints "Blood Red" for the uniform color. Then I blocked in all of the equipment with black paint as this makes things like muskets and cross belts stand out better. This takes a little longer than if I had black primed everything, but then I would have needed two or three coats of red to cover the black.

Thankfully, Richard Ansell has strategically covered over most of the frogging and detail on these Croats with careful placement of things like the rolled up cape or the arm position and the musket, etc. Thus you don't have to paint much of the frogging at all. This is terrific! For the little frogging that you do paint, I black lined the areas first and then carefully painted a thin line of Dun Yellow from IWM/Ral Partha to finish off the figure.

All in all, these Croats are very dynamic and animated and are a simple joy to paint. I had always steered clear of painting Croats in the past, thinking that they would be hard to paint. But with these Minden figures, the details are a snap to paint. I give the figures my highest recommendation.

Saturday, May 29, 2010

Black Hussar (Minden) Sample Painted


My first painted sample of the new Minden SYW Prussian Hussars. This is of course one of the Black Hussars (H5 or von Reusch Hussars) Click the picture to enlarge the view.

This evening I primed the 18 Minden Prussian Hussars that I assembled yesterday and then pitched into painting my first sample. The sample figure is painted as one of the Black Hussars, which was a 10 squadron regiment that had 3 squadrons serving in Western Germany with Prinz Ferdinand's army, while the remaining 7 squadrons were primarily deployed in East Prussia to fight the Russians.

I always paint one figure to completion whenever I start on a new battalion or cavalry regiment. This allows me to get more familiar with the figure and how best to work with it (i.e. the order in which I should paint the various parts and equipment pieces etc). It also helps me experiment with some of the colors. In this case, I wanted a lighter brown horse so I tried some different shades and highlights in the lighter brown color spectrum before settling on something that I liked.

Here are some more pictures of the Prussian hussar, taken from different angles.


The figure was relatively easy to paint -- afterall, it is mostly black. The red and white "Van Dyking" that edges the shabraque was actually the hardest item to paint on this figure. Much of the braids and buttons on the dolman and pelise are artfully concealed by the positioning of the clothing items. The braid that is visible is detailed enough that you can either lightly dry brush white over it or actually paint in the white squiggles with your brush. I chose the latter option on this figure. For black highlighting, I mix in some flesh color paint with my black to get a very nice highlight that makes the uniform "pop" out at your eye. I learned this little trick from someone on The Miniatures Page a couple years ago.

I am really pleased with the way that this first figure turned out and I can't wait to start painting more figures tomorrow. While I have 17 more primed and ready to go, I think that I may work on a smaller batch of, say, 5 to 7 figures so that I can complete them over the weekend, get them based, and then take a final photograph for the blog.

I also grey primed eight of the Minden Croats (one of each pose) and will be tempted to paint a couple of these samples over the next couple of days so that I can see how they turn out. They are wonderful figures, as are all of the Minden figures.

Thursday, May 27, 2010

Prussian Cavalry Is Next!


The Bayreuth Dragoons (DR5) practice on the marchfeld under the watchful eye of their colonel. Minden Miniatures painted by Der Alte Fritz. GMB Designs flags. Click the pix to enlarge the view.

I have been working on the Bayreuth Dragoons over the past week, having finished a second batch of eight riders and bringing the regiment (DR5 in the Prussian cavaly establishment) up to twenty figures. Eventually the regiment will have 30 to 36 figures in the first five squadrons. Curiously, the Bayreuth Dragoons were one of several regiments that were organized with ten squadrons, rather than the standard five squadrons. So at a 1:20 ratio of castings to real men, I will eventually need about 60 dragoons. Hmm, I could also use them in one of the BAR games that we play, as a 5 squadron regiment of 60 figures at 1:10. Even though these are mounted two horse per base, rather than on single stands, the frontage for both set ups is the same at a one inch frontage.


A view of the dragoons from another angle.

And now, here is a picture of what many of you are looking forward to seeing: the Minden Prussian hussars in mirliton. I ordered a 36 figure regiment from Frank last week and received them in record time a couple of days ago.


Minden Prussian Hussars in Mirlitons await for the glue and epoxy putty to dry before advancing to the priming booth.

The Minden hussars are sculpted in a more animated pose than their heavy cuirassier and dragoon bretheren, and this seems apt and fitting for these wild and daring light cavalrymen. As a result, there are two new horse poses added to the range: one galloping horse with legs stretched out and one galloping with legs bunched. They ought to convey rapid movement when they are mixed together on a stand, one bunched and one stretched.

The sword arm is cast separately, but do not let this dissuade you from buying some of these beauties. Frank had Richard Ansell design them with a deep hole in the arm socket and a long cast on pin on the sword arm. You will not have to drill out any holes or add you own pins to the arm for fear of it (the pin) being too short. You will find that arm and socket provide a strong and comfortable fit that require minimal assembly.

I took a quick swipe across the torso with a flat file to expose more metal, for a better glue bond, and then did the same around the pin in the arm. Then I inserted a small ball of green epoxy putty into the arm socket for extra support, added super glue, and inserted the arm into the torso. It was as easy as pie to do. I would imagine that you could forego the extra step of using green stuff, but then again, I like to over engineer things a bit too much. Adding putty only adds another minute, if not seconds, to the assembly process.

I will let the figures dry and cure overnight and then prime them friday night. Thus, I will have 18 figures ready for painting over this weekend. Since it is Memorial Day weekend in the United States, I have a holiday on monday and thus some extra time to paint over the weekend. Hopefully, I can complete a half dozen or so of these hussars. Since I plan to paint them as HR5 von Reusch (the Black Hussars), the painting should go faster for this regiment.

One other thing to mention, Richard Ansell sculpted a lot of nice detail into the shabraque with raised lines depicting the "Van Dyke" style of edging on the shabraque. This should make the painting of the shabraque very easy to do.


I finished six more jagers this week, bringing the regiment up to 30 figures.

Finally, I painted six more jagers last weekend and finally had a chance to complete the basing the other day. The last two stands are seen on the front row, on the left of the unit as it faces you. I wanted to add a couple more stands with the rock wall motif so that I could create a standing vignette of jagers firing from behind a low stone wall. The frontage of the stand is the same as that of my regular infantry battalions -- 60mm per stand-- the extra depth in the stand gives the appearance of a more open order deployment of the jagers, as opposed to the more formal look of the infantry stands.

Well then, I am looking forward to painting some of the hussars over the holiday weekend and hopefully I will have some "work in progress" photos to post on Monday evening.

Thursday, May 20, 2010

The Prussian Army, So Far


The entire Minden Project Prussian army is on the parade ground for a review. Please click on the picture for a closer inspection of the troops. And do leave a comment with Der Alte Fritz if any particular unit deserves special mention, or conversely, has failed its inspection.

Last evening I decided to lay out more of my terrain squares on the wargame table and see how my Minden Prussian army would look on a 6ft by 10ft table. As of now, I have eight battalions of line infantry, 1 battalion of jagers, 3 heavy 12-pounder foot artillery pieces, and 4 light 3-pounder regimental guns. I only have a dozen Bayreuth Dragoons so far because I have concentrated on the artillery and infantry combat arms, so far this year.


A view of the Prussian right flank and the camp ground area behind the lines. On the left, you can just see the start of the field forge vignette (unpainted castings so far). Eventually, I will have a full camp area with tents, men at their ease, sutlers and camp followers, etc.

One of the benefits of this exercise is that it enables me to see how the whole project is coming together; to get a better idea of how well the various pieces fit together; provides an idea of what else needs to be done (cavalry!); and finally, it is simply mesmerizing to look at, which makes the whole exercise fun.

One of the things that really jumps out at me is that this army, as it is constituted right now, takes up most of the tabletop space. If I add another two foot square tile to the left flank, that will give me 12 feet of table length and provides a moderate amount of "open flank area" on the left for maneuvering and cavalry action. If I removed the temporary hill on the right flank, which serves primarily as a photo background, then that would give me two feet of open area on that flank as well. To put it another way, I don't think that I need any more Prussian battalions for a typical game on 6ft by 12ft table, which would be my standard table dimension for this army and project.


Here are some RSM Prussian hussars (HR4 Puttkamer) that are shown next to a Minden Prussian officer (a dragoon officer converted to an infantry officer) with an RSM aide on foot. This demonstrates how compatible the two ranges are. The hussars were painted over 20 years ago by Bill Biles of Lexington, Kentucky (one of the original owners of RSM Miniatures).

I plan to rebase these figures in my new style of basing, and that should improve the overall appearance of the figures. Note the difference in painting styles between the hussars from 1990 (which was state of the art painting at the time) to the Minden command stand that I painted. We did not use much shading, highlighting or multi-tone coloring on our figures back in 1990. Bill hand painted the intricate hussar shabraques using a dark blue ink pen.


Now of course I won't stop painting my beloved Prussians. In fact I recently placed an order for figures to fill out the second battalion of the IR49 Diericke Fusliers, another grenadier battalion, and a regiment of the new Prussian hussars that Frank announced (today) as being available for shipments. I will probably have three or four Prussian cavalry regiments in this army. However, a typical game looks like it should have no more than nine battalions, unless the other three of the dozen that I have planned for each side are used as off board reserves that arrive later in the game.

Or to put it another way, perhaps it is time to start painting Austrians. I hate to say that, but this is true.


A parting shot of the Prussian left flank with the Itzenplitz regiment (IR13) in front with its battalion gun deployed. In the second line, you can see IR49 Diericke Fusiliers and their battalion gun being prolonged by hand. I really like this picture with the close up of the two battle lines and the deployed and prolonged battalion guns. I think that more wargamers should add things like battalion guns and limbers to their SYW armies.

I currently have more DR5 Bayreuth Dragoons on the painting table. I finished the first dozen a month or two ago and have a second group of eight partially painted. Another ten dragoons need to be primed and ready for painting. With Memorial Day weekend coming up soon (May 31st) I hope to be able to finish the dragoons this month and then possibly start on some Austrian infantry in June.

Wednesday, May 19, 2010

Prussian Artillery Is Finally Based


Two 12-pounders with four crew, two artillery labourers, and a supply wagon to complete the battery vignette when it is deployed. The limbers are not shown in this picture. Figures are Minden Miniatures, gun models are from Berlin Zinnfiguren, and the wagon is from Front Rank. Click the pix to enlarge the view.

Last evening I finally decided to place all of my field artillery models on a 60mm wide by 120mm deep base made from MDF material (rather than the narrower 40mm wide base), and having done that, it was time to finally get some of my Prussian artillery based. My initial thinking is that my foot batteries will have two gun models so as not to overpower everything on the field, but I could make the battery 3 or 4 guns, as show below.


A mock up of a potential 3-gun battery. The extra 60mm frontage provides extra room at the back of the battery for a pair of wagon horses (detached while the wagon is unloading) and a horse holder. RSM limbers can be seen in the background, providing even more depth to the depiction of the battery and all of its accoutrements.

I kind of like the look of the three gun battery and the extra room available for some wagon horses. I may go this route as I get more figures and gun models painted.


Here is a little vignette that I made showing two artillery crewmen prolonging a light 3-pound regimental gun by hand, in front of its parent battalion, as the latter moves foreward.

I got the idea for the regimental gun vignette from a picture of some similar models in John Ray's Fulda Campaign collection. I figured that these guns could be given to battalions forming the second line of battle. Afterall, they can't fire the guns because their own men in the first line of battle would be in the way. So they hand prolong the guns as the second line moves forward in support of the first.


A closer view of the regimental gun vignette.

I used one of the Minden Prussian artillery crewmen and one of the generic pioneers in waistcoat to form the prolonging team. The battalion gun is an RSM 3-pounder (it is really a 20mm French Griveaval 12 pounder). There are no conversions in this vignette. I simply selected two figures that had hands positioned such that they appear to be carrying the gun trail. Then I glued the 3 pounder into their hands. I placed them on a semi round or oval base to indicate that it is a vignette rather than an integral part of the game. I could replace these guns with another stand of one gun in firing position, when the gun is ready and deployed for action.

Sunday, May 16, 2010

IR49 Diericke Fusiliers


IR49 von Diericke fusilier regiment - first battalion (Minden Miniatures). Click pix to enlarge. Double click for a really close up look.

I finished my first battalion of Minden SYW Prussian fusiliers late friday evening and finally finished the basing and the flaging of the unit yesterday. For my first fusilier regiment, I decided to paint IR49 von Diericke for the sole reason that I like the regiment's unique orange breeches and waistcoat. Add to that that GMB Designs makes a very cool looking set of flags for this regiment, and the choice to paint IR49 was an easy one to make, to say the least.


IR49 shown in a column, providing a closer look at those nice GMB Designs flags.

Originally, I was contemplating only having one battalion of fusiliers, or possibly painting only one battalion of IR49 and one battalion of IR40 (in pink small clothes for added color) to maximize the color variations in my SYW Prussian army. However, I really like the way that this battalion turned out. The orange is very striking and is also very different from the standard white or straw small clothes worn by most regiments. Undoubtedly, I will have to order some more figures and paint the second battalion of the regiment. I always say that a good plan can still be adjusted in mid-course, and so I will have a full regiment of IR49 fusiliers in my Prussian army.


Minden labourers painted as Prussian pioneers.

I have been using the Minden generic labourers as everything but pioneers, so I finally decided to paint a few of them as what they were meant to be - pioneers. I placed two figures on each stand 40mm by 30mm. I will paint at least 12 figures as pioneers and eventually increase the unit up to 20 or 24 figures. These can be used for digging field entrenchments, seige works or as for use as a pontoon corps to go with my Berlin Zinnfiguren pontoon wagons. They make a nice complement to my growing artillery park and technical corps.

Within the next couple of days I will post some pictures of an artillery battery with its full complement of crew, matrosses and supply wagons. I have been going back and forth in my mind about the size the bases to use. My original idea was to use 40mm wide bases, but after looking at the artillery vignettes on their 60mm wide bases, I have grown to like and appreciate the wider bases.

Sunday, May 9, 2010

The 200,000 Visitor Milestone Is Reached


The Minden Prussian army turned out on the marchfeldt today to fire a salute in honor of the 200 thousandth visitor to the site today. Click on the pictures to view the proceedings up close. Double click for an even closer view.

At approximately noon today, Sunday May 9, 2010, the 200,000th visitor to this blog paid a visit to see what was going on at Der Alte Fritz Journal. I never imagined that this little blog would attract so many visitors in such a short time. I want to thank everyone for taking the time to look at my pictures and read my musings on the wargame hobby. I am honored to have so many wonderful readers.


To celebrate the passing of this milestone, the color bearers of the Prussian Regiments (left to right) IR13 Itzenplitz, IR5 Alt Braunschweig, and IR1 Winterfeldt presented their colors to King Friedrich II and Major General von Winterfeldt on the marchfeld.

It seems that most of 2010 will be devoted to my Minden Project covering the armies of Austria and Prussian using Minden Miniatures 1/56 scale figures. As of this writing, I have completed 8 Prussian battalions and four sections of 12-pound artillery, plus a dozen Bayreuth Dragoons. I would imagine that if all goes according to plan, that I will begin to tackle the Austrian army starting in July 2010.

My latest addition to the Prussian army is the second battalion of IR13 Itzenplitz, which is pictured below.


The complete IR13 Itzenplitz Regiment on review. I haven't added the flags for the second battalion yet, so I will not base the command stand until the new flags arrive. I like to Dull Kote the figures, but the flags are added after the Dull Kote is sprayed on so as not to fog up the flags.

I finished the second battalion on Saturday and prepared to base the battalion that afternoon. To my horror, I discovered that I did not have a set of GMB Flags for IR13 - second battalion, which would have two black flags. I was sure that I had some duplicates in my hoard of GMB Flags that I have accumulated over the past couple of years, but alas, no IR13. So I fired off an order to Grahame Black and hopefully the flags will soon be on their way, provided that darn volcano doesn't interfere with things again.

I really had a hard time getting this second battalion of Itzenplitz completed. The unit had been sitting on my painting table for a couple of weeks as I delved into creating vignettes. There is something about those all white facings that just didn't appeal to me. I prefer red or straw when it comes to painting Prussians. Oddly enough, Itzenplitz was one of the best regiments in the army, and it has a rather spiffy looking regimental flag - all in black, sure to strike terror into the hearts of the Austrians.

This evening I primed up 30 fusilier figures for IR49 and plan to start painting them this week. I also put together some of the pioneer figures so that I could increase the pioneer company from 2 to 12 figures, and also plan to add some more artillery labourers to my artillery park. So I have replenished my inventory of primed Minden figures and am ready to finish off the month of May with IR49 and a few other goodies for the table top.


c


s

Saturday, May 8, 2010

Supply Wagon & Pioneers


Artillery & crew (left), matross stand (center) and supply wagon (right) will make up my artillery batteries in my Minden Project.

I have been working on some Front Rank ammunition wagons from their 18th Century equipment range and the picture above gives you some idea as to how I will eventually organize my artillery batteries for the Minden Project armies. A battery will consist of two gun models, a small stand of matrosses to drag the guns back into place, and finally, a supply wagon that will set on the table perpendicular to the gun models. This will provide the necessary depth to depict all of the equipment that is placed behind the battery in the field. There will also be limber teams.

The picture above provides a general impression of how it all might look, although I haven't painted any extra matrosses for the middle stands yet. The actual artillery pieces will be Berlin Zinnfiguren 12 pounders with Minden Prussian artillery crewmen in blue coats.


A picture of the Front Rank wagon. Minden drover, artillery crewman carrying a round, and a Minden horse holder walking alongside the wagon. A stack of powder bags completes the vignette.


Minden pioneers painted as IR49 Prussian pioneers. I really like their orange waistcoats and breeches, although the pioneers actually wore fusilier mitre hats. Still, they look very nifty.

I like the way the pioneer figures turned out in the above picture. My plan is to base them two per stand and have approximately ten or twenty figures for pioneer work. Thus a few stands could be working on constructing gun emplacements, filling gabions or working on pontoon bridges.

This has inspired me to paint a unit of Minden Prussian fusiliers next, as IR49, the pioneer regiment. This was eventually turned into a regular fusilier regiment for battlefield use when Frederick needed the extra manpower to fight on the field.

At some point on Sunday morning, the 200,000th visitor will have visited the Der Alte Fritz Journal. We were about 170 visits short of that milestone as I entered this posting this evening. Thank you everyone for your support. It is much appreciated.

Thursday, May 6, 2010

Dragoon Vignette Painted


Dragoon officer (center) dismounted peering through his spyglass while on recon. Previous dragoon vignettes are shown with the new model, in situ.

I was able to paint the dragoon vignette this evening, having had the foresight to prime all of the figures last night. I opted for the smaller round base that I use for my command figures, mainly because Mrs. Fritz liked the smaller base better than the larger base. I also decided not to include any other foot figures on the stand. I kind of like the tighter look to the officer vignette and in theory I could use this as a command stand.


A picture of the dragoon officer by himself. The fence is from Irregular Miniatures, the horse is from RSM, and the dragoon officer is a Minden Prussian jager standing firing, that I have converted.

Tomorrow night I can apply the brown ink to the base and after the ink dries, apply the static grass. So it is a couple of steps away from being finished.

Tuesday, May 4, 2010

Dragoon Conversion


Minden Jager turned into a dragoon officer, with RSM standing horse tied to an Irregular Miniatures rustic fence post.

I have been looking at the Minden Prussian jager standing firing and have decided that he would be a suitable candidate for a conversion project. I envisioned cutting out the jager's rifle and substituting a spyglass or telescope and turning him into a dragoon officer on recon.

The jager/dragoon conversion was fairly simple to do. At first, I tried to just cut out the rifle and use both arms/hands. Sometimes you can make a good conversion by simply bending arms and heads and doing some minor cutting under the arm pit or at the elbows. But in this case, it was apparent to me that the bend in the right arm would be unnatural. So I decided on an amputation.

Once I sawed off the right arm, I filed the stub flat and then drilled a hole in the shoulder socket. Here I cut off a pin to 12mm, the same length as the now discarded arm, and glued it into the hole. Once the glue dried, then I applied a sausage roll of green epoxy putty and shaped the arm until it looked about right. Then a small flat piece of putty was rolled out to create the cuff of the gauntlet and the right hand. This worked out much better than the hand conversion that I attempted on Marshal Schwerin last week.


RSM horse with epoxy putty horse furniture added.

I used the standing horse from the RSM range to create a saddled horse that I could use in the vignette. I filed off the reins and drilled a hole into the muzzle so that I could replace the reins with wire reins for a more realistic look. Since the horse comes without a saddle (I wish that someone would make saddles with shabraque accessories for the 18th century to use on this type of project) I had to make my own shabraque and saddle out of green stuff. I'm not entirely happy with the result of the horse furniture -- it looks a little lumpy and lacks sharp definition, but it will probably look all right after it is painted. I could have used one of the Mirliton saddles, but I didn't have any left. That would be a better choice if I want to do a line of four or five horses tied to a hitching post.


A view of the original jager figure (left) and the conversion figure (right) for comparison.

I finished the sculpting last night around midnight so I am going to let it cure all day tuesday, before priming the figures on Wednesday night and then painting them on Thursday.

I am still deciding whether I should use one of the Minden horse holder figures to hold the officer's horse, or dispense with the extra foot figure and tie the reins to the Irregular rustic fence. Or, I could add one of the RSM officers pointing and perhaps directing the attention of the dragoon with the spyglass to something that he has spotted.

Sunday, May 2, 2010

Artillery Hoist Is Completed


A front view of all three artillery park vignettes after completing the static grass phase of the basing process. On the left, a Minden Prussian dragoon officer has been converted into an infantry officer. All I did was file off the aigulette on his right shoulder. He is slightly different from the mounted colonel in that his right arm is bent and his hand is in a jaunty pose, resting on his hip.

Note: click the pictures to enlarge the view. Double click for a really large picture.

I completed the final phase of the artillery hoist vignette that you saw yesterday. All that I had to do was to affix the static grass onto the base with Elmer's White Glue (pva glue in the UK) and then it was ready for its photoshoot. In the picture above, you can see how all three artillery vignettes fit together and complement one another.


A view of the model during its construction.

In the picture above, you can see the hoist frame during its construction phase. The legs are made from bass wood (1/8 inch square) cut to 2.5 inches in length. A spare offcut from a North Star flag pole was used to provide the connecting rod at the top of the A-frame and similar pieces were used to make the turning handles on the lower axle. The lower axle is a piece of dowel rod. I used wooden bead sleeves to act as a sort of washer at the ends of the lower axle. Since these were made from wood, it was easy to drill four holes in the bead to accomodate the turning handles. Florists' wire was used for the rope on the block and tackle suspended from the top of the hoist.


Left side view of the hoist vignette. The officer in the blue coat is from RSM. I clipped off the lapels on the figure since Prussian artillerists did not wear lapels. Note the coiled rope on the ground running from the hand of the labourer in the foreground. The rope was made by twisting two pieces of florists' wire together.


The view of the front of the model.


A view of the right hand side of the vignette.


Another view of the complete artillery park and a long view of how it fits with the rest of the Minden Miniatures Prussian army. Supply wagons are now in the painting que.

The will be it for the vignettes for the rest of this week, unless something strikes my fancy and I embark on some new project that catches my eye. I was working on the second battalion of Itzenplitz (IR13) this evening and I want to finish it this week. So after Itzenplitz is completed, I may work on some more vignettes. I am almost out of Minden labourer figures to use in these projects, but never fear, a new package of inventory is winging its way across the ocean, even as you read this post.

By the way, I am very close to surpassing my 200,000th visitor and we should pass that milestone sometime this week. Click on the little Sitemeter logo at the bottom of this page to see how many visitors have passed through. You can also click on the map inside Sitemeter to see where other readers of this blog come from. It's kind of a cool thing to see.

Oh, and keep the comments coming -- I love to read the feedback. There is no telling what might come next as I build on and expand this wonderful Minden Project.

Update
A big fat box of miniatures arrived this evening chock full of Minden figures including Prussian fusiliers, Austrian grenadiers and labourers for vignettes. I've got my work cut out for me now. Kudos to Frank on the super fast service. I am looking at some of the Prussian fusilier NCOs and I see pioneers holding their tools in their hands. I was going to lop off heads and do some swaps, but the NCO figure for the fusiliers is a ready made pioneer in mitre hat.

Update II - Monday Night
This evening, after watching the Blackhawks vs. Canucks Stanley Cup Hockey game, I went down to the basement and started converting the Prussian jager standing firing into an officer holding a telescope.

I cut out the rifle and kept the left arm and hand that held the rifle. This would eventually hold the telescope. Then I had to amputate his right arm at the shoulder - I tried but I couldn't save it and use it by bending the arm into position. I measured out the length of the old arm at about 11-12mm and cut a piece of wire the same length.

Then, after drilling a hole in the shoulder socket, I glued the wire armature into the shoulder and started applying green epoxy putty to form the arm. The hand is much better on this model. I seemed to learn a thing or two from my last arm conversion. Then, as an afterthought, I decided to remove the jager belly box and turn the figure into a dragoon instead of a jager officer. So I filed away the belly box and covered up the scratchings with a new officer's sash around the waist. It looks fairly decent. The telescope was just a piece of brass with some putty building up the end of the spyglass.

Then I got really crazy and decided to make a dragoon shabraque and saddle set for a standing RSM horse. The idea is that this will be the officer's horse as he will be dismounted. I may add a horse holder to the stand using one of the existing Minden generic horse holders, or I could just have the horse and the officer on the vignette stand. I will decide on that later.

It will probably take a couple days for the epoxy putty to cure, so I will prime the figures on Wednesday and start painting on Thursday, if all goes well. Preliminary basing on Friday and then I can finish off the base and shoot some pictures on Saturday May 8th. Stay tuned for that.

Saturday, May 1, 2010

The Die Hard Dragoon


Reiter Christoph Steiner makes his last stand after losing his mount, determined to take a few Austrians with him. Minden Prussian jager painted as a Prussian dragoon, Minden generic casualty figure painted as an Austrian, Foundry or Perry dead horse, and RSM sword.

Here is another vignette that I added to my collection this weekend. This was was relatively easy to do and required only a minimum amount of conversion work. I already had the horse casualty (which comes from either Perry or Foundry - I forget which one) and the Minden generic casualty, and when I saw the dead horse figure, I immediately began to envision a dragoon firing his last rounds of ammunition from his carbine.

I used the Minden Prussian jager figure for the dragoon. The conversion work consisted of cutting off the cartridge box on the jager's belly and making a new dragoon cartridge box from epoxy putty. The belting was made from a spaghetti string of putty, which I placed over the shoulder and then flattened out with the eraser end of a pencil. The rectangular box was easy to fashion out of putty. I also cut off the hilt of the sword that the jager was wearing.

I envisioned Reiter Steiner being a bit ticked off over losing his horse, so he has unsheathed his sword and has jammed it into the ground in defiance. Then he crouches behind his dead mount and fires his last few rounds at the on-coming Austrians. You can see one of his victims, dead, in the foreground. Reiter Steiner intends to die hard and take as many Austrians down as he can before they finish him off.


Artillery Vignette Preview


Prussian artillery crew removing a gun barrel from its carriage for some repair work. I will ink the gravel tomorrow morning, after the spackle terrain has dried, and then apply the static grass to complete the base.

I spent a good part of friday evening and saturday night constructing and painting the latest vignette addition to my artillery park. This is a vignette of the Prussian artillery crew using a hoist to remove the cannon barrel from the gun carriage for some type of repair work. Since a gun barrel could weigh anything from 700 pounds on up to 1,500 pounds, this was no easy task to remove the barrel.


A side view of the vignette.

I will post some pictures of the completed artillery vignette tomorrow after I complete the base work. The spackle on the ground needs to dry for a couple of hours. After that, I will cover the ground with brown ink, leaving a few exposed areas of gravel un-inked, for contrast. Then, after a quick dry brushing of some tan paint, I will apply the final touch of the static grass and then the model will be ready for some "show and tell" photography.

This model was a bit fiddly to figure out and construct, but now that I have done one, it probably would not take me as much time to build another one. I will tell more of the construction story when I post the finished pictures tomorrow.