Friday, June 30, 2017

Battle of McDowell Preliminaries


A squadron of Tarleton's Legion cavalry (Fife & Drum Miniatures).

I will be playing the Battle of McDowell, or McDowell's Camp, over the weekend here at Schloss Seewald.

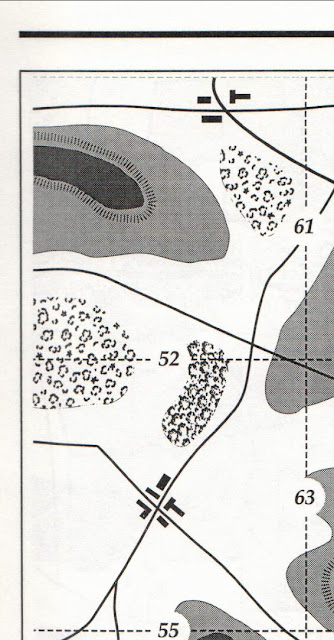
The battle terrain map is shown below, taken from the Sport of Kings battlefield generation system. I rolled two D10 percentage dice and rolled a "52", so that means that map "52" will be the random terrain that we will fight over. Initially, I had turned the map on its horizontal axis, but I then decided to rotate it so that the game would be played on the longer vertical axis of my game table.


Tarleton's little army will arrive on the lower, southern, table edge with his British army of 3SPs. His force will consist of 

24 British Legion Cavalry
24 Loyalist Infantry (Queen's Rangers)
24-30 converged British Light Infantry Battalion
12 Ferguson's Rifles

British Light infantry battalion on the far left, placed here just to show what they look like. This is a picture from the Winnsboro battle.

Colonel John Sevier's American army begins the battle with 4SPs, mostly militia along with one South Carolina State Regiment. We rolled on the Local Militia Reinforcements table to see if any of the locals would join the fight, and Sevier got lucky with the addition of two more militia units. So Sevier's force will consist of the following units:

1 x 30 South Carolina State troops (comparable to Continentals)
5 x 20 American Militia battalions

Clearly the troop quality is with Tarleton's army, but will he have enough to overpower the large collection of militia that have gathered at McDowell's Camp?

Tuesday, June 27, 2017

South Carolina Campaign Turn 4 - Battle at McDowell

1st Continental Dragoons guard the baggage train as it retires from Winnsboro after the American defeat .


The South Carolina campaign has resumed now that I'm back from my trip to the UK. Recall that we had a British victory at Winnsborough on Turn Three. We continue with the moves for both sides on Turn Four, which has resulted in one battle that will be fought at McDowell, in the Carolina backcountry between Sevier (4SPs) and Tarleton (3SPs).


A REQUEST FOR HELP

I was wondering if anyone with Adobe Illustrator and Photoshop or some similar program could take my basic map and make it look more professional so that I do not have to present handwritten maps on every turn. I could then draw in the SPs of the two sides each turn by hand or if you can help with a map update on each turn, add the SP information so that it is not hand drawn. Some form of compensation for your work could be worked out between us.


AMERICAN MOVES - TURN 4

DeKalb falls back one dot to Catawba Town with 8SPs following his loss at Winnsborough. We deducted 1 SP from his army for casualties and 1 SP for losing the battle. His 10SP army has been reduced to 8SPs. Dekalb retires 1 dot north to his supply base at Charlotte.

Gates moves one dot south to Cheraw, SC with 8SPs

Marion takes command of the Partisan Uprising that occured on Turn 3; he moves 3SPs south to Kingston, to possibly threaten the British garrison at Georgetown (2SPs).

Another Partizan Uprising occurs at Orangeburg. Thomas Sumter takes command with 3SPs. Sumter has to hold at Orangeburg for one turn since the uprising is his move. This potentially cuts off the route from Charleston to Augusta and positions Sumter for an attack on the British supply base at Augusta.

Sevier holds at McDowell with 4SPs. He will engage Tarleton in battle on this turn.

There is 1SP in the Hillsborough, NC American supply base that supports Gates' move south.

BRITISH MOVES - TURN 4

Cornwallis dispatches Tarleton with 3 SPs to pursue Sevier towards McDowell. He leaves 1SP at Winnsborough and retires back to his supply base at Camden with 6 SPs, resulting in a total of 7SPs at Camden.

Webster moves 3 SPs from Augusta north to Ninety Six, joining Cruger's garrison of 5SPs. Webster assumes command of the 8SPs at Ninety Six due to his seniority. He leaves 1SP at the Augusta supply base.

All other British forces remain in their positions from the previous turn: Rawdon at Charleston with 7SPs; Savannah with 6SPs; Georgetown with 2SPs; and Forts Granby, Motte and Watson with 3SPs collectively.

BATTLES ON TURN 4

As noted above, Tarleton (3SPs) will fight Sevier (4SPs) at McDowell. Sevier elected to accept battle rather than retreat  to Gilbert Town, NC.

Sunday, June 25, 2017

Command Stand Vignettes: British & Prussian

British (left) and Prussian (right) command stand vignettes. Click to enlarge.


The second annual wargamers' meeting at Kenilworth in Warwick, UK met last weekend at the Chesford Grange Hotel. Twenty-five of us assembled for the event, with myself traveling the furthest, from the American Colonies.

I wanted to give the event organizer, Stuart Insch, a little token of my appreciation for all of the work that he has done. Since Stuart resides in Scotland, I thought that a command stand vignette with Minden Government Highlanders would be the perfect choice.

A close-up view of the Highlander stand (click to enlarge the view)

A call out should also go to Captain Bill Walker, who created the various colours that you see in the pictures. The British Union colour looks like a regulation regimental flag, but when you look closer you can see that the words "AMB XVII" are in the center.

Here is the red AMG flag that Captain Bill made for us.

Captain Bill also made a second AMG flag with a red field and the roses and garland in the center. I really like the way that this flag looks.

But wait, there's more. Captain Bill also made a black flag for those of us who have been excommunicated by You Know Who. The inscription in Latin reads: "Exsulem Nobilis" or Gentlemen in Exile.

Exsulem Nobilis

The colour bearers in both vignettes have removeable flags so that you can interchange other flags. For example, after the event I plan to use a Prussian Garde flag instead of the black flag, whose need has already run its course, LOL.

Here is a picture of the Duke of Brunswick and Staff (PER-001 product code) in the Minden range - it was not taken to Kenilworth and below is the Eureka Miniatures vignette of Voltaire and Frederick, which was painted by and given to me by Robbie Rodiss. Thank you Robbie!!

"I tell you, it says right here on page 12, second paragraph, that Prussians get a +6 bonus on the firing tables."

"You know Voltaire, this is the best of all possible worlds."
( vignette from Eureka Miniatures. Painted by Robbie Rodiss who gave it to me as a gift at the Kenilworth event).

I have been having a lot of fun employing personality and command figures from the Minden and Fife & Drum figure ranges to create interesting command vignettes.

Saturday, June 24, 2017

A Visit to Griffin Moulds

On Friday June 16, 2017 I stopped in at the Griffin Moulds factory located in Birminghan, UK to meet with the staff and to get a look see at how things were going. Graham Cummings had picked me up at the Coventry rail station and from there we made the short 30-minute drive to the factory.

Whilst there, Jane (the owner) gave Graham and I a tour of the factory, which I had not seen since June 2015. Jane has brought a considerable amount of organization to the operation since taking over the management of the company, adding more employees so that there are at least two people with knowledge of every function of the business. So if one person leaves or is indesposed, there is another person as backup that can step in and take his place.

The premises are in tip top and Bristol shape, making it easy for the casting personnel to find the moulds and set up everything for each spin casting section. The shipping area is nice and clean and well organized. Since my last visit to the factory, Jane has added more mould makers and will be introducing 3-D printing towards the end of this year. In fact, they were working on some prototypes of new resin and plastic products using this new technology. I was very impressed with quality of the prototypes and this bodes very well for Griffin's future.

Shipping times have been dramatically reduced so it is easier for me to restock my inventory and keep backorders to a minimum. We had a particularly large new order come in about two weeks before my visit and they were already casting the order for me - with delivery yesterday!

I thought that readers of this blog would be interested in seeing some of the pictures that I took during my visit as it gives you a better idea of how your figures are made. See the captions to the pictures below:


Here is what a figure mould looks like. We get 16 infantry figures in each mould, top and bottom halves of the mould are shown above.

The metal is injected into the mould using a centrifugal spinner that ensures that the metal will flow to the furthest reaches of the mould and produce a clean casting. This eliminates those bothersome "spiders" and bits of sprue that are left on figures that use the older technology drop cast moulding technique. The picture above depicts a single spin of metal figures  as they are pulled out of the mould.

They were spinning some of the new Crann Tara castings during our visit.


A view of the storage room where all of Griffin's customer moulds are stored.

A side view of the Minden/F&D collection of moulds. We have approximately 400 moulds in aggregate covering both figure ranges.

Wednesday, June 21, 2017

Kenilworth War Game Weekend


The third annual wargaming event with purchasers of the Book That Shall Not Be Named (BTSNB?) was held in the Chesford Grange Hotel in Kenilworth, Warwick in the United Kingdom on June 16 and 17, 2017.

The gathering of 23 gamers featured four games that were run on both Saturday and Sunday:

* Colin Ashton's Leuthen 28mm game using Honours of War

* Graham Cummings Falkirk Jacobite Rebellion game, also using Honours of War

* Paul Robinson's Marlborough Era game featuring his own Grimsby Wargaming Club rules

* Martin Grane's Sudan game featuring the Sands of the Sudan rules.

I'm typing this blog entry on the road whilst I'm still in London so I don't know how much my iPad app will let me type before shutting down. This happens frequently so I never know.

I plan to do a more detailed and picture heavy report when I return home this weekend.

I arrived in the U.K. at London Heathrow on Thursday June 15, 2017 and spent a day ambling around London and enjoying the nice sunny and temperate weather. I tried to visit the Guards Museum, but it closed at 3:30 PM just as I was arriving, so no visit this time. The related shop was open so I went in and talked Toy Soldiers with the proprietor which turned the afternoon into a relative success.

Friday June 16th Saw me up bright and early so that I could take the one hour journey to Coventry, where I was met by Graham Cummings and his friend Leigh. I really like traveling by British Rail ( actually Virgin Rail in this case) and the smooth ride was over in a short hour on the rails. There is nothing like this kind of passenger train service in the USA and wish that we had the equivalent. I'd much rather travel by train rather than traveling by air cattle car and going through the painful airport experience.

We drove a short distance to Birmingham for our visit to Griffin Moulds and we were given a tour of the facilities by Jane, the owner. There were a lot of changes to the factory since my last visit to Griffin in 2015, all for the good. The company is adding some new technologies that promise some exciting opportunities for Minden, Fife & Drum and Crann Tara Miniatures. I can't reveal much more for now, but expect some announcements this Fall. More to come later.

Most of the gamers started arriving late Friday afternoon and the four games were set up and ready to go for the Saturday morning session. This event reminds me of the Seven Years War Association in the USA with its friendly and cheerful atmosphere. We eventually retreated to the bar where I had the opportunity to great old friends and make new acquaintances with the other gamers.

I will continue the story in a few days, or sooner if Blogger for iPad is still cooperating.


Monday, June 5, 2017

British Victory at Winnsboro


Battle of Winnsboro - British attack of American right wing. (click or double click all photos to enlarge)


The British army commanded by Lord Cornwallis defeated DeKalb's American army at the Battle of Winnsboro on March 30, 1780. A British oblique order attack on the American right wing, directed at the American militia in the town of Distow, was the key to the British success.

Cornwallis' preliminary inspection of the American deployment indicated that the American center, held by 4 South Carolina State regiments/Continental artillery, and the American left wing deployed around the town of Winnsboro, were both too strong for a frontal attack.

British scouts from Tarleton's British Legion cavalry, probed the American right wing and discovered that DeKalb had placed all 4 of his militia regiments as well as a squadron of South Carolina mounted militia, on his right wing. 

Andrew Pickens deploys the 1st and 2nd Spartanburg militia along a stone wall. Two other milita units are posted behind Distow in support.

Two battalions of British Light troops descend upon the militia line.

Accordingly, Cornwallis resolved to attack the militia on the American right wing of deployment. Two British Light Battalions spearheaded the attack, followed by three British regular regiments: the 4th, 5th and 55th regiments. The British movement to their left (American right) was screened by a hill in the center of the British deployment area. The Americans did not discover this troop movement and so they were surprised when the full weight of the British army attacked Distow. Cornwallis had "refused" his right flank by posted the von Mirbach regiment of Hessians on the hill, and the Queen's Rangers and British Legion cavalry on his right.


Opening phase of the battle showing the British attack on the American militia in Distow.


As the British attack developed, DeKalb reacted by shifting Brigadier General Isaac Huger's South Carolina State brigade to its right to back up the expected break of the militia at Distow. Simultaneously, Colonel John Eager Howard shifted two of his regiments, the 1st and 2nd Maryland, to their left as well. Howard retained the Delaware regiment and his cavalry, 1st & 3rd Continental Dragoons, in Winnsboro to guard the line of retreat back towards Charlotte, NC.

British attack on the American right. You can see two of Huger's regiments marching (above the horizontal road) towards Distow to shore up the American right.
1st Virginia (green and red flag) and 3rd South Carolina (grey hunting shirts and red flag) arrive to shore up  the American right.
Colonel Andrew Pickens' two Spartanburg Militia battalions faced the brunt of the British assault and they fiercely defended their ground through Turn 4, when the 1st Spartanburg routed away from the 1st Light Battalion. The 2nd Spartanburg got involved in a melee with the 2nd Light Battalion and miraculously held their position until Turn 6.


The two Spartanburg militia regiments rout and the 1st South Carolina falls back up the hill.  The 2nd Maryland Continental regiments marches to the right to fill in a gap in Huger's line.


Pickens' militia bought a little bit of time for Huger to shift his brigade to the right to counter the British assault.

The 2nd Spartanburg militia are shaken and fall back into the woods. A second battalion of milita (red flag) provide some support.

Once Distow was cleared of militia, the Light Battalions drove straight ahead to finish off the militia. At the same time, the three regiments of British regulars followed up behind the Lights and then wheeled to the right to confront the 1st and 2nd South Carolina State regiments near Distow. The Royal Artillery battery on the British hill pummeled the 1st South Carolina with round shot. This reduced the 1st SC's numbers ahead of a columnar assault by the 55th Regiment into the 1st SC. This drove the shalen (not routed) 1st SC back up the American hill, opening a large gap in Huger's line.

British Light battalions have cleared the wall of militia. Now the three British regular regiments (top of the picture above) move in to take on Huger's brigade of South Carolina State regiments.
The 2nd SC regiment was shaken so the British 55th Regiment closes in quickly, charging in column, to take advantage of the moment.

The British 55th Regiment breaks through Huger's line as the shaken 2nd SC falls back up the hill, leaving the 1st South Carolina regiment all by itself facing two British regiments plus bombardment from artillery at close and long range.

The 1st VA and 3rd SC regiments had just arrived at Distow, now Huger immediately orders them to return to the American center on the hill to close up the gap.


DeKalb realized that now was the time to commence the withdrawal of his army in order to save it for another day. Howard's Continenals deployed facing the British attack, which allowed Huger to extricate two (3rd SC and 1st Virginia) of his regiments from the battle line. The 2nd SC struggle back towards Howard but could not disengage. They were left behind as a forlorn hope that had to be sacrificed to allow the rest of Huger's brigade to retire behind Howard's brigade. Once Huger had broken free, Howard skillfully withdrew his Continentals, covered by the American light dragoons, back down the Charlotte Road and to safety.

DeKalb orders Huger to withdraw from the center towards the Charlotte Road. Howard's Continentals also fall back to cover the retreat of the rest of the army. The 2nd South Carolina provides a desparate rear guard.


Howard's Continenatals cover the withdrawal of Huger's brigade from the center.


Cornwallis wanted to pursue the Americans, but he needed time to reorganize his 5 regiments on his left befor they could be in any condition to pursue. Tarleton was eager to launch the British Legion at the retiring Americans and give them another taste of Tarleton's Quarter, however, this was thwarted by the presence of the veteran Delaware regiment of Continentals and William Washington's light dragoons.


DeKalb commenced his withdrawal towards the safety of the Santee River and Charlotte as shown in the map below.


Cook map of South Carolina circa 1773. Annotations show the key points in our campaign map. DeKalb will withdraw from Winnsboro north to the next red town below Gilbert Town.

A view of the campaign map post-battle of Winnsboro


Saturday, June 3, 2017

Battle of Winnsboro Terrain Set Up


The battlefield around the town of Winnsboro (top center of the picture). Americans are deployed on the left and the British are deployed on the right side. (Click or double click to enlarge the view).

Last evening and early into this morning, I cleared off the town of Altefritzenburg from my game table (alas and sigh) and set up the terrain for the first battle of our AWI South Carolina campaign - the Battle of Winnsboro in March 1780.


The Winnsboro battlefield looking west from the town of Winnsboro (bottom right of the picture) toward another small village, called Distow,  that will anchor the American right flank. Winnsboro will anchor the left flank of the American position which runs the length of the righthand side of the table

Things are starting to get very busy around the town of Winnsboro, South Carolina. DeKalb's American army (16 strength points) is descending upon the town from the northeast from Santee Crossing, while Cornwallis' British army (11 SPs) is approaching from the southeast from Camden.

The Americans have arrived in Winnsboro first, so they get to choose the ground where they will deploy. Ahead of the army arrives the baggage train, which is escorted by a squardon of the 1st Continental Dragoons (brown coats with green facings). The baggage will be shifted out of the way towards the road to Charlotte, NC. to keep it from falling into British hands.


Continental Dragoons escort the baggage train through Winnsboro ahead of the arrival of Cornwallis' British Army.

DeKalb's American army will anchor its right flank on Cedar Creek and the adjacent village of Distow. Its left flank will rest on the town of Winnsboro. The connecting center has a slight elevation that is a perfect siting for the Continenatal artillery, while the treeline provides cover for the South Carolina state troops to deploy.

A view of the American right flank, protected by Cedar Creek and the village of Distow. A lone wagon ambles down the road to Winnsboro, oblivious of the looming battle. You can find Distow on the James Cook 1773 map, near Dutchman's Creek and Cedar Creek, both west of Camden.
A closer view of the village of Distow. The South Carolina militia will be defending this town against the British advance from left to right.

Here is a view of the ground that will be defended by the American center. The road leads to Winnsboro, just to the left of the photograph.

The picture shows the ground that will be defended by the American center, consisting largely of South Carolina State Regiments and a battery of 6-pounders.
The town of Winnsboro, South Carolina located about a day's march west of Camden. The American army commanded by DeKalb will attempt to hold the town and fend off the British attack. This represents the American left flank.


I plan on starting my solo play of the battle of Winnsboro later on today and hope to complete it by Sunday evening. An after action report should be posted either Sunday evening or on Monday morning.

We will see you then. Do check back in because it should be a colorful and interesting battle.

Friday, June 2, 2017

DEFIANCE: Gentlemen in Exile (Exsulem Nobilis)


The Defiant Gentlemen In Exile (click to enlarge, if you dare)

One of the gentlemen on the  Fife & Drum Miniatures Forum decided that after the Great Purge,  all of the outcasts from the Forum That Shall Not Be Named (FTSNBN) deserved to have their own banner under which that could rally in Defiance. This is all done all in good FUN.

I found the new banner, courtesy of Captain Bill,  to be very creative (see below)

All ye outcasts, raise your banner high! (click to enlarge)
I then decided that such a banner was practically begging to be raised as part of a vignette, and so it goes, I created the vignette shown at the top of this page. The figures are from the Minden and Fife & Drum figure ranges: the gentleman holding the banner is one of the Prussian officers from the musketeer command pack; the general with the orange sash is the Duke of Brunswick figure from the personality pack of the same name, Frederic is Frederick don't you know, and the drummer is the Hessian standing drummer from the Fife & Drum AWI figure range.

The banner carrier normally holds an officer's spontoon, but I decided that it could just as easily hold a flag pole. Somehow I did manage to think of that (points to head and taps his tricorn with his fingers).

Here is another view, since the finial of the flag pole got cropped out of the picture. 


We almost didn't make it to the basing part of the modelling process.

The vignette has somewhat of a troubled history already. When I was painting the Duke of Brunswick, I was holding him over the open cap of some white paint and I deftly allowed His Grace to fall out of my hands and straight into the cap of white paint. GASP! Before I could even say "Bob's your uncle" I raced to the sink and washed off as much of the paint as I could. I'm sure His Grace was grateful for the clean  up, but he was clearly unhappy with Olde Fumble Fingers. I did a little bit of touch up work and so everything was all tickety-boo again.

But wait, there's more! I was gluing the banner onto the flag pole (you all know where this is headed) and had it all pressed together and I had made some nice furls in the flag. As I looked admirering my handy work, I suddenly realized that the banner was upside down. ANOTHER GASP!

Olde Glue Fingers tried to slide the two halves of the banner apart, but it was to no avail as the glue was holding fast. Then another idea hit me - I was able to slide the flag pole out of the flag and then reinsert it in the proper direction. That was a close one.

So after some near misses on disaster I finally got the vignette based and ready to hit the table top. The flag pole is removable from the hands of the flag bearer, which allows me to insert a proper Prussian Garde flag therein if I so wish.

However, I am proud of the Gentlemen In Exile so I think that DAF shall carry the black banner around to a particular convention in the wilds of Warwick in a couple of weeks.

We shall not be denied our fun in the wargaming hobby...

Defiance.


South Carolina Campaign - Battle of Winnsboro

Things were starting to heat up on Turn Three as events started with a Partizan Uprising by Andrew Pickens, with 3SPs at Cheraw, SC. There was some lucky die rolling there, as the maximum number of partizans in an uprising is 3SPs.

American Moves on Turn 3
DeKalb impetuosly continued to move south towards Winnsboro, which was well within the marching range of Cornwallis' army stationed at Camden. He received additional support from Sevier, who sent 3SPs from McDowell to Winnsboro thereby increasing DeKalb's army to 12SPs. 

British Moves on Turn 3
On the British side, the small force of 3SPs at Nelson's Ferry marched into Camden to become the garrison (now at 4SPs), as Cornwallis moved 11SPs north from Camden to Winnsboro, where he expected to find DeKalb. 

The only other British move of force was Webster's command moving his 4SPs from Orangeburg to reinforce the garrison of Ninety Six (5SPs). This increased the army at Ninety Six to 9SPs. Webster took over the command of Ninety Six from Cruger, since he outranked the latter.


The Battle of Winnsboro - March 1780
The campaign manager rolled a pair of D10 to select a battlefield from the Sport of Kings selection with number 35 being the result. The ground looked favorable for a battle without two many terrain obstacles in the way.

I was going to have a dice off between the two commanders to determine who would get first selection of deployment area on the battlefield. However, I decided that it made more sense to place the Americans on the upper boundary (North side) and the British on the bottom boundary (South Side). This reflects the direction of march for the two armies.

Double click on the map to enlarge the view:


DeKalb rolled a D6 to determin whether any of the local militia would choose to join his army for the battle. He rolled very well, adding 4SPs of militia. While they are not very good troops, there was lots of cover on the battlefield that would suit the militia very well and possibly make them a force to be reckoned with by the British.

American Army Composition

Continental Line   4 battalions
SC State Regts      4 battalions
Cavalry                 2 regiments
Militia                   6 battalions

Total American Force: 16SPs


British Army Composition

British Regulars     6 battalions
Hessians                 1 battalion
Loyalists                3 battalions
Cavalry                  1 regiment

Total British Force: 11 SPS

It is interesting that the American army has a significant cavalry contingent of 2 regiments and outnumber their British counterparts, with only 1 regiment of cavalry. Of course the quality of the British army was much higher than that of the American army. British and Hessian regulars are rated one level higher than the American Continentals in my Fife & Drum rules. 

State regiments and Loyalist regiments are rated one level below Continentals in the rules. Finally, the militia is the poorest quality troop type in the rules having generally ineffective musket firing and a low level of morale. Furthermore, since Militia do not carry bayonets, they have a healthy fear of all types of the British army, which all carry bayonets.


To Be Continued: the Battle of Winnsboro will have its own posting on this blog.