Thursday, January 22, 2015

Museum in Berlin


Frederick the Great
The Uniforms of the Prussian Army under Frederick the Great from 1740 to 1786

About the book

824 pages (linen bound with a protective cover, it comprises two volumes in a slipcase), ca. 1500 colour photographs and illustrations, Format: 29.5 cm x 26 cm

The authors

Daniel Hohrath, with additional contributions from Judith Zimmer and Elisabeth Boxberger

Price

€ 129,90

ISBN

978-3-902526-51-9 (English)
978-3-902526-50-2 (German)

Monday, January 19, 2015

Battle of Trenton - Part 2

The situation at the start of Turn 5
We left off at the conclusion of Turn 4 and found that Colonel Rall had managed to shake out most of his soldiers into some semblance of a battle line on the east side of the town, along the Pennington Road. Two companies of fusiliers were deployed in the town making sure that none of the Americans could enter the town through the back door (from the west side of Trenton). 


The Americans have so far deployed all of Greene's division on the east side of town. This lot includes (from left to right in the picture below) Fermoy's brigade deployed at the intersection of Queen Street and the Pennington Road; then one section of Hamilton's NY Artillery also positioned in front of Queen Street; followed by Stephens' brigade facing off against the Rall grenadiers; then the other section of Hamilton's NY Battery on the small rise looking down King Street; and finally Sterling's brigade has moved down King Street to engage the 3 companies of the von Lossberg fusilier regiment.


American positions at the Queen Street intersection.
The Hessians won the initiative on Turn 5. I use an IGO UGO system in my rules, so usually the side that moves first can fire second, but for this game, I allowed the Hessians the first fire on any turn in which they won the initiative (done via a die roll).

The Hessians are formed in a loose battle line on the east side of Trenton, facing Greene's division and Washington. Glover and Sargent's brigades are still working their way across Assunpink Creek on the west side of town, positioning themselves to cut off any Hessian retreat to Bordentown. Mercer and St. Clair's brigades advance into the middle of the town, encountering light resistance from 2 companies of von Lossberg's fusiliers.

A general firing takes place on Turn 5 and both sides easily pass morale checks, due to casualties taken this turn.


General Washington and his escort of the Philadelphia Light Horse.

The Hessians won the initiative once again on Turn 6, and they used it to great advantage. Turn 6 would prove to be the high water mark of Hessian fortunes in this game. The von Lossberg fusiliers in King Street let loose a volley on Sterling's brigade, and Sterling's men routed. There was nothing in front of von Lossberg but a single cannon at the head of King Street. Colonel Rall, ever contemptuous of the Continentals, ordered a general advance to the east. The Rall Grenadiers were given Stephens' brigade a hard time, as the American casualties mounted, but the brigade held, perhaps because they were under the watchful eye of General Washington himself, who was positioned on the high ground behind them.

On the far left of the American line, Fermoy's brigade took a face full of lead and returned the favor to the von Knyphausen fusiliers, who routed down Queen Street. 


The von Lossberg regiment has cleared Sterling's brigade from King Street  during Turn 6.
So we start Turn 7 with fortunes looking fairly good for the Hessians on the east side of Trenton. The Rall Grenadiers are now in a shoot out with Stephens' brigade, while von Lossberg moves towards Hamilton's battery, their movement also potentially giving them a flank shot at Stephens. I was figuring that now would be a good time for the Hessians to fall back to the south side of town and high tail it to Bordentown. So I threw a D6 to determine what Colonel Rall would do: "even" and they retreat, or "odd" and they continue to attack. The die was cast and an odd number turned up. Rall continued to advance.


Colonel Rall orders the Rall grenadiers and the von Lossberg fusiliers to counter-attack Stephens' brigade and Hamilton's artillery now that the protection of Sterling's brigade is gone.

The American center was looking very thin at the moment, and if Stephens' brigade broke, then there was nothing in the center to stop the Hessians but one artillery piece and Washington's troop of Philadelphia Light Horse. However, once again, Stephens' men stood fast and refused to retreat or run away.

To the left of Stephens, Fermoy spotted an opportunity to wheel to the right and flank the Rall Grenadiers. His brigade had routed the von Knyphausen on Turn 6 so Rall's flank was wide open.

Fermoy takes advantage of an opportunity to wheel right and enfilade the Rall Grenadier regiment.

It was now Turn 8 and fortunes had changed considerably against the Hessians. The Rall Grenadiers were in a box with enemy to their front and flank. Mercer's brigade could be spotted working their way up the alleys in Rall's rear. The von Lossberg regiment over on King Street was likewise surrounded. Colonel Rall knew that to continue the fight would simply result in murder. And for what good? Colonel Rall decided to surrender.

Neither side knew it, but von Donop's brigade of two regiments would be arriving on the next turn, but they would probably been too late to change the outcome.

On the west side of Trenton, Sargent's brigade prepares to recross the Assunpink Creek bridge to attack Rall's troops from the rear. Only one compan of fusiliers is there to contest the bridge crossing.

Rall Grenadiers fall back behind the Pennington Road so as to avoid being enfiladed by Fermoy's brigade. Stephens' brigade has suffer the loss of two stands, but they are holding steady and keeping Rall attention.

End game: the von Lossberg fusiliers are surronded, with St. Clair's brigade attacking up King Steet while Hamilton's guns take a bead on the front of the battalion.

Sargent's brigade easily pushes the company of von Knyphausen fusiliers off the bridge and they advance up Queen Street in column.

Only the von Knyphausen fusilier regiment has any chance of escaping capture, although Glover's brigade can be seen moving up the Bordentown Road to intercept them on Turn 8.

Mercer's brigade move's into Trenton and threaten the Rall Grenadiers from the rear.

The rear guard of von Knyphausen's regiment provides cover while the rest of the regiment marches to safety.
Conclusion

I was very happy with the way that the scenario turned out. There was an opportunity for the Hessians to win on Turn 6 and Turn 7, but their good fortune swiftly disolved. Perhaps if von Donop could have arrived on Turn 7 then the Hessians could  have won the battle.

It was a near run thing for Washington, especially when he and his troop of horse were the only thing standing in the American center. Things worked fairly well using one of my battalions as an American brigade and a Hessian battalion as a regiment.

All in all, I think that Trenton can be a good war game scenario and I am interested in trying it again soon.


Battle of Trenton Game Report - Part 1


Brigades of Sterling, Stephens and Fermoy advance along the Pennington Rd to Trenton
I refought the Battle of Trenton this weekend as a solo game and reached a definitive conclusion by Turn 8. The after action report will be posted here in installments. So here is Part 1, which takes us from Washington's opening attack early in the morning of December 26, 1776. Washington had divided his army into two wings once he had crossed the Delaware. Sullivan's division advanced along the western side of the table, parallel to the Delaware River, on the River Road. Greene's division, to which Washington accompanied, advanced along the eastern side of the table on the Pennington Road.

The picture at the top of this page depicts the opening advance of Greene's division along the Pennington Road


Sterling's brigade pushes the jager outpost aside and continues its advance on the Pennington Road. In the middle to the top of the picture you can see Mercer's Brigade in the field, St. Clair's brigade marching on the River Road, and Sargent''s and Glover's brigades at the very top of the picture will attempt to cross Assunpink Creek and cut off any Hessian retreat to the south on the Bordentown Road.

Sullivan's division attacks Trenton along the western edge of the town, easily brushing past a piquet of jagers. The American army gets the initiative on Turn 1 and again on Turn 2. Rall's grenadiers automatically activate on Turn 2 since they can hear the sound of musket fire within 24 inches of the town. The von Lossberg and von Knyphausen fusilier regiments can only activate on a roll of "3" or less on a D6 die. Both fail to activate on Turn 2.

St Clair brushes aside a Hessian piquet of Jagers, who do manage to get off some warning shots, but inflict no casualties.

Ground level view of the Jagers and St Clair.

Sargent (left) and Glover's (right) brigades of Sullivan's division.

The von Lossberg fusilier regiment tries to form up at the base of King Street. Colonel Rall's headquarters were in the stone house on the left.

Once firing is heard, the Hessians have one chance to wake up Colonel Rall and have him order the dragoons to ride south on the Bordentown Road to secure help from Colonel von Donop's command. A roll of "3" or less is required to send the orders. The Hessians roll a "1", so off go the dragoons, as seen below. We roll another D6 to determine how many turns it will take for von Donop's reinforcements to arrive. I use the number of pips on a thrown D6 and add "3". The Hessian player rolled a "6" so it would take until Turn 9 for von Donop to arrive. Neither side knows if or when von Donop will arrive. Only the game judge is privy to this intelligence.

A pair of British 16th Light Dragoons gallop off to Bordentown to get help from Colonel von Donop.

The Rall grenadier regiment was already on duty that morning, so they easily form up and are ready for action on Turnn 2.

The Hessians win the initiative on Turn 3, so Colonel Rall orders his grenadiers to attack the American infantry and artillery at the head of King Steet and Queen Street.

Mercer and St. Clair are advancing into the town on the River Road, where they get into a firefight with the two companies of von Lossberg who are blocking the road.

On the eastern side of town, Hamilton is deploying his 6-pounders - one on each of King and Queen streets so that they can rake both streets with cannister. They are supported by Stephens' brigade. Fermoy's brigade continues its march east on the Pennington Road, heading for Princeton, so as to cut off any Hessian retreat in that sector. Sterling's brigade advances down King Street to take on the 3 companies of von Lossberg and its regimental 3-pounder.

To the west of town, Sullivan sends Sargent's and Glover's brigades across Assunpink Creek in order to cut off any Hessian retreat to the south along the Bordentown Road.

Sargent and Glover cross Assunpink Creek to cut off any Hessian retreat.

Von Lossberg is activated on King Street. Three companies and the regimental 3-pdr face down the advance of Sterling's brigade up King Street. Two more companies hive off to block the entry of Mercer's brigade into the town.

The Rall Grenadier regiment (center) advances towards the American position along the Pennington Road.

Alexander Hamilton's New York battery deploys on a slight rise facing down King Street . A second section of the battery is limbered  and moving off to the left to deploy in front of Queen Street. Stephens and Fermoy's brigade provide infantry support for the battery. General Washington and his guard (Philadelphia Light Horse) supervise the deployment of troops in this sector of the battlefield.
 The Hessians win the initiative on Turn 4 and continue to attack towards the east (Greene's division). The von Knyphausen fusilier regiment marches down Queen Street, forcing Fermoy to halt his flanking march and deploy facing Queen Street. Fermoy is supported by a section of Hamilton's battery. Stephens deploys into line along the Pennington Road and finds itself in a fire fight with the Rall grenadier regiment (see below):


Overhead view of Fermoy's brigade (left), a secton of Hamilton's battery (center) and Stephens' brigade (right) deploy for the fight. You can see the von Knyphausen fusilier regiment marching down Queen Street to support the Rall Grenadier regiment, deployed in line behind the fence.

So by the end of Turn 4, Colonel Rall has managed to set up a battle line  facing east, where it engages Greene's division (Fermoy, Stephens, Sterling brigades and Hamilton's artillery battery). His line has the von Knyphausen fusiliers on the right in Queen Street, the Rall grenadiers in the center, and 3 companies of the von Lossberg fusilier regiment on his left in King Street. His rear area is protected only by two companies of von Lossberg, who face off against two of Sullivan's division (St Clair and Mercer's brigades). Sullivan's other two brigades (Sargent and Glover) are crossing over Assunpink Creek to its west bank. Their objective is to control the two bridges that cross the creek to the west and south of Trenton.

Part 2 will be posted tomorrow and take us through Turns 5 through 8 and the game's conclusion.


Sunday, January 18, 2015

Battle of Trenton Game In Progress


I finished seven turns yesterday and through Turn 6, the Hessians were standing tall and holding their own as they attacked up King Street towards Hamilton's battery and the brigades of Sterling, Stephens and Fermoy. Sterling broke and ran leaving the American artillery unprotected as the three companies of von Lossberg advanced towards them.

However, Colonel Rall may have missed his best chance of escaping from the trap at the start of Turn 7. I roll a D6 to determine whether he would continue to attack (even) or retreat from the town (odd). In his arrogance and contempt for the Continentals, he decided to attack and the trap appears to be closing in on him.

We shall find out later today what the outcome will be. By the way, von Donop's is marching to Trenton with two battalions and, unbeknownst to anyone, will arrive on Turn 9.

Friday, January 16, 2015

Heading Into A 3-day Weekend or Oh Be Joyful!

My latest acquisitions from E-Bay.

Americans have a national holiday this weekend (MLK Day) so most of us have a three day weekend.

Hmm, what can I do to take advantage of the extra time?  Normally, I would hunker down in the Man Cave for three days and not be seen again until Monday evening. However, just 5-weeks from my wrist surgery it is still a little too tender to do much figure painting. I can go in 15-20 minute spurts, but that is all. So while I would love to finish off those dozen Volontaires de Saxe that are sitting on the painting table, it would be a minor miracle if they were completed.

If it's a miracle, it's a Kalinsky 10 point O miracle, Colour Sargent Bourne.

Aye, and backed up with a bit of pain threshold.

So I still have not answered the question of how to spend this time. As I cast my eyes around the Man Cave, what do they settle on but this?


Trenton! It seems like this would be the perfect time to play the first solo test of the scenario. With a little bit of negotiating with Mrs Fritz ( I have a surplus of favor chits in the ledger), I envision the conversation going a little bit like this:

Me: "well my Dear, it's off to the Man Cave with me! I've got the Battle of Trenton to fight and General Washington is depending on me."

Her: ( rolling her eyes) " Chin chin and all that, do go on playing with your Little Men."

Me: " what ho?" thinks I . This is turning out better than I had imagined. "why thankee, Dearest."

Her: "Just as long as you remember that you have to take Lady Emma Cuddlestone-Smythe and four of her friends to the cinema on Sunday to see "Paddington Bear."

Me: (thinking to myself) well that wasn't all bad.


Thursday, January 15, 2015

Napoleon Statue Collection


Today's mail brought a little present that I bought myself on E-Bay: a nice statue of Napoleon Bonaparte (see picture above) standing in his famous pose with hand buried in his waistcoat. The white bust shown in the picture was a Christmas gift from Mrs. Fritz in 2013. 

Over the past few years I have started collecting statues of Napoleon. They come in all shapes and sizes and I have ten of them so far. Whenever I see a statue or bust, I buy it, provided that it is not some expensive antique running thousands of dollars. We try to keep things real here in Hesse Seewald. My one parameter is that the collection will not include war game figures and must be at least 54mm toy soldier size or larger.

Part of my Napoleon collection can be seen on the bookshelves in my library, in the picture below.


The Napoleon collection started with a Royal Daulton Toby Jug, or Character Jug, of the Duke of Wellington (gasp!). The handle on the Wellington jug had a miniature Napoleon. I then found an actual Napoleon jug in an antique store and that really got the collection going. Next, I found a pair of 12-inch tall porcelains from Germany and added a couple of small busts here and there. 


I have also added some framed pictures of Napoleon in my library. A trip to Paris ten years ago produced  a deck of playing cards in which all of the face cards have pictures of either Napoleon as King and Josephine as Queen, and various French marshals as the Jacks. So I removed all of the face cards from the deck and took them to a picture frame shop and had the cards framed. It turned out rather nice (see below).


I also found a set of six cheese plates, one of which included Napoleon, so I bought the whole set just to get the one plate, shown below. Another antique store find was a pair of wax silhouette rounds of the Emperor and Empress and these were posted on the wall to fill a narrow space next to a window. I later cut out a picture of a younger Napoleon and had the frame store put him in a round frame that augments the silhouettes. See below.


I'm always on the lookout for more Napoleonic items. If you have any that you want to part with, contact me and we can work out a transaction. My Holy Grail item is the limited edition Royal Daulton Napoleon Toby Jug that was produced in the early 1990s. I've been looking for one of these for a very long time.


Wednesday, January 14, 2015

Washington and Rochambeau at Yorktown


I found this painting on Pinterest the other day and I'm posting it here simply because I think it is a good looking painting.

I don't know who the artist was or when it was painted, but I like his realism and style.

I just recently discovered Pinterest and have been having a lot of fun searching for pictures of historical paintings and military uniforms. It is somehow related to Facebook, so I guess if you are a "friend" of Der Alte Fritz, you can also follow me whenever I add a new picture pinned to my album.

I have found this to be a useful tool for collecting military uniform information that I can use as a painting guide for figures.

Tuesday, January 13, 2015

Save A Battlefield in 2015


I want to bring it to the attention of my readers that the Civil War Trust has recently established a related organization that will focus on saving and preserving battlefield sites of the American Revolutionary War in the United States. The CWT has saved thousands of acres of historical land from developers by acquiring it, using donations and Federal and State matching funds. The land is held in trust and eventually turned over to the National Park Service or similar organizations. The CWT has been at the forefront in leading the fight to save valuable acres at such sites as Fredericksburg, The Wilderness, Brandy Station and Franklin, among others.

Now the aim is to use the same model to save sites from the American Revolution.  I have cut and pasted their message below. 


*************************

Happy New Years from Campaign 1776, a project of the Civil War Trust!

Does your New Year's resolution include helping to preserve American history? Ours does! Battlefields are monuments to American valor, sacrifice, and determination. Campaign 1776 is the first-ever national initiative designed to preserve these tangible and irreplaceable links to this country's founding. Join the cause, preserve American history, and become a charter member of Campaign 1776 in 2015! http://www.campaign1776.org/battlefields/princeton/princeton-2014/


Saturday, January 10, 2015

Trenton as a Wargame

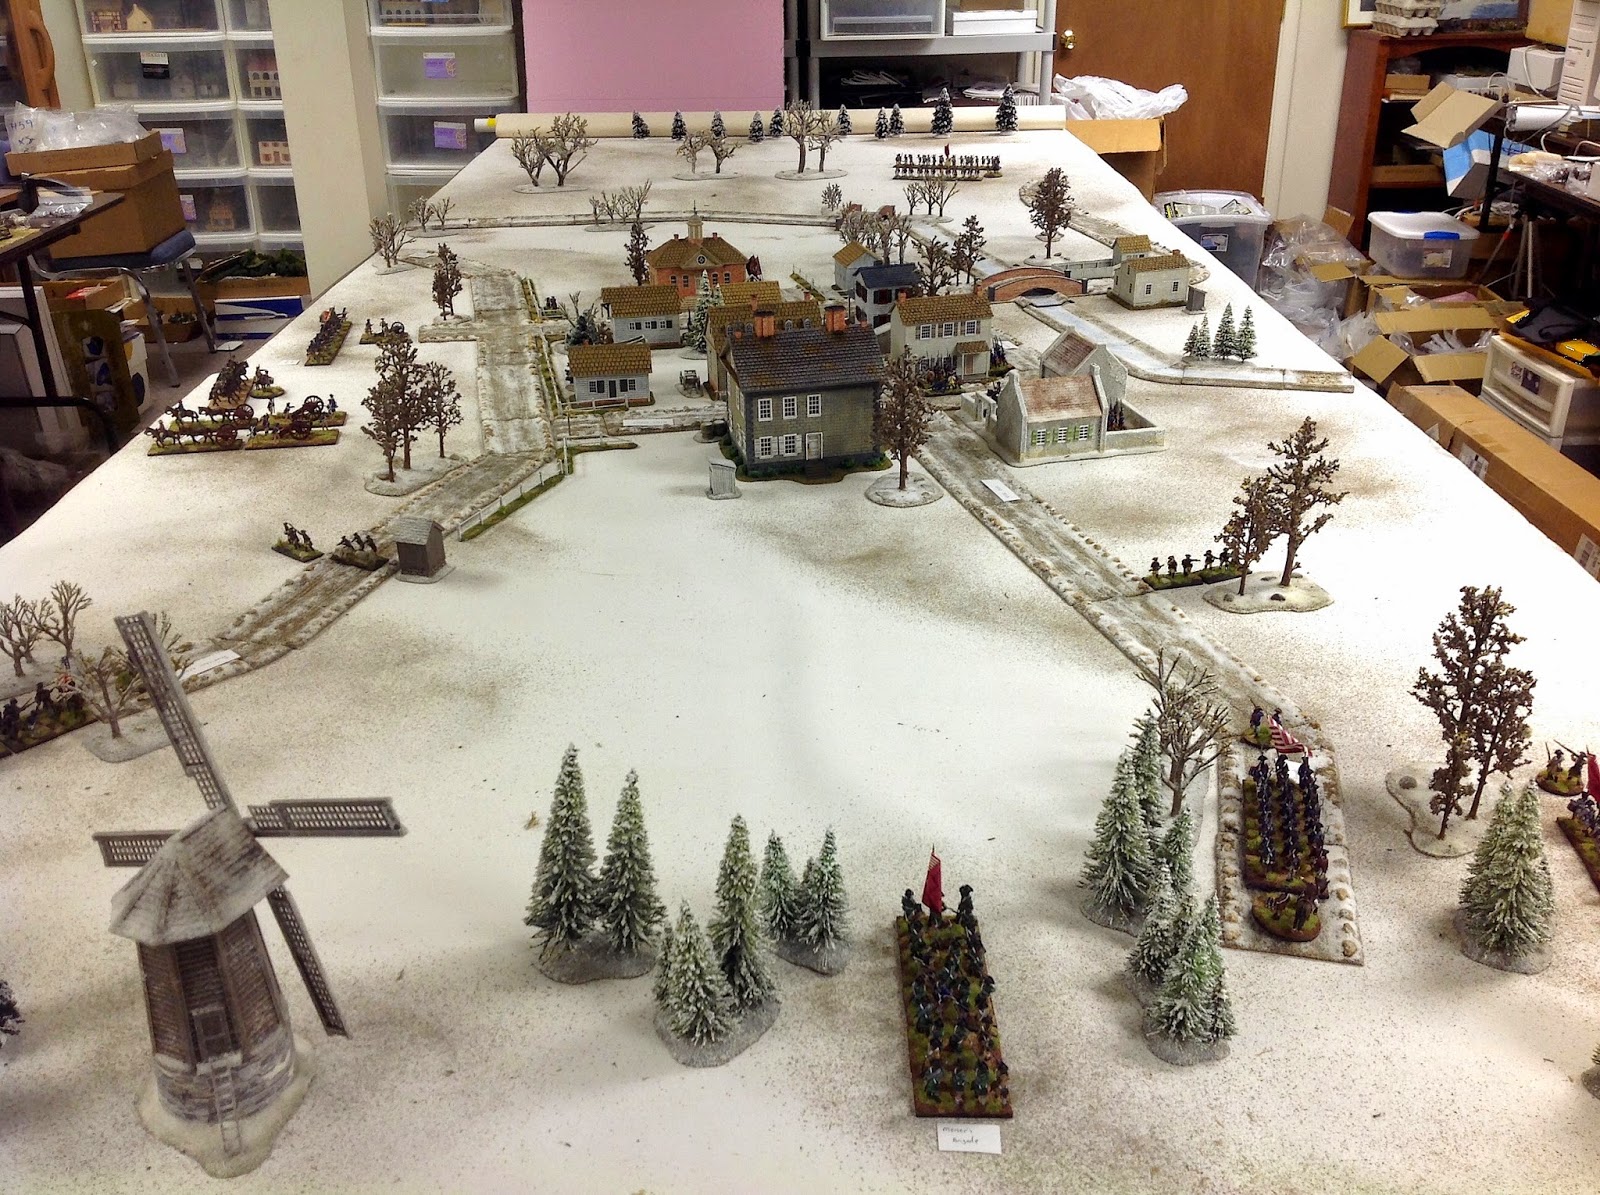
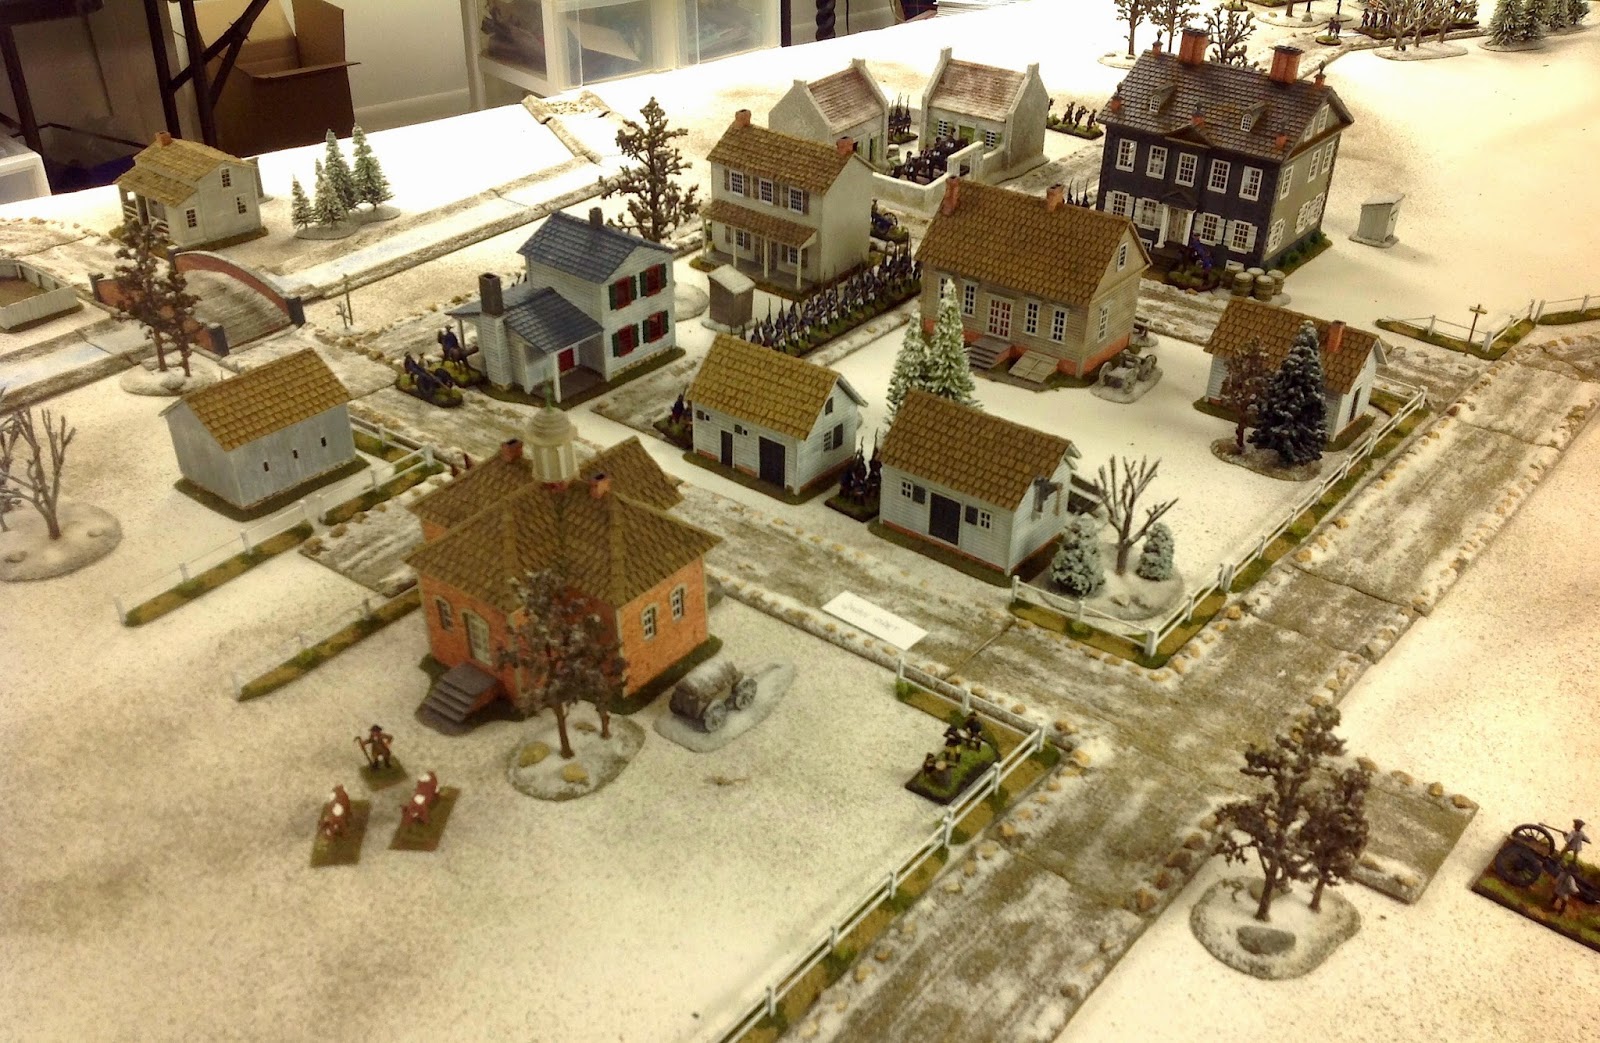
Opening positions of the American forces. (click to enlarge view)
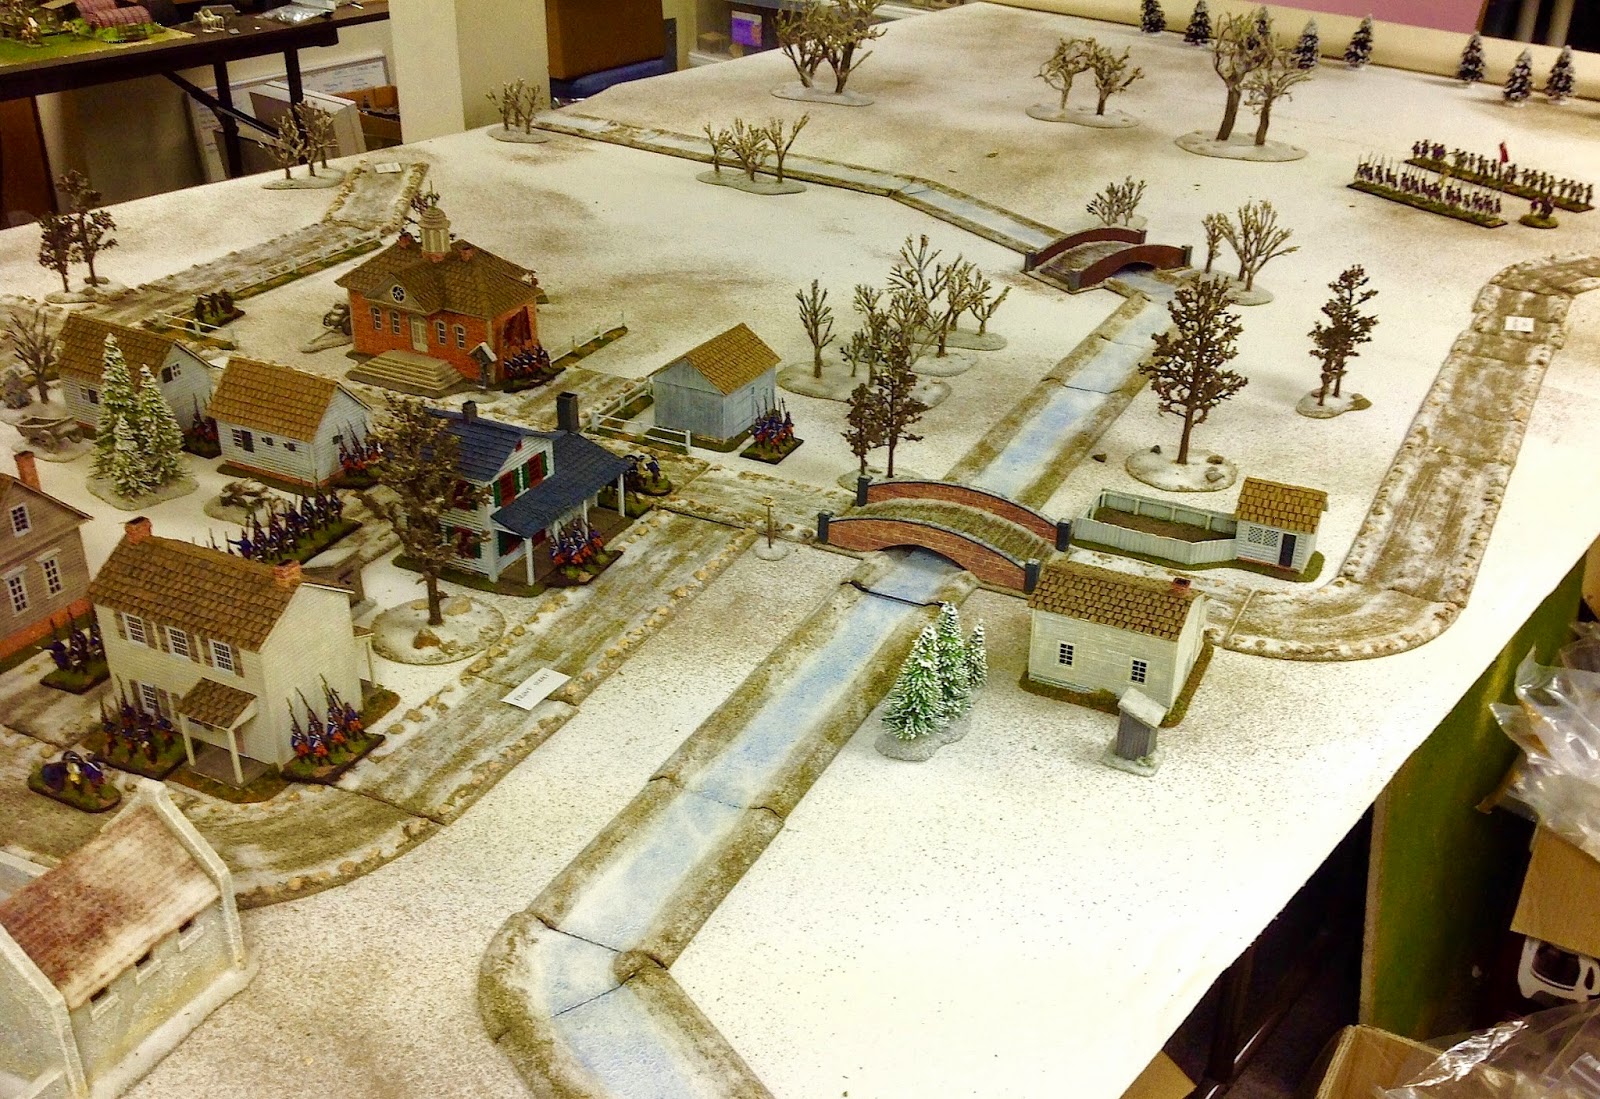
I thought that I would write down some of the elements of my Trenton wargame scenario as a template for anyone else who wants to give the scenario a try. Looking at the picture above, the road on the left is the Pennington Road; the road on the right is the River Road. In the upper right corner, you can see Assunpink Creek and the road that crosses the bridge seen on the right leads to Bordentown.

Directionals: the top of the table is South, the bottom of the table is North, the left side of the table is East, and the right side of the table is West. For all intents and purposes, the right side table edge is the Delaware River, which may not be crossed. Thus any unit that routs off the right edge of the table automatically surrenders since it has nowhere to go.

The American infantry forces each represent one of the seven brigades in Washington's army. Hamilton's New York Battery is represented by three cannon models. That gives the American players 8 elements that could be divided among two players, each having 4 elements. The Hessian units will represent actual battalions. There were only three Hessian regiments in the Trenton garrison, but I am using four battalions in order to keep the proportions correct and to give the Hessian player enough elements to move about the table. The Hessian forces could be divided into two commands.

I am using a figure to man ratio of 1 to 10, thus one casting equals ten actual men. The Hessian force is generally thought to be around 1,300 soldiers or 130 wargame figures. The American forces were thought to be approximately 2,400 soldiers or 240 wargame figures.

American Mission
You want to capture the town of Trenton and bag at least two battalions of Hessians as prisoners.

American Forces

7 units of infantry
3 artillery models

American Deployment

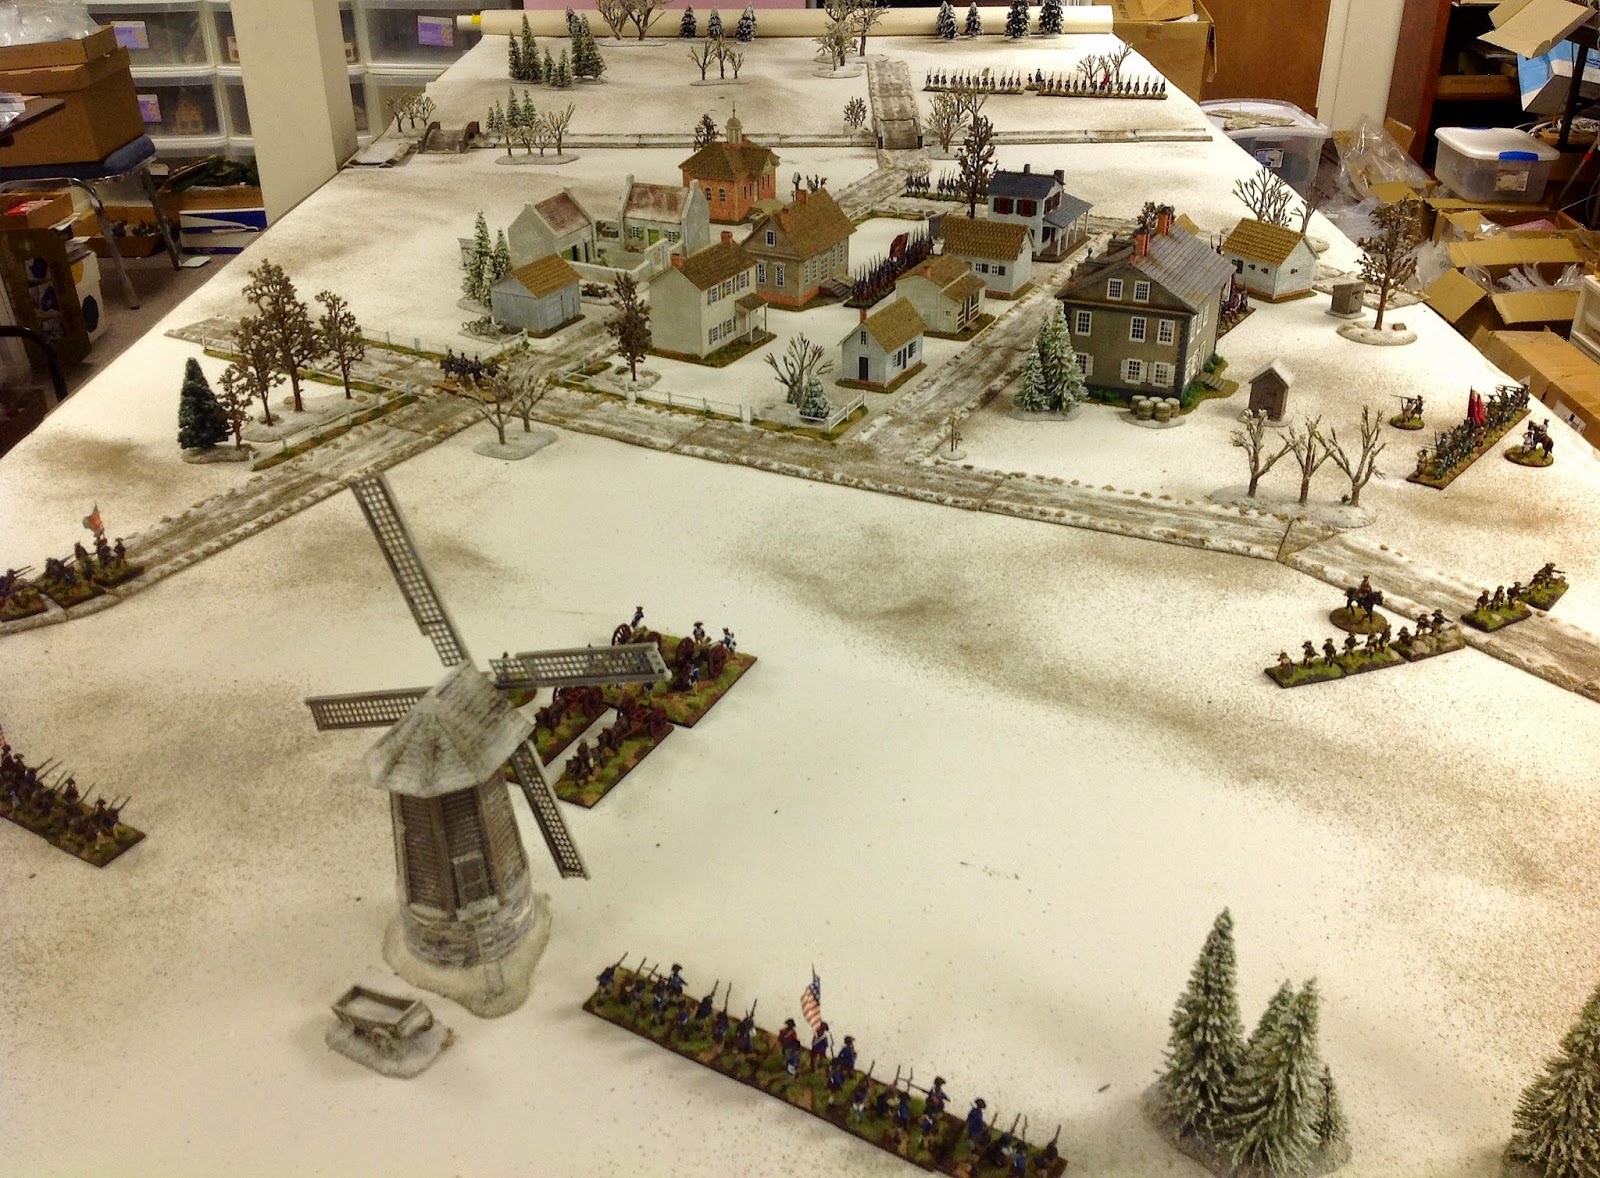
Hamilton's New York Battery begins the game deployed looking straight down King Street. To his left is deployed Stephens' brigade of infantry.

Fermoy and Sterling's brigades are deployed on the Pennington Road.

Mercer's and St Clair's brigades are deployed between the Pennington Road and the River Road.

Glover's and Sargent's brigades are deployed on the River Road.


Hessian Mission
It is a given that you are outnumbered and probably can not hold the town, so your mission is to escape from Trenton with at least two battalions of infantry.

Hessian Forces

1 unit of grenadiers (Rall Grenadiers)
3 units of fusiliers or musketeers ( 2 x Lossburg; 1 x Knyphausen)
1/2 unit of Jagers (12 figures at most)
2 mounted dragoon figures
2 light 3-pound artillery pieces

Optional forces: 1 unit of the von Donop regiment stationed in Bordentown.

Hessian Deployment

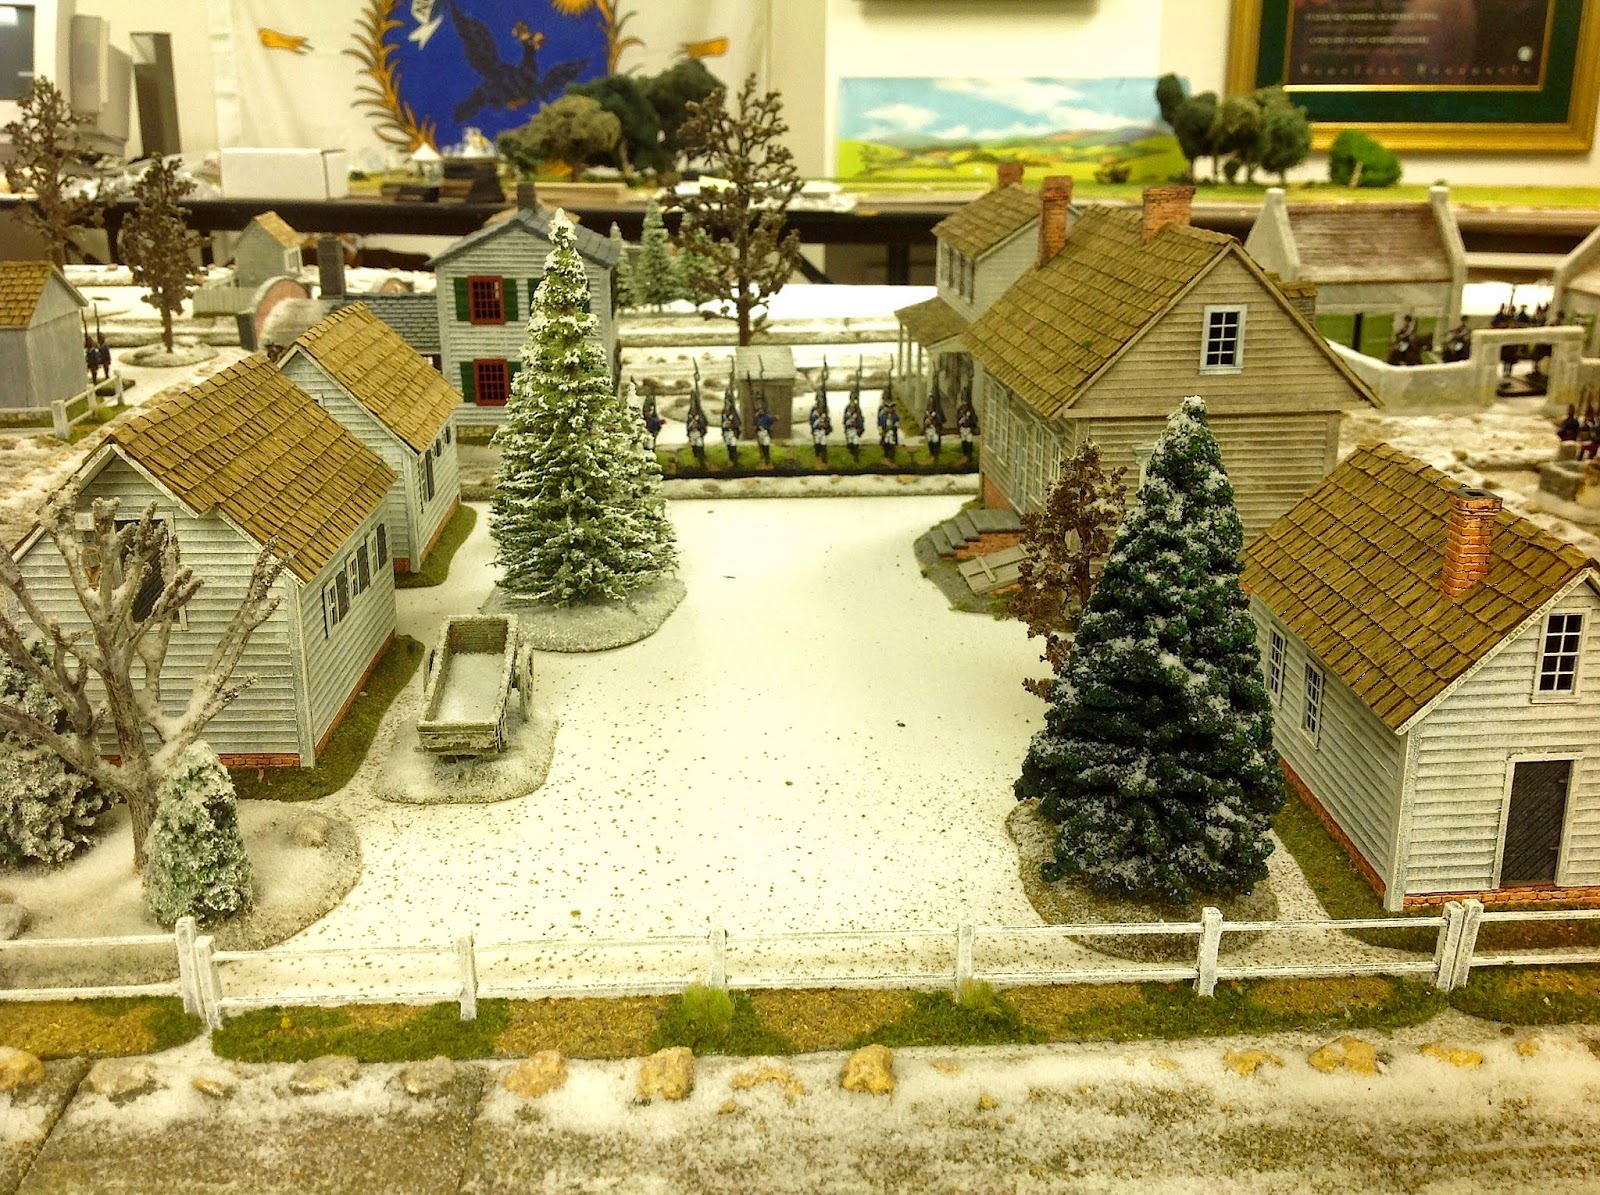
The Rall Grenadier regiment was the designated "unit of the day" and so they were already deployed when the American attack began.

The von Lossberg and Knyphausen regiments are in quarters at the time the opening attack begins, so these units should be scattered around the town in various houses. They will have to attempt to form up somewhere in the town once they become activated.

The jagers should be divided into two small piquet details, one deployed on the Pennington Road and the other on the River Road, both roads to the north of the town.

Optional Hessian Forces
The von Donop regiment never was notified of the attack and so they did not participate in the battle. However, we can model the possibility that a messenger could have been sent to them requesting assistance.

For this possibility to occur, I suggest the following mechanism:

1. on Turn 1, the Hessian player(s) will roll one D6 and have a 50-50 chance of successfully waking up the commander, Colonel Rall, who will send a messenger off to Bordentown (use the 2 British Dragoon figures in the OB for this purpose). So a roll of 1 to 3 = success and a roll of 4 to 6 is a failure. The Hessians only get one opportunity to wake up Rall and send for reinforcements.

2) you will need to determine how many turns it will take for von Donop to arrive, so roll two D6 dice , noting that von Donop may not arrive prior to Turn 4, regardless of the outcome of the dice. Von Donop will arrive on the Bordentown Road, which is on the south side of Assunpink Creek.

Turn One Mechanics

The American army will get the first move and first fire of the game, to represent the surprise nature of the attack.

The Hessian Rall Grenadier regiment starts the game deployed in the center of the town of Trenton. All other Hessian infantry units are scattered throughout the town at at the start of the game.

Turn Two Mechanics
The von Lossberg and von Knyphausen regiments are not activated until at least Turn 2. To activate the units, a simple ODD-EVEN on a D6 die determines what happens. Both units automatically activate on Turn 3 if they have not previously activated. They will be considered "disordered" until the majority of the unit's stands are touching base to base.

The Hessian 3-pounders are deployed on King Street and Queen Street, both facing East. The cannon on King Street may activate on Turn 1 and the cannon on Queen Street can not activate until Turn 2.


So set up the terrain and forces and give the scenario a try. I would be interested in hearing how your game turns out. Will any of the Hessian units escape capture in Trenton?

Tuesday, January 6, 2015

Trenton Terrain Revisions

Overhead view of Trenton - rotated 90 degrees to the left
 I spent a fair amount of time today studying the Stryker book on the Battles of Trenton and Princeton (published in 1898) and this has given me a better understanding of how the battle of Trenton unfolded. As a result, I decided to rotate my terrain about 90 degrees to the left. (see picture above for new layout).
The original Trenton terrain setup is shown above so that you can see the difference between the two tables. Note the position of the large stone house - Rall's HQ - in both pictures.

It became apparent to me that my previous terrain set up did not provide enough room for Sullivan's division, which advanced along the River Road to the west of Trenton. Glover's and Sargent's brigades would eventually work their way around the town and take up a blocking position on the south side of the Assunpink Creek.

I think that these changes will make for a better game scenario and give all the players more space to maneuver.

click or double click on all pictures to enlarge the view:


Assunpink Creek with the road to Bordentown snaking off to the right.
The table edge to the right of this picture, above, represents the Delaware River. In the back ground you can see Glover's and Sargent's brigades taking up a blocking position on the south bank of Assunpink Creek. The Bordentown Road leads to the Hessian garrison in that town comprised of the von Donop regiment, some two miles away. I want to give von Donop a slight opportunity to come to the rescue of Colonel Rall and his Trenton garrison.


Hamilton's New York Artillery battery deploys in front of King Street.
As Mercer and Sterling move on Trenton from the north, Alexander Hamilton has set up his New York artillery company in command of King Street. The large stone house is Colonel Rall's headquarters.


The view looking down Queen Street.

A view of the back yards between King and Queen streets.

Overhead view of Trenton depicting the Princeton Road.

A view down the Pennington Road towards Trenton. This is the road taken by General Washington with his half of the army as it approached Trenton early in the morning. You can see a piquet of Hessian jagers manning their post.

Glover's brigade of Sullivan's division marching down the River Road, parallel to Washington's advance along the Pennington Road. Fife & Drum Miniatures.

In a future posting, I shall start to reveal some of the game scenario rules that I am working on. These will include elements to activate Hessian infantry units, send couriers to Bordentown to summon reinforcements from von Donop's command.


Sunday, January 4, 2015

The Battle of Trenton Terrain and Scenario

Trenton Overhead View


Last evening I cleared everything off of the war game table and set up my Winter terrain to depict the Battle of Trenton on December 26, 1776. This will be the first of a trio of games covering Washington's make or break winter campaign from December 25, 1776 through January 4, 1777 in New Jersey. I will also refight the 2nd Battle of Trenton (or Assunpink Creek) on January 3, 1777 and Princeton on January 3, 1777.

The game mat is a bespoke production from The Terrain Guy (sadly, no longer in business) with white flock adhered to canvas, along with a sprinkling of dark brown here and there that helps to break up the winter white look. All of the roads, winter trees and buildings were made by Herb Gundt (primarily for my Leuthen game) and the figures that we will use in the battle are all from Fife & Drum Miniatures, of course.

The Hessian soldiers are actually SYW Prussians from the Minden Miniatures figure range. In 2015, Fife & Drum will finally add actual Hessians to its range and I am looking forward to see what Richard Ansell, the sculptor, comes up with. Lt. Colonel Rall had approximately 1,350 men in his command at Trention, so that would work out to 135 figures using a 1:10 figure to man ratio. I plan to break this down into four battalions of 30 figures and an extra 15 jagers and/or artillery crewmen.

The American force is a little more difficult to pin down. The Boatner book indicates that Washington had approximately 2,400 men at Trenton whereas the Osprey Campaign book on the battle suggests that there were as many as 3,500 involved in the battle. Since there were seven Continental brigades in the army, I think that what I will do is have each brigade represented by one of my battalions of Continental figures.

So the Hessians will have 4 and 1/2 battalions of infantry and the Continentals will have 7 battalions of infantry, plus two to three cannon per side.

The game scenario will start with Washington's forces deployed as they would have been just prior to the start of the shooting, around 6:30 AM on December 26, 1776. I am not sure on what to do with the Hessian troops. Should I scatter the battalions around the town and develop some mechanism for activating each Hessian unit? Or should I just let the Hessians react once the Continentals fire the first shot?

Please feel free to scroll down and view the pictures - click or double click the pictures for an enlarged view.


British 16th Light Dragoon Vedettes on King Street

Lt. Colonel Rall's Headquarters on Queen Steet, looking south.

The Americans approach the town of Trenton at first light.

The Rall Grenadier Regiment in its quarters