Friday, February 23, 2018

Zorndorf Terrain Adjustments


The new Zorndorf battlefield with the Zabern Grund and Galgen Grund features.
The lichen has not been added to the depressions in this picture.
CLICK ON ALL PIX TO ENLARGE

I have been fiddling around with the terrain set up for my Zorndorf game that will be played at this year's Seven Years War Association ("SYWA") convention on April 4-6, 2018 in South Bend, IN.

I decided that the Zabern Grund terrain feature needed to look more imposing and I could barely make out a depression in the ground where the Galgen Grund was located. While I would dearly love to make purpose-built terrain boards, I don't have the time with the convention game coming up in about six weeks. Also, the terrain needs to be portable.

My terrain system involves placing some insulation board on the table top and then placing my game mat on top of the foam boards. I can add pieces to create elevations or make cuts in the boards to create rivers, streams and a few Grunds.

I bought some one-inch thick pink insulation board at Home Depot and transported the boards, which I had cut down inside the store, from 8 feet long to 6 feet long. It was a very windy day and so the boards all wanted to take flight. To make matters even more difficult, I could barely fit the boards into my SUV vehicle, which I had imagined would have enough space to do the job. I was able to cram a couple of the boards into the car, but the others had to be cut lengthwise. Fortunately, the boards come with scored lines that make it easy to break off sections along the length of the board. I finally got everything loaded and delivered to my basement.

The first step in the process was to lay out some markers to make sure that I was making enough space for the Prussian battalions of Manteuffel's advance guard to deploy. By coincidence, my infantry battalions are 12-inches wide when deployed in line, so I was able to use foot long rulers to stand in for my infantry. Thus I could estimate how much room I needed for troops before I started cutting into the foam boards.

I also set out some dowel rods to mark off the area of the Zabern Grund; placed the footprint of the Stein Busch on the table; set up a temporary Galgen Grund; and placed some Russian infantry on the far end of the table to see how much table space I would have on the far side of the wooded area.


Working on the layout before cutting into the insulation boards.
 I wanted to have enough room to deploy four battalions in the area between the Zabern Grund and the Stein Busch.

Conveniently, my infantry battalions are 12-inches long when deployed in line. Thus I can set 12-inch rulers on the table to estimate how much room I will need on the table for the troops.

More of the pre-cutting layout work as seen from the opposite end of the field.
 Once I had the troop placement set in my mind, it was time to start cutting up the foam boards. I hope to keep some of them intact (without cut outs) so that I can use them over and over again for other scenarios. I only had to cut one board to create the Zabern Grund and a second board had just a small cut out, otherwise it was a whole board.


Cutting the Zabern Grund (nearest to the front) and Galgen Grund (mid-lefthand side of the boards)

The next step was to lay my game mat on top of the foam boards. Now you can see the depressions of the two grunds on my table top.

Now that the cutouts are made, I can lay my game mat on top of the insulation boards and get a nice deep Zabern Grund terrain feature.


Now I start laying the trees and foliage on the table.
The Galgen Grund and the Stein Busch can be seen in the middle part of the table.
I now filled up the grunds with trees and lots of lichen to give it a wild appearance. The Galgen Grund was not passable for troops and I think that this is conveyed by the new terrain. Below is a picture of the new Galgen Grund


The new Galgen Grund terrain feature.
Now it is clear that the feature is inpassable to troops.

Another view of the new Galgen Grund, with the Russian light baggage train
providing further obstacles to troop movement
The Zabern Grund was decorated in the same manner, although this time I added some small stream pieces that I had purchased many years ago at Historicon.


The new Zabern Grund - deeper and more imposing looking.
The lichen really makes the depression in the ground "pop".

Russian infantry anchor their right flank on the Zabern Grund.
Cossacks patrol the right bank of the stream.

A view of the Stein Busch. Troops can move through the feature at a slower than normal speed.
European woods were often more open to allow livestock and wildlife roam through it.
You can just barely see the tip of the Galgen Grund at the bottom of the picture.


The finished new tabletop terrain with the Russians deployed on the left side
and the Prussians deployed on the right side of the table.

I will have to rent a van to carry my terrain to the convention, so the boards shall fit inside rather easily. I have to rent a van anyway because I am also transporting all of by Minden and Fife & Drum inventory bins, and my game troops, to the convention.

I'm giving some thought to maybe running a couple of Zorndorf games at this year's Historicon convention in July 2018. Stay tuned to this blog for more information about a possible Historicon appearance this year.

As of today, I have most of the Russian army needed for the game painted and based. So now I can focus on painting some of the accoutrements such as limbers, wagons and casualty markers, among other things. I also want to make a hill that I can set on top of the map, rather than under the mat, where I can deploy the Prussian artillery. For this game I shall allow the cannons to fire over the heads of the Prussian infantry as it advances towards the Russians. At some point the infantry will be too close to the Russians to allow for Prussian artillery fire. However, the Prussian guns will all be howitzers so that they can fire on other targets deeper into the table.


Monday, February 19, 2018

The Ebb and Flow of Morale in a Wargame - Mine and Yours


A battery of German 88s deployed behind a sand dune. l.

This past weekend I played in my first WW2 wargame ever, not counting HO figures that I played with in my sandbox as a kid. The battle was set in North Africa in 1942. We were using 15mm tanks and equipment played on a long table measuring about 6ft wide  by 15ft long, so there was a lot of maneuvering room to work with. The rules used were a house variation of Blitzkrieg Commander II. I found that the rules were relatively easy to grasp, so that helped to overcome some of my trepidation about playing a game in something other than the black powder horse and musket era.

Because I had a box full of German Mark III tanks and a couple of big "You Know Whats" that I had never played with, our host, Bill P. let me play on the German team.

You know the old saying, "if you are playing in a poker game and trying to figure out who is the mark then it is probably you." That was easy to figure out - the chump was undoubtedly me  since I knew next to nothing about WW2 tactics.  

So I went into the game with something less than a peaceful easy feeling about my play in the game.

This game report is more about the ebb and flow of morale in a wargame. I'm not talking about the morale of the Little Men on the table, but rather, the morale of the players in the game. There are some interesting dynamics going on from that perspective.

The Scenario
It went something like this: there was a town in the middle of nowhere call Sidi El Something Or Other (the names are not important when you are just learning the ropes). The town was at a crossroads. The Germans and their Italian allies were approaching  from the south (I just made that up) and they had to make a right turn at the town and exit the table. There were three ridges going across the width of the table and they were widely spaced out so that they could easily hide those naer do well British Tommies.

A view of Sidi El Something Or Other and some of those cute little Harringtons comming towards ME. The middle ridge is to the left of the town, the far ridge is off in the distance where the road leads to the next village. I have already passed the ridge that was hiding the Germans.

Let the Game Begin - the Recon Phase
The game started with four turns of reconnaisance, with cute little Marmon Harringtons and German Pskvxkzrt 's (that is, the vehicles had long names without any vowels). I have no idea what they are called, but they seemed to scoot around the desert and they had a little pop gun of a cannon that couldn't hit anything.

The Italian scout vehicles entered the table on the left and my two German Volkswagens scooted across the table on the right. The spotting rules were easy to learn and soon we had a little game of cat and mouse as the British scurried hither and yon. I figured that there was probably something big, mean and bad on the other side of the central ridgeline on the table. (Gee, you think?).


My Vowel-less VW zips across the sand and raises a dust cloud. In the upper left corner you can just barely see the yellow ochre colored Italian Ferrari scout vehicles heading towards the middle ridge to see what is on the other side of the hill.


After four turns of recon, the clank of treads was heard and large clouds of dust were seen on the horizan as Big Armor came rumbling onto the table for both teams. At this point, the real game would start and so we got down to the business of moving our vehicles and trying to exit the table.


The British scout cars put it in reverse and lay a patch. Was it something that they saw or was it tea time in the Sidi?


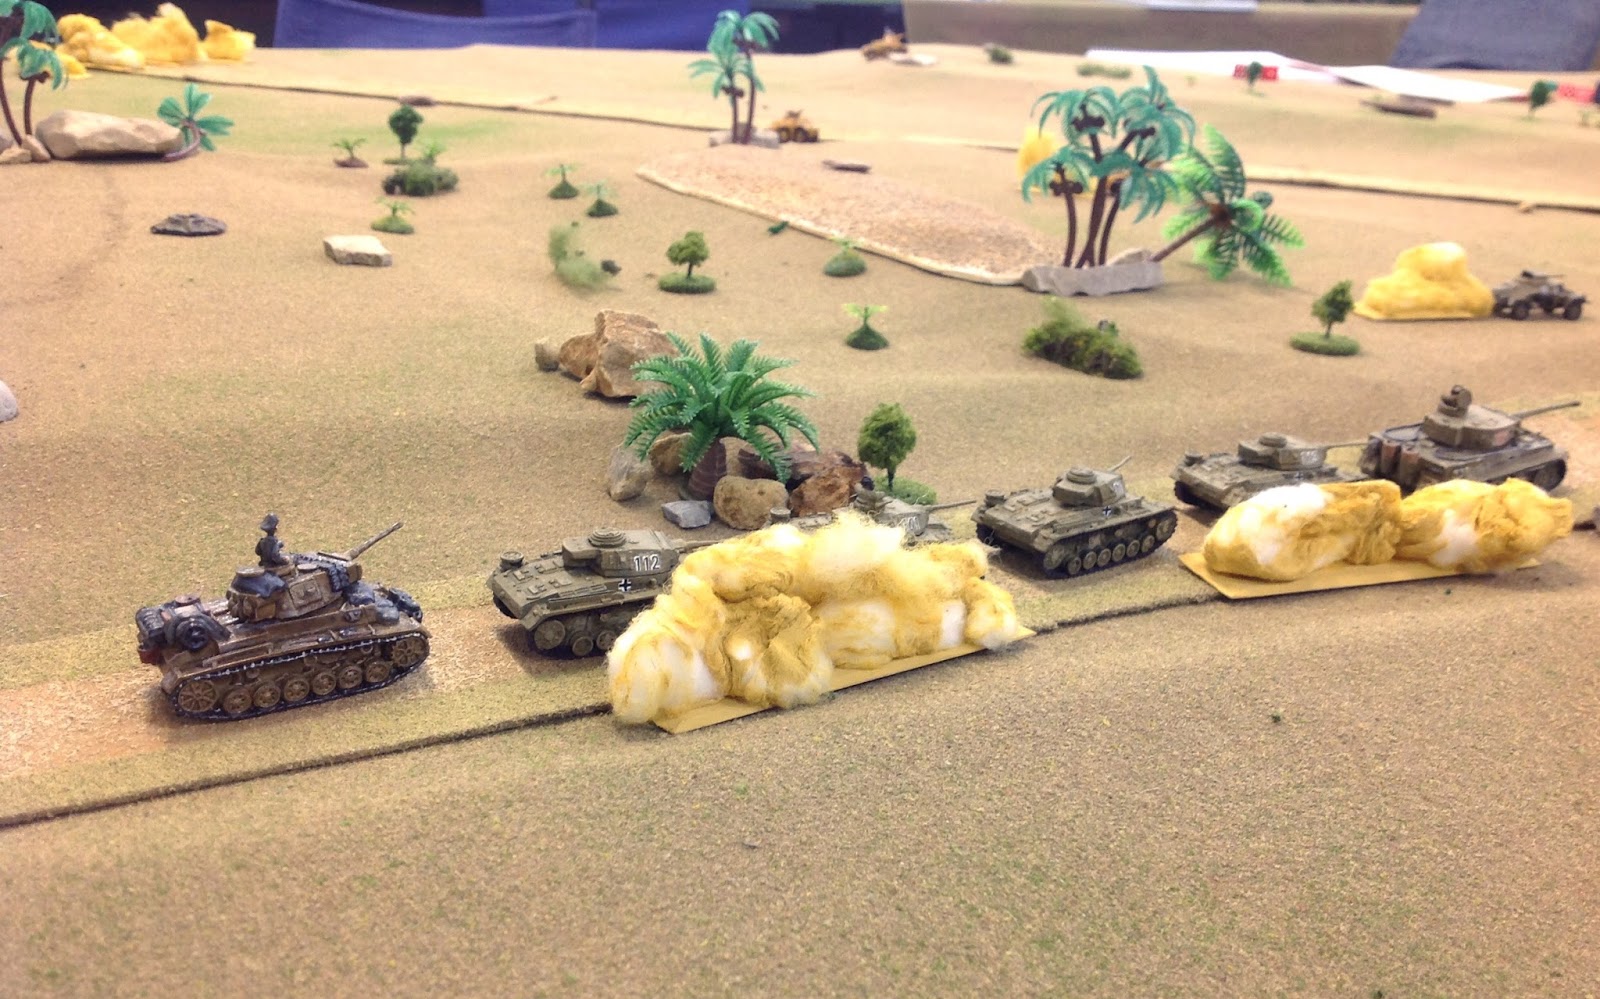
This is what the Harringtons saw rumbling down the road trying to loosen their load.
Seeing those panzers really lifted my morale, to say the least.


At this point in the game, my personal morale was pretty good because I hadn't been blown up yet and a passle of panzers was coming up behind me in support.

It's Clobberin' Time!

So things were looking wonderbar on my side of the table (the right) and the Italians were helpful as they made a bee-line for the central ridge. They were chasing a couple of British Harringtons back towards the town. The Italians crested the ridge (come on, you know what is going to happen) and watched as two big dust clouds headed their way.

To their left were a few small Grants, but to their right was a platoon of some Big Nasties, Chieftans I think. I heard a lot of big booms and pops to my left, but paid them little heed as the tune Alte Kommeraden played in my head as I watch four Mark III and one awesome looking Tiger (I know, but its just a game and you bring what ya got, right?).

The booms and pops turned into a rising mushroom cloud of flame and smoke as one after another, the Italian tanks started blowing up. I looked over at my Italian ally and I could see that his personal morale was heading south after that ugly encounter with British armor. I am certain that the British players detected the shift in Italian morale as they came rumbling over the hill to give chase. Doesn't anyone learn anything?

To my immediate front, this is what I saw! I flatter myself to thing that they were coming for me! 


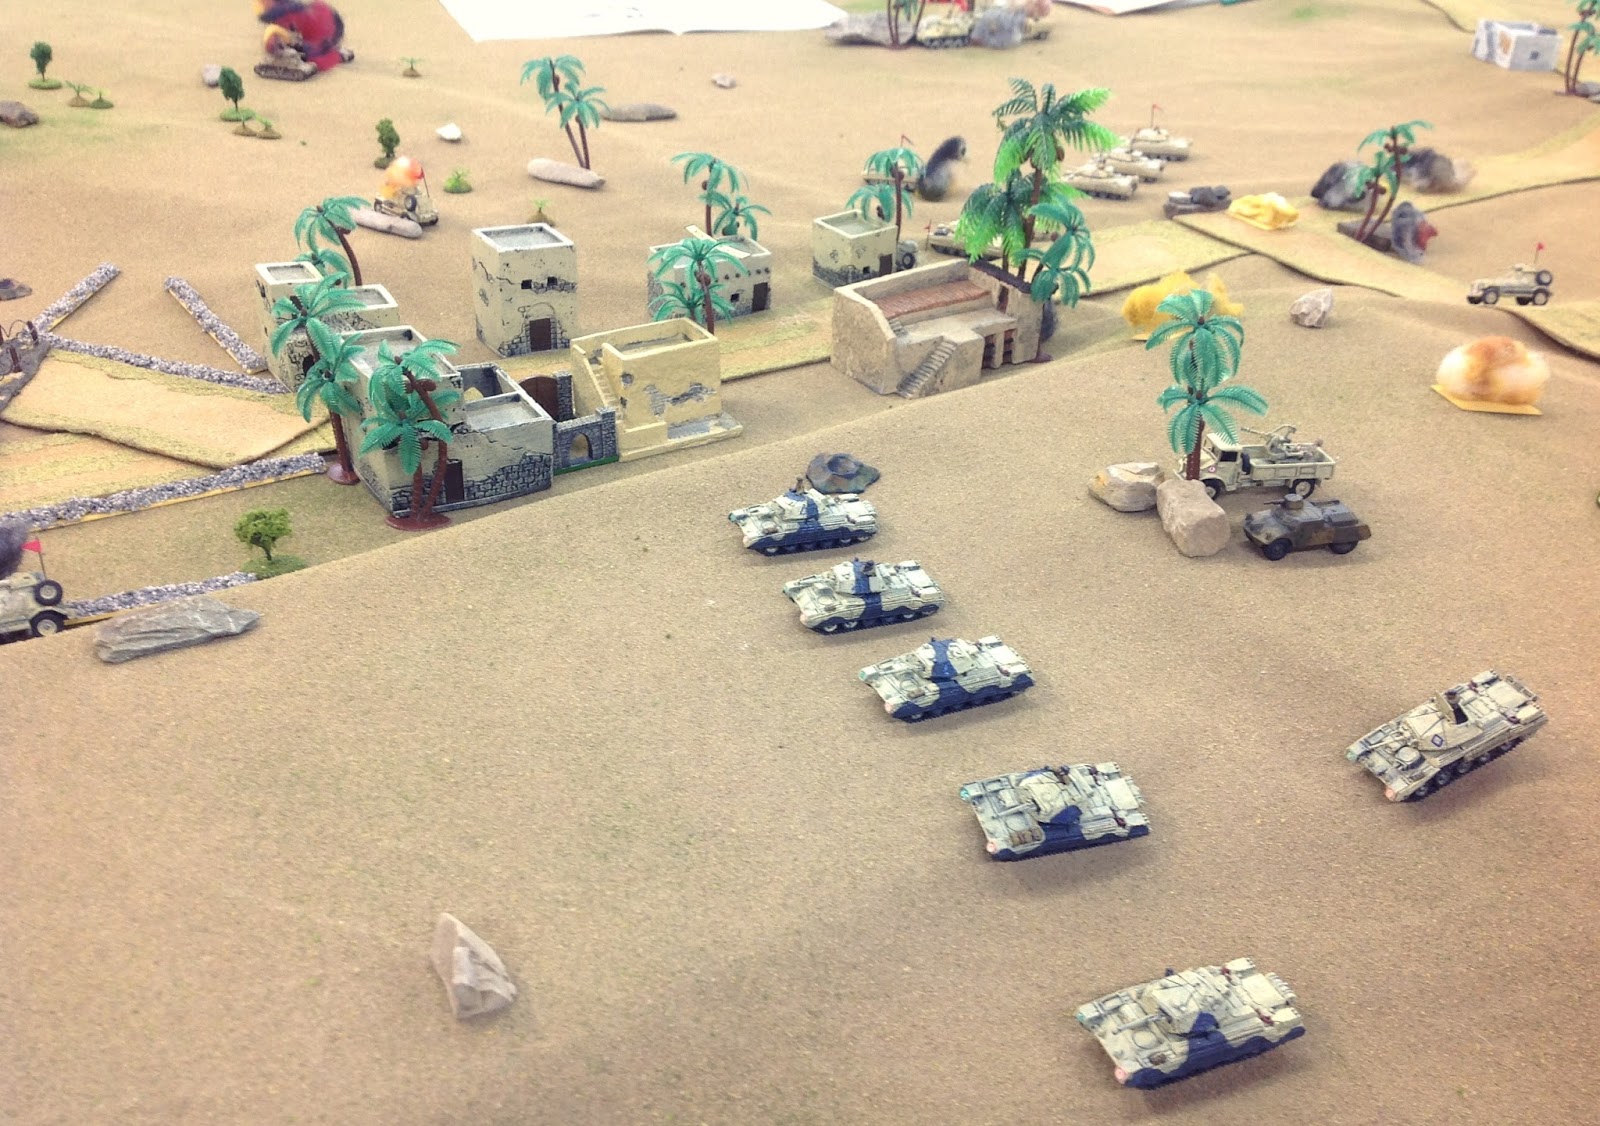
A bunch of nasty looking British tanks come out of hiding and block the Germans' exit road. Oh fiddlesticks. 

What ho! The British were more interested in the German panzers than they were with me and my little VWs. My morale level was dialed in at "Relief".

An aerial view from a German Stuka shows the German ridge and a platoon of tanks on the road.

One thing that you learn in a wargame is that when the Big Guys are going at it with one another, the Little Guys had best get out of the way. One of my Volkswagens was caught in the middle and blew up in the ensuing tank fight. My other scout car, probably an Audi or something fast, decided that the safest place on the board was in downtown Side El Something Or Other. So I headed into town and nobody paid me heed as I hid out in Rick's Cafe until the fighting settled down.


Payback Time!

Undoubtedly the morale of the British Chieftans was sky high as they followed the Italian armor over the central ridge. Then they saw a sight that probably soiled their trousers:

I deployed my tank platoon in front of the German ridge and set up a pair of 88s behind the sand dune.  Mwahahaha!


Yes, I had just deployed my platoon of Mark IIIs on the other side of the central ridge and was warming up the 0le 88s for good measuring. My personal morale was about to go sky high.


It's a beautiful thing if you are a German...

Even with the Chieftans hull down on the central ridge, the whole platoon got blown to bits by the weight of all of The Krupp Works best munitions. I watched as one tank after another blew up and erupted into fireballs - five times!

...not quite so if you are the British though.
The remnants of the Italian tanks can be seen burning in the background while those of the British, in the foreground, are billowing black smoke. Their day is done.

Now I'm sure that the personal morale of the British tank commander had to be at its nadir. Mine would if I were in his boots. However, he put on a brave face and didn't show any signs of being downcast. This is a good point to make and a teachable moment - never let your opponent see your morale going down. Kudos to the British player on this score.

A Comical Interlude
The British decided that the time was ripe to unleash the RAF onto the line of German panzers, all eight of them at the moment, all sitting pretty on the ridge.

An RAF Hurricane draws a bead on the German tank line.
My memory of this is rather hazy, but I think that the RAF managed to take only one German tank out of play. The flyboys missed everything on their first pass, but their aim improved enough on the second pass to knock out one of our panzers.

I should point out that there was a second Hurricane, but it couldn't get off of the ground for at least two turns. It finally experienced liftoff on the third attempt, but the pilot's Mr. Magoo Myopia kept him from hitting any targets. We named him, Eddie the Eagle.

We Were Getting A Little Too Full of Ourselves

At this point in the game, the British were on the run all across the desert. The two British heavy tank platoons lost 9 of their 10 tanks (all 5 on the ridge, and the other 4 that were guarding the exit road near the Sidi. Two of the light Grants were also out of action and skedaddling over the far ridge.

So what does a good cocky German tank commander do in this situation? Why pull an Elmer Fudd of course and chase Bugs Bunny back over the central ridge.

Here come my four remaining Mark IIIs emerging from the smoke and ruins in pursuit. Sort of reminds of the scene in Animal House when the badass car emerges from the smoke to inflict havor on the parade.

The Italians were feeling pretty good too. You can see them in the background on the right as they too rumble towards the ridge where Glory awaits us all.

There is another old saying (I love old sayings) that "when something is too good to be true, it IS too good to be true." My personal morale is insanely high at this point, afterall, I put a can of whoopin' on the British tanks and I had a couple more cans yet to give away.

Well not so fast there Ace.


Boom Boom, Out Go the Lights

As I was emerging through the smoke of the burging Chieftans on the central ridge, I looked through my binoculars at the little village on the last ridge and saw a little man in a khaki peaked cap, sitting on the roof of a mud house, and he was waving to me and laughing.

Insolent little pup, I thought to myself. What could be so funny.  I was about to find out:


Um, uh what happened. Egads! That's my panzer platoon  going up in smoke.
In short order, a barrage of explosive shell came over the hills from far away and landed smack dab in the middle of my panzer formation. Italians to the left of me, little Harringtons to the right, here I am stuck in the middle with you!

The vehicle of my destruction was not the Stay Puffed Marshmellow Man, but rather a full battery of five big old ugly Royal Horse Artillery 25 pounders.


This is what happened to me. Looks like every single British artillery piece in North Africa.

If you go out in the desert on day and see these guys, then kiss your derrierre goodbye.

My command was wiped out, save for one Mark III, but it was not allowed to move on the next turn because my command vehicle was also a smoking ruin.

My personal morale was totally shot to pieces, just like my tanks. Sweet Baby Onions, I thought, what the heck just happened to me?!!! 

Well, here is what happened; that little man in the peaked cap was an artillery spotter and he was calling in the barrage on me. 

My tank command after getting pounded by British artillery - three times.
(image is of the Highway of Death in the Gulf War in 1991)

What did I learn from all of this? 

Well a couple of things actually; first, it is always a good idea to find out what is on the other side of the hill before you go wandreing over; and second, whenever you see a single little man with a pair of binoculars in his hands, you had best train all of your guns on him before he calls in an artillery barrage on top of you.

There is another lesson of sorts to be gleaned from all of this, and that is just as there can be an ebb and flow in a wargame, so too can our personal morale shift up and down during the course of the game. It is best not to get too high or too low in your personal morale. Don't be visibly too happy when the game goes your way because you can bet your bottom dollar that the weather vane will eventually turn against you in the same game. It is important how we wear our emotions and our morale.

At the end of the day, I had a good time playing WW2 for the first time. It was not too technical as I had feared. I had some early success and I also got clobbered. I was expecting the clobbering before the start of the game so I came out of it better than I had thought possible.

I think that we all had a good time playing this game - a good host, good food and amiable players all add up to a good day. Here is a post game picture of our band of brothers


Bad Guys: Jim P. (me), Michael M., and John B.
The Good Guys: Keith J., Bill P. and Bob M.

Undoubtedly I misnamed or misidentified most of the tanks and equipment used in the game, so no corrections please. LOL.

Friday, February 16, 2018

Some small terrain bits to spice things up

Zorndorf - before
The other day I was taking a look at the terrain setup for Zorndorf that is currently on my game table and thought that something seemed to be missing (see picture above).

There were large areas where there was nothing on the ground and to my eye seemed to be calling for something to fill the space. So I took a few round discs of various size from my box of MDF bases and terrained them in much the same way as I do with my miniatures. You can see the results below:


The tabletop showing how things look with a few terrain bits added.

You can see a close up view of the terrain discs in the picture below. A Minden officer on horse is shown to provide some comparison of the discs to the size of the figures.

Close up view of the terrain discs. A Minden Russian officer stands in for comparison.

I use a game mat that was made by a company called The Terrain Guy (now sadly out of business). It measures 6ft wide by 12ft long. If I need a longer or deeper table, then I have to add some terrain squares (2ft x 2ft) that I made many years ago for one of my Kolin games.

When I purchased the game mat, my thought was to use it as a flat surface and then to lay all of the terrain (hills, roads, streams and wooded areas) on top of the mat. I haven't made very many hills or elevation pieces, so I have resorted to the time honored method of sliding some books, telephone books and pieces of wood underneath the mat in order to create undulations in the table terrain.

One of the visual problems that has vexed me over the years is the look of emptyness that certain parts of game table can have after all of the major terrain pieces have been set up on the table. You can see how this looks in the picture at the top of this page and compared it to the second picture which has the terrain discs that I made.

The discs are simple to make. I start with a round disc made out of MDF wood and glue down any large bits of grass or weeds that I want to use. I bought a pack of "weeds" somewhere in my past and figured that one day they would come in handy. Today was that day. So the small 1-inch diameter discs had one weed glued to it, the 1.5-inch diameter disc had two weeds, and the large 2-inch diameter disc received three of the weeds.

The next step in the terraining process is to mix up some brown paint into a can of Red Devil Premixed Spackle Compound (used for covering up the joins in wall board) and just stir in the paint until it looks like chocolate pudding. You can add a tiny bit of water to reduce the viscosity (there's a big word that I don't get to use very often) and make the goop flow easier on the base.

Next, I dip the wet base into a pot of extra fine railroad ballast material (you can use fine sand too) and shake off the excess material around the rim of the disc. It takes about 4 hours for the goop to dry really hard, at least hard enough to accept paint without dissolving again. So I usually let the bases sit overnight and I finish them off the next day.

Once the bases are dry, I use a light brown color (Geo Hex Brown - no longer produced) and stipple the paint onto the base using a wide paint brush. This gives the ground work a little more visual depth. 

Now the bases are ready to have tufts and static grass applied to them. I use Woodlands Scenics or Army Painter products for my tufts. Any brand of static grass will do as well. So it is a matter of dabbing some white glue to the tuft and sticking it onto the disc. I let this dry for about ten minutes and then glue a random pattern of white glue onto the disc, then sprinkle static grass onto the base and shake off the excess static grass. At first, you can see the white glue through the grass, but this look will go away once the glue has dried and becomes colorless.

The final step is to give the discs a spritz of matte finish - I use Testor's Dull Cote, but there are a number of similar products on the market. You could probably eliminate the coating step because it doesn't really protect the finish of the materials. I do it for peace of mind that the static grass will contiue to stick to the disc.

Now that I have completed this project, in retrospect I probably would have left off the plastic weeds and just gone with the terraining process using the tufts and static grass. Use of the white and yellow field flowers tufts adds a little bit of POP to the disc. 

The finished discs are now scattered around the table and nicely fill in some of the open spaces on the table surface.


Sunday, February 11, 2018

Charge of the Zieten Hussars!


Lt. General Hans Joachim von Zieten leads the charge of the Zieten Hussars.
CLICK ALL PICTURES TO ENLARGE

PRUSSIA FOREVER!

I thought that I would arrange a photo shoot of some of my Minden Prussian hussars to see what they would look like as a wall of snarling charging horseflesh. The Hans von Zeiten personality figure is heroically leading the charge. Austrians beware!
Three squadrons of 12 figures charge: the Zieten Hussars (HR2) in blue and the infamous Black Hussars (von Reusch) HR5/


A ground level view of the charge. I wouldn't want to be on the receiving end of this one.

This was a fun picture to set up and shoot. I had this image in my mind for a little while now and wanted to put it into practice. Let me know what you think by leaving a comment in the comment box below.


Thursday, February 8, 2018

Painting Tutorial - Do It Like Fritz


From start to finish, how I paint a figure.
Click on all pictures to enlarge.


I started painting a battalion of RSM Russian Grenadiers and I though that it would be helpful and of interest to our readers if I went through a step by step tutorial of how I paint miniatures. I have a list of the paints (names, manufacturer, product code) that I used at the end of this article.


Step One: I start by washing the figures in rubbing alcohol to clean it of any dirt or mould release. The I prime the figure with grey primer. I like grey because it doesn't overwhelm the lighter colors such as your reds and yellows, yet it is dark enough so as to make the lighter colors appear too bright, as you would get with white primer. I used to use black primer for everything, because then all of the black bits on the figure are already painted, which saves time. However, I am now with grey.


Step Two: Now I block in the basic uniform colors. In this example, I paint nearly the whole figure Russian Green. I am not concerned about the paint getting on the areas where there will be red paint. Then, I paint all of the skin areas with an undercoat of red-brown. Flesh looks better with a darker background than it does if you apply dark flesh over the grey primer. It results in a "doll house" look that I don't like. So go with a red-brown undercoat. Next, I apply the secondary base color, in this case, the red breeches, waistcoat and cuffs.
Primed figure on the left, then block in the basic uniform color, then add red-brown undercoat for all skin areas; and finally, add the secondary uniform color - in this case red.

Step Three: After all of the basic colors have been applied to the figure, I do what I call blacking the figure. I paint all of the equipment (muskets, cartridge boxes etc.) and black bits (gaitors, hats, mitres, etc). This can be kind of tedious. I have timed myself on this and find that it takes about 5 minutes to do all of the blacking.

Step Four: Once the blacking is completed, I add the color for the cross belts. This gives the figure the look of having  black lined the cross belt which is a neat effect. Then I paint all of the brown bits (hair, musket stock and fur bags) over the black. This seems to produce a nice effect on the brown coloring. Note also that the musket barrel and mitre front plate are black - when the metallic colors are added, they stand out better with a black undercoat than they would atop of the grey primer.

So the crossbelts, skin and a bit of the white undershirt have now been painted on the figure on the right, below.

For the face, I let some of the red brown color stay uncovered in the eye sockets, moustache and around the nose and neck. A dot of dark flesh on the nose, the chin, each cheek and the forehead are all that you need.

The "Blacking Process". Paint all bits of equipment, hats and gaitors black. Then start adding your basic color for belts, in this case a leather brown color. Note that the flesh color has also been added to the figure.

Step Five: Now I paint all of the metallic bits, in this case, the mitre plate, the gun barrel, the copper buttons and the copper on the cartridge boxes. Metallic colors show off better when there is black underneath them. For example, buttons should always start with a black dot on the button, followed by the metallic button color.


After the Blacking is done and the belting painted onto the figure. I paint the musket stock and hair  a medium brown. Finally, I paint all of the metallic bits: mitre cap, gun barrel, brass buttons and cartridge box facing.


Step Six: Now comes the fun part of the painting: adding the highlights to the basic colors. The three tone color system works well on many figures, but that third step adds more to do and more time. So I usually use only two colors: a dark shade and a highlight.

I have added red highlights to the breeches and waistcoat and cuffs and some green highlighting on the coat. The belts have some leather highlights too. I used to add wood grain to musket stocks but I stopped doing that because nobody is going to see the wood grain anyway.

The figure on the left is the same as the righthand figure in the preceding picture. The figure on the right  depicts the highlighting of the red and the green colors.

Step Seven: Now we are ready to complete the figure. All of the highlighting has been done except for the skin. I do this next. The face is easy - just a small dab of flesh highlight on the chin, bridge of the nose and on each cheek. You can also add a line or two of flesh highlight on the hands.

Part of the last step is painting in the eyes. Many people don't like to paint the eyes, which is ok. Paint the eye socket black and then you are finished. However, I like to paint the eyes so I put two small dabs of white paint in each eye, leaving the center of the eye black.

The finished figure is shown on the right in the picture below.


The figure on the left is the same as the one on the right in the preceding picture. The righthand figure is finished by highlighting the skin and painting eyes. Some people do not like to paint the eyes, which is OK too.

Paint Recipe Used on These Figures

GREEN Uniform Coat:
  Gnarls Green - P3 Paint (93034) = base color
  Leaf Green - Reaper Master Series (09011) = highlight color,
I find that the Leaf Green is a little too bright, so I tone it down by mixing in some Gnarls Green color.

RED Breeches, waistcoat, turnbacks and cuffs:
  Base Color: Blood Red - Reaper Pro Paint (18001)
  Highlight: Fire Red - Reaper Master Series (09004)

BROWN Hair and Musket Stock:
  Base Color:  Ruddy Brown - Reaper Master Series (09109)
  Highlight: Oiled Leather - Reaper Master Series (09110)

TAN/BUFF Leather Belts:
  Shade: Leather Brown - Reaper Master Series (09030)
  Medium : Tanned Leather - Reaper Master Series (09031)
  Highlight: Amber Gold - Reaper Master Series (09032)
I use the shade color, but mix the Tanned Leather and Amber Gold to create my highlight color.

FLESH:
  Shade: Rosy Shadow - Reaper Master Series (09067)
  Highlight: Rosy Skin - Reaper Master Series (09068)
  Undercoat for the shade: Red Brown - IWM (77-713)

COPPER Mitre Plate, Buttons, Cartridge Box Emblems:
  Copper Metallic - IWM (77-722)
  Old Gold - Viejo (70.878)
I mix the copper and gold together to create a sort of brass color. The Russian copper pieces were not the red copper color like on the U.S. Penny, but instead, had a gold/brass tinge to them.

METALLIC GUN BARREL:  Cold Steel - P3 Paints (93075)

WHITE Pom Pom:
  Gray - IWM (77-707)
  Morrow White - P3 Paints (93075)

BLACK Gaitors, Grenadier Helmet, Cartridge Boxes and belting undercoat
  Lamp (Ebony) Black - Deco Art American craft paint (DA067)


***********************************

So that is basically how I paint my figures. It is basically a two-color shade/highlight color system rather than the 3-color triad system. I use it because it eliminates a step in the painting process and reflects my point of view that no one notices the middle color in the triad for the most part. Recently, I have stopped using two colors for my browns - hair, packs and musket stocks - and just go with one color. Black is usually used without any highlight, although sometimes when I feel like it, I will mix up a black highlight by adding some flesh color paint into the black paint.

The key step in my painting process is the blacking phase. It makes the cross belts really pop because it gives the impression of black lining the belt without actually black lining it. Also, it makes the metallic gun barrel and hanger swords and buttons pop.

I hope that this tutorial can help you improve your figure painting. Use some of the tips or use them all as you see fit.

Monday, February 5, 2018

NEW AWI Mounted Militia Are Available


New Fife & Drum Miniatures AWI Mounted Militia
(click on all pictures to enlarge)


The new Fife & Drum Miniatures AWI Mounted Militia figures are now available for purchase on the Fife & Drum Miniatures web store site. We have also added the new South Carolina Continentals wearing leather caps and SYW Russian musketeers in waistcoats to the web store.

Please Note: we now accept credit cards as well as PayPal payments for all purchases on the Fife & Drum Miniatures web store.

Click on the links below to view the new products and product codes in our web store:


Today's post features the AWI Mounted Militia figures. The Russians and South Carolina Continentals will have their own blog post later in the week. However, you can still click on any of the links above to see the figures or make a purchase.

AWI Mounted Militia

We have added eleven different figures that are suitable for use as either mounted militia for the Southern Campaigns or as Continental Dragoons in campaign dress. These are further grouped into six new product codes as shown below. Note that all cavalry figures include the horse.

AC-023 Dragoons wearing hunting shirts (2 figures)     $10.00 
AC-024  Mounted Militia - Tricorn Hats (3 figures)      $15.00
AC-025  Mounted Militia - Brimmed Hats (3 figures)  $15.00
AC-026  Mounted Militia - Brimmed Hats, turned up on right side (3 figures)   $15.00
AC-027  Mounted Militia Officer (1 figure)  $6.00
AC-028  Mounted Militia Regimental Pack (all 11 new figures)  $50.00

AC-024 Mounted Militia in Tricorn Hats.


AC-025 Mounted Militia in Brimmed Hats.

AC-026 Mounted Militia in Turned-up Hats.

AC-028 Mounted Militia Regiment Pack
(note: the two figures in hunting shirts are not shown in this picture)
The Mounted Militia figures are ideally suited for wargames set in the Southern Colonies during the 1776 to 1783 period and can be used both as militia cavalry or as mounted militia troops who would ride to the battle site and dismount so that they could fight on foot. They could also be used to give a campaign look to your Continental Dragoon regiments.

The Mounted Militia figures are priced at an introductory discount from our regular prices ($6.00 per horse and rider set at regular price, reduced to $5.00 per horse and rider set) per individual figure.

We also offer all eleven of the new mounted militia figures as a Regimental Pack for $50.00 which makes the figures even more economical than if they were purchased as individual figures.