Tuesday, October 31, 2017

More SYW Russian Cossacks


RSM Russain Cossacks for my SYW Russian army.
Click on all pictures to enlarge.

I have been on a good painting frenzy of late and I finished a second set of 12 Russian Cossacks. As with the others, these are RSM figures mounted on Minden light cavalry horses. The combination looks very lifelike and visually appealing.

I find that the RSM and Minden figures are very compatible and so I use both figure ranges in my SYW armies.

A closer view of the new Cossacks, wearing short hats.

The picture below gives one a sense of how the whole Cossack unit will look. The grassed set of 12 wear the tall fur hat and the ungrassed set of 12 wear the short hat.
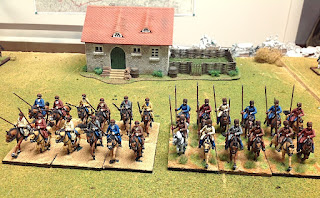
Two squadrons of RSM Russian Cossacks mounted on Minden Horses. The lefthand unit will be grassed
later today after the ground spackle has dried.

Next in the Queue

I have another dozen Russian dragoons to paint to build the regiment up to 24 figures. I am giving them a coat of grey primer today so that I can start painting them tomorrow. After that, I will either turn to the Horvat Hussars (using the Minden Austrian hussars) or the 3rd Cuirassier Regiment (using Minden Austrian cuirassiers).

Because 18th Century armies and uniforms are very similar in look and style, it is relatively easy to recruit figures from one country's troops for use in another country's troops, in the event that the needed figures are not yet a part of the Minden Miniatures figure range. I find that the French infantry with turnbacks work for Russian Musketeers, RSM Russian Grenadiers are used in my army, Hanoverian Horse, Austrian Hussars and Austrian Cuirassiers suitably fill in for their Russian counterparts.

Minden already makes the Russian artillery crewmen and some of the more common Russian artillery pieces, so this combat arm is fairly well handled within the range.

My SYW Russian Army, so Far

With the completion of the Cossacks, I now have enough Russian cavalry to fight a small battle - 24 Horse Grenadiers, 24 Cossacks and 12 Dragoons (up to 24 by the end of this week). I could also use some of my Austrian cavalry to augment the Russians, if needed.

The infantry contingent has 3 musketeer battalions and one grenadier battalion for a total of four battalions. In a pinch, I could use my green coated Hesse Seewald battalions as Russians (in fact, I had this in mind when I started painting my own Hesse Seewald regiments).

The artillery contingent has four cannon: a Shuvulov Secret Howitzer, a 12 pound Howitzer, a 12 pound smoothbore and a 6 pound smoothbore. I still need to paint limber teams for my cannon. I am thinking that I will delegate the 6 pounders to the infantry to use as regimental guns, which the Russians often did. I have been reading that the Shuvulov Howitzers took longer to reload, so in my rules they will only be able to fire every other turn.

I have some new Russian infantry wearing their Summer kit at Griffin Moulds awaiting the production of master moulds. If the figures pass my muster, then I will put them into production moulds and add them to the Minden range. I sculpted the figures using Richard Ansell's dollies, so there should be similarity with the rest of the Minden figures that Richard sculpted. My own effort is passable, but nothing up to the standard of Richard. So if my sculpts do not look good to my eye, then I won't put them in the range. So we shall see.

First Anniversay of my Retirement

Today, October 31st, is the one year anniversary of my retirement from work and my new career as a gentleman of leisure. As one of my longtime friends said, "Jim, you were made for retirement." I can't dispute that.

Retirement has given me more time to devote to the figure business and to painting figures, so that part of it is great. I have also played a number of solo wargames which I do to generate pictures for this blog or test out scenarios and rules changes. My solo game year to date include:

Reichenbach
Fontenoy
Cowpens
Cheraw (AWI campaign game)
Winnsboro (AWI campaign game)
Fisher's Crossing (AWI campaign game)
McDowell's Camp (AWI campaign game)

I like the solo games because they give me the opportunity to do what little army men were made for - playing wargames.

I also did a little bit of traveling this year, going to the UK in June and Fort Donelson, Tennessee in October. I also did the Christopher Duffy tour of SYW battlefields last October, but that took place before I officially retired. I would like to visit some more ACW battlefields in the USA this next year and a return trip to the UK for another wargame mini convention is definitely in the works.

Year Two of Retirement should be just as busy and so I'm looking forward to seeing how the year unfolds.

Saturday, October 28, 2017

Russian SYW Cossacks WIP


Russian Cossacks and Kalmuks burning Zorndorf. ("Zorndorf 1758" - Osprey Campaign  125 book). RSM Miniatures makes the two mounted figures in the center - tall hat with the red kaftan and the short hat with the orange kaftan. The Kalmuk shooting the bow and arrow might be found in some range of 28mm Asiatic Horse Armies, as their "uniforms" appear to be a bit of a throw back to days of olde.


I have been working on the cavalry portion of my nascent SYW Russian army, of late, and have some pictures of the Cossacks that I am working on over this weekend. Today I finished a 12-figure squadron of Russian Cossacks, shown below:

RSM Cossacks mounted on Minden light cavalry horses. The lances are cut down North Star 100mm spears .
Click all pictures to enlarge the view of the photograph.

I am using the RSM Cossacks, both in tall hat and short hat, for my Cossacks and am mounting them on Minden light cavalry horses. By using the Minden horses, this brings some consistency to the overall look of my Minden Russian army for the SYW.

Step 1 - sort by kaftan color
I want some variety in the appearance of my Cossacks and the best way to do this is to paint them all in different colors. So I sorted the figures into groups of threes and gave each group a different kaftan (the coat) color. Then to save time, the color that I paint on, say, the kaftan is used on one item in the other group of Cossacks. For example, the blue kaftan Cossacks on the left in the picture below - after painting the kaftan, I might use the same blue to paint the trousers of the next group of three figures, Then I would follow it up by using the blue on the saddle blanket or blanket roll on the back of the horse. 

This provides a little bit of economy on your time because you are using the same color for a number of different clothing items all at once, rather than going back and forth to the paint jar as needed.

Cossacks grouped by the color of their kaftan.
RSM Cossacks mounted on Minden horses - click picture to enlarge.

Step 2 - sort by horse color

Painting the horses different colors also adds to the variety of the unit. So the next step is to rearrange the Cossacks into groups of 3 or 4 figures and then paint each group's horses the same color. Again, this saves me a considerable amount of time.

Cossacks grouped by the color of their horses.

Step 3 - now mix all of them up
Now that I have finished the clothing and the horse colors on all figures, it is time to mix them up at random, as shown below. This also adds a look of variety to the Cossack hoard.

Now you can mix them up in any order to get the look of variety in the hoard.

A Connoisseur Cossack Find
I found a previous set of 14 Connoisseur Napoleonic Cossacks that I had painted years ago and it looks to me that they are somewhat compatible with the Minden figures, as shown below in the comparison of Cossacks to Minden dragoons.

Connoisseur on the left, Minden on the right.

This instantly gives me another 14 Cossacks to add to my army without having to paint them.

Dragoon Update
Last week I finished painting a 12-figure squadron of Russian dragoons. Since the uniforms of all dragoon regiments were the say, this unit could be any regiment in the Russian cavalry establishment. I plan on painting 12 more dragoons this coming week, to bring the regiment up to 24 riders.

A completed squadron of Russian dragoons, using Hanoverian Horse cavalry figures.

Russian Cavalry Organization in my Army

Might current thought is to have 24 figure units, one each, of horse grenadiers, dragoons, cuirassiers, and hussars, plus 30 to 40 Cossacks.

As of today, the horse grenadiers are completed, the dragoons and Cossacks are half-way done, and the cuirassiers and hussars are yet to be started.

I plan on painting the Horvath Hussars, who fought at Zorndorf, using the Austrian hussar figures. The Russian cuirassiers will be recruited from the Minden Austrian cuirassiers.

One of the nice things about 18th Century armies is that the uniforms are all very similar, in some fashion, so it is easy to "convert with paint" if you can not find the exact figures that you are looking for.

Monday, October 23, 2017

Russian Kargopol Horse Grenadiers


My SYW Russian Army, so far, at least.

My SYW Russian army project is back at the top of the painting queue again. I completed a second squadron of 12 horse grenadiers last week, which brings the regiment up to my standard two squadrons of 12 riders per regiment, or 24 figures in total.

Kargopol Horse Grenadiers

Russian Cavalry
You are probably asking yourself, "I didn't know that Minden Miniatures made Russian cavalry?" And you would be correct, we do not make them. However, the Minden Hanoverian Horse regiment figures look very similar in that they have no lapels on their coats. Their coats are unbuttoned, versus closed for the horse grenadiers and dragoons, but who is to really say that the Russian cavalry would not unbutton their coats on occaision?

The other noticeable difference is that the Russian cavalry did not have lace on their shabraques, so it is a simple matter of not painting any lace on the shabraques. You could also use some green stuff epoxy putty to fill in the pistol housing and shabraque to give everything a smoother appearance. I have converted some of these figures with putty as samples, but I am waiting for the masters to return from Griffin Moulds.

Minden Hanoverian command with head swaps and RSM horse grenadiers
mounted on Minden medium horses.
I used RSM Russian horse grenadiers for the rank and file reiters and placed them on Minden medium sized horses. This helps to create the illusion of consistency with my other Minden cavalry regiments in my Prussian and Austrian armies.

Russian cavalry horses were smaller than those of Prussia and Austria, which would put them at a distinct disadvantage on the battlefield. I did a head swap of RSM foot grenadier heads attached to the Minden Hanoverian Horse command figures.

Kargopol regimental flag - from Kronoskaf


The flags are down loaded from the Kronoskaf web site and adjusted to size in Word. The horse grenadier flags in Kronoskaf only have one side, so a little bit of copy, paste, moving and reducing of size is needed. You end up with the flag fringe in the middle of the flag, in the staff position, and no fringe on one of the ends of your flags, but the cavalry flags should be so small as to not be noticeable. At least that is so with me. I think that GMB Designs makes the correct flags, so buying your flags from them eliminates the need to improvise.

General Organizational Information for the Russian Cavalry
According to Kronoskaf, while the organization of Russian cavalry, in general, had 5 squadrons, only 2 or 3 actually fought on campaign, the other squadrons (primarily the 4th squadron) remaining at their bases in Russia. The 5th squadron was often not even raised and existed in name only.

Not every regiment actually fought in the SYW. The only dragoon regiments in the fight were the Tver, Tobolsk, Nizegorod and Arkhangel regiments. The horse grenadier regiments that fought in the SYW were Kargopol, Narva, St. Petersburg, Rizhsky and Ryazan.

There were five cuirassier regiments fighting in the SYW, but only 2 of the 5 were issued cuirasses (oh goody!) until late in the war. These regiments were largely converted from dragoon regiments prior to the SYW and thus had not received their official cuirassier gear. They even retained their old dragoon coats. The other two regiments, Prince Fedorovich and the "3rd" regiment, were dressed as cuirassiers with chamois colored coats and breeches and a black cuirasse front plate. We will probably use Prussian or Austrian cuirassiers for the Russians in my army.

Usually all three types of heavy cavalry only wore their summer uniforms on campaign, This consisted of a buff colored waistcoat with long sleeves. The dragoon and horse grenadier blue coats were saved for parade and cold weather use. One would think that they would break out the coats around October when the weather turned colder.

Russian horse grenadier uniform - formal and winter dress. - Kronoskaf

Russian horse grenadier summer uniforms - Kronoskaf


One nice thing about the Russian cavalry, at least from a painter's point of view, is that the uniforms and shabraques are, well, "uniform" or the same for each regiment.

In the Painting Queue
I have primed another 12 Russian Dragoons and plan on painting them this week. Since the dragoon regiments are smaller, I think that I will only paint one squadron of 12 figures for my dragoon regiment (I suppose that horse grenadier regiments should also be 12 figures). I use the term "squadron" rather loosely in my SYW army organizations. I simply divide my 24 figure regiments into two groups of 12 figures. At a 20:1 figure to man scale, this translates into 480 riders per regiment, which represents a campaign strength. I could go with 36 figures in three 12-figure squadrons, but then I start to have problems with spacing on my game table, so I keep cavalry regiments at 24 figures.

After painting 24 Russian dragoons I will turn to the Cossaks. Again I will use RSM Cossaks mounted on Minden light cavalry horses.

Monday, October 16, 2017

AWI Battle of Cheraw Report


Battle of Cheraw - July 1780
(Click/Double Click to enlarge)


I solo played the meeting of Gates' American army with Cornwallis' army at Cheraw, South Carolina over the weekend. The action resulted in a crushing British victory over the Americans, who lost half of their army during the battle and the disengagement from the battlefield. Both Gates and Cornwallis started the battle with 8SPs (strength points). Gates lost 4SPs and Cornwallis lost 1SP (from battle casualties).

Both armies were divided into three brigades of infantry, varying from 3 to 4 units plus a small amount of artillery. The battlefield was mostly light woods with only the roads being in the open.

Please refer to yesterday's post  (  Battlefield Map ) which depicts the tabletop map of the game, the list of troops in each brigade, and the deployment of the respective British and American brigades.

Brigade Deployment Map (double click to enlarge).


Gates decided that it would be better to attack the British before they had the time to deploy into their battle line, than to just sit back and await the British attack. Two of the three British brigades arrived on the tabletop from separate roads that eventually met at a crossroads in the center of the table. Gates sensed that a vigourous attack towards the crossroads could defeat the British brigades in detail.

American Swedish 4-pdr drops trail in the road and sweeps the crossroads with cannister and shot.


Unbeknownst to the American commander, who was taking lunch back in town at the Savage Swan Inn, a third brigade of British light infantry was working its way through the woods and around the left flank of the American deployment. A brigade of three militia battalions were posted on the left to stop such an eventuality.


Horatio Gates dines at the Savage Swan Tavern while the battle commences.


Two of the three militia battalions on the American left flank spring an ambush on the British Converged Light Companies, who are traversing the woods and trying to attack the American left flank.


The American battle plan was actually a very sound one, although not reflected in the eventual American loss. The Pennsylvania Brigade pitched into O'Hare's British brigade before Phillips' British brigade could reach the crossroads. The latter was hotly engaged by the Virginia brigade on the American right wing.

Phillips' British Brigade arrives on the lefthand road.
The Queen's Rangers lead O'Hare's British Brigade onto the table on the righthand road.


O'Hare's Brigade shakes out into a line of battle before it can reach the crossroads.

Phillips' British Brigade on British left wing shoots it out
with the Virginia Brigade on the American right wing.


The two sides got into a heavy firefight of close range musketry, with the Americans giving as good as they got. At one point it looked as if Gates might pull off a victory when, on Turn 4, the Queen's Rangers routed from the center of the battle line, opening up a huge gap. The British regiment to its left, the 4th Regiment of Foot, also went "shaken" from the American fire. If the Pennsylvania Brigade could exploit this gap, then victory could have been the prize.


The Pennsylvania Brigade of Continentals engages O'Hare's British Brigade near the crossroads.
The 1st Virginia (green coats) drives off the Queen's Rangers and advances into the gap created by their rout.


Phillips' fills the gap left by the rout of the Queen's Rangers by bringing
the 27th (Inniskillings) Regt. up to the crossroads.

Another view of the action between O'Hare and the Pennsylvanians.


However, the British began to pile up a string of "first fire initiatives" on Turn 5, Turn 6 and Turn 7 and the cumulative effect began to tell on the American regiments. In my rules, one side gets to fire first (based on an initiative die roll on a D10) and it follows that the other side must first pass a morale check and remove casualties received on that turn before it can fire back. This caused the American fire to diminish considerably, by virtue of fewer numbers of men firing back,  by the third straight turn of losing the first fire. 

Rout of the 2nd Virginia opens up a huge gap in the American center. Gates tries to rally the regiment.

OUTFLANKED! The 1st Pennsylvania Regiment's attrition from casualties shortens its frontage, resulting in its left flank being over-lapped by the British 5th Regiment.

The 1st Maryland Continentals were held in reserve for most of the game,
but now is their time to  support the Pennsylvania Brigade before it crumbles.


SURROUNDED! The 1st & 2nd Pennsylvania regiments are outflanked and virtually surrounded. Only the 1st Maryland regiment, coming up behind the Pennsylvanians, gives them anything but a small hope of extricating themselves from the battleline.


The Pennsylvania Brigade was shot up and shaken to a regiment. The length of the brigade's line began to shrink and this allowed the opposing British brigade of O'Hare overlap the Pennsylvanians. With the American left wing militia caving in to pressure from the Light Brigade and the Pennsylvanians near collapse in the center, I deemed that the British were going to win the battle and so I stopped the game prior to Turn 8.

On the far right flank of the American position, the 4th Virginia (green hunting shirts) and 3rd Virginia (in the smoke) have routed the British 55th Regiment and now have a wide open British left flank to attack. However, it is too late as the rest of the American army is either routing or retiring from the battlefield.


I decreed that each side would loose Strength Points, or "SPs", based on the total number of casualties divided by 30, with 30 being the average size of regiments in the game. Additionaly, the losing side, the Americans, would lose SPs for any unit that was either Routing or Shaken at the end of the game. I reasoned that such units were in no condition to escape capture by the British. As a result, the British lost 1SP from attrition while the Americans lost 4SPs from attrition or capture.

Gates had to decide whether to retreat north over the border and back to his base at Hillsboro, or take the least likely escape route to the east, towards Kingston/Little River and the Atlantic coast.  With information that Tarleton was in the rear burning down Hillsboro, and the liklihood that Cornwallis would pursue the Americans northward, Gates grabbed the option of retreating to the east. This would put the Americans out of supply, but they had three campaign turns to get back into supply before attrition started to set in.

Needless to say, Lord Cornwallis was rightly miffed when his pursuit met up with Tarleton, coming south on the same road from Hillsboro. This meant that somehow Gates had avoided the British pursuit and likely capture of his remaining SPs.

With the battle of Cheraw over, it is now on to Turn 8 (August 1780) of the South Carolina Campaign.


Sunday, October 15, 2017

Battle of Cheraw Game Map


Battle of Cheraw tabletop. American forces are on the right and British forces are on the left.
Click/double click to enlarge

The basic map of the tabletop battlefield is shown below. The British army has three brigades, of which two are marching onto the table at the start of the game. The Light Brigade (on the right) is hidden from view and is attempting to march through the woods and engage the left flank of the American army, where only some militia are posted.

The American forces begin the game already deployed on the table in three brigades as shown in the map below. The Virginia Brigade (4 regiments) is posted on the American right wing; the Pennsylvania Brigade (3 regiments and 2 x 6-pd cannon) is deployed in the center; and three regiments of militia are posted on the American left flank. A small regiment of Continental dragoons are also posted on the left flank to provide some support and inspiration to the militia, who are prone to running away.

Battle of Cheraw Deployment Map - click/double click to enlarge

Terrain Rules: All of the tabletop is covered with an open woods, which reduces movement to half speed. The exception are the open areas where there are either roads, farms or towns.

Fife & Drum Rules: I used my own Fife & Drum rules for the American Revolution. The system determines the initiative for each turn based on a D10 die roll by the commanders-in-chief of each army, with high die winning. Gates also has a minus one to each die roll while Cornwallis has a plus one for his die rolls. 

The game will last a maximum of 12 game turns. Presumably the results of the battle will be obvious to both sides. Either side may withdraw from the battlefield at the end of turn 12.

British Forces - Lt. General Lord Cornwallis commanding

Phillips' Brigade (left flank)
55th Regiment
27th Regiment
4th Regiment
one-pound amusette

O'Hare's Brigade (center)

5th Regiment
44th Regiment
Queen's Rangers
2 x 3-pound cannon
17th Light Dragoons

Ferguson's Light Brigade

1st Battalion of Converged Light Infantry Companies
2nd Battalion of Converged Light Infantry Companies
Ferguson's Rifles


American Forces - General Horatio Gates commanding

Virginia Brigade (Woffard)
1st Virginia
2nd Virginia
3rd Virginia
4th Virginia

(the Virginia Brigade regiments are all wearing hunting shirts)


Pennsylvania Brigade (Cadwalader)
1st Maryland
1st Pennsylvania
2nd Pennsylvania
2 x 6-pound cannon

Militia (Adams)
3 x regiments of militia


I will follow up with another blog posting tonight or tomorrow that describes the game results and includes lots and lots of nice color pictures.


Thursday, October 12, 2017

Setting My Table for the Battle of Cheraw


An overhead view of the battle of Cheraw battlefield. (Click the twice picture to enlarge).


The other day I cleared my game table of the detritus from my recent SYW action at Reichenbach and began setting up the terrain for the AWI battle at Cheraw, South Carolina. As you can see from the picture of the game table at the top of this page, it is rather covered by trees. I picked up this idea from the Camden battlefield, in which the troops of both armies fought largely in forested areas.

I rather like the effect achieved from using a variety of different trees, colors and sizes. The tall green trees were made by Herb Gundt and the rest are either K&M trees or Woodland Scenics trees.


A view of the wooded terrain on the battlefield.
There are three built up areas, using that term loosely: the village of Cheraw in the upper right corner of the picture; The Ray Farm in the upper left corner, and a smaller un-named farm in the lower left corner. Other than some open tilled fields and the road network, the battle will be fought in open forest areas - the undergrowth has been cleared by farmers or livestock so there is visibility through the trees. Movement speed will be reduced for units that are moving through the woods.

A view the village of Cheraw, with the black smith in the foreground and the  tavern with the window dormers.

An aerial view of Cheraw. Areas surrounded by snake rail fences are open areas - everything else is in the forested areas.

Life in the American camp outside of Cheraw. A few of the camp followers are seeking spiritual comfort.

The Benedict Ray Farmsted - an infamous gathering place of Tories.
(Road dust copy right of the Benedict Ray Foundation)


The South Carolina Campaign - Situation Update
Those of you who are searching through your reference libraries for information on this battle will be surely disappointed because Cheraw is a fictional battle that has been generated by my South Carolina Campaign of 1780. See the campaign map below - armies are allowed to move up to two dots at the start of each campaign turn. The armies also have to be in supply (that is, have an uninterupted line of dots from the army to a supply base).

South Carolina Campaign Map. Cornwallis' 8SPs have inadvertantly been left off of the map. He should be at Cheraw. (Click on the map to enlarge the view, double click for an even larger map)


The British army, led by Cornwallis, has chased down the American army commanded by Gates at the town of Cheraw, which lies near the border of North and South Carolina. And unbeknownst to Gates, his supply base at Hillsborough, North Carolina has been captured and destroyed by Banastre Tarleton's raiding force. Accordingly, Gates is caught between the proverbial rock and a hard place with British forces to his front and rear. Should he lose his battle to Cornwallis, he cannot retreat to any location where his army is still in supply and thus could lose the rest of his army through attrition.


So there is a lot at stake at Cheraw, South Carolina.


I plan on playing the Battle of Cheraw over the next several days, so there should be multiple posts over the same period of time.


Monday, October 9, 2017

A Compendium of the Charles S. Grant Publications


Two of the Charles S. Grant books from his most recent series, "Refighting History."

A Grant battle always features big battalions of 53 figures and cavalry regiments of 27 figures. The above picture depicts one of our "Batailles de l'Ancien Regime" (or BAR for short) battles last year. Our 60 figure battalions and the rules are inspired by The Wargame Rules, in part.

In the course of looking up some information in one of Charles S. Grant's books, I started to write down the various titles of his books and publications so that I could go back and find articles or stories that I might be looking for in the future. So I figured that I might as well post that list on this blog so that others could benefit from it too.

The list does not include any of Grant's books on the Napoleonic Peninsula War, Egypt or any of his books on Marlborough.

The Wargame Series

"The Wargame" - originally printed in 1971 by his father, Charles Grant, and reprinted in 2007 by Ken Trotman.

"The Wargame Companion" - (2008 - Ken Trotman) a paperback supplement to the original "The Wargame" book. This is one of my favorite Grant books because it provides a lot of the background story to the original book and is chock full of anecdotes about his Father and Peter Young that will bring you a good chuckle or two.

"The Wargame Rules" - (2012 - Ken Trotman) a paperback publication that puts all of the original rules found in the book, The Wargame, and includes all of the rules additions that the Grant family has added over the years. With all of the rules adjustments, the rules have advanced far beyond the "Old School" designation and are a modern set of rules that are a joy to read and easy to play.

Wargaming In History Series

These were a set of 12 hard cover, full color books published by Ken Trotman from 2009 through 2015. Seven of the titles were writen by Charles S. Grant and cover 18th Century topics, other than one title for the Peninsula War. The first two volumes were co-written by Phil Olley, with Grant going solo after that.

Volume 1 - Krefeld, Sandershausen and Lutterberg - 1758 (2009 - Ken Trotman).
Volume 2 - Dettingen, Fontenoy and Laufeld (2010 - Ken Trotman)
Volume 4 - Hastenbach, Rossbach and Leuthen (2011 - Ken Trotman)
Volume 5 - Minden, Kunersdorf, the Action at Torgau and Maxen
Volume 7 - Peninsular Actions (2012 - Ken Trotman)
Volume 9 - Lobositz, Reichenberg, Prague and Kolin (2013 - Ken Trotman)
Volume 11 - SYW Small Actions (2015 - Ken Trotman)

Battle Games Magazine and related Publications

"Battle Games Table Top Teasers - Volume 1"  (2008 - Battle Games Publications). 
This is a set of 12 of the Table Top Teasers that appeared in Battle Games magazine. It features a reprint of the articles, but then does something unique: employes a group of wargame writers to play the scenarios on their own and then report how their game went.  Many of the teaser reports conveyed the scenario to a completely different historical period. For example, my contribution takes a SYW action and transfers it to a battle during the American Civil War.

Battle Games Issues with Grant's Table Top Teasers

Issue 1 (March/April 2006) - Pontoon - using pontoons in river crossing scenarios.
Issue 2 (May/June 2006) - Can you demolish "The Bridge at Kronstadt"?
Issue 3 (July/August 2006) - The Tactical Use of Forests in Your Wargames
Issue 4 (September/October 2006) - Plunder and Pillage - a raid scenario to fetch supplies
[NOTE: this issue also contains a marvelous article about a refight of the Peter Young "Battle of Sittangbad" from his "Charge"book, that accurately recreates all of the forces and terrain featured in the Charge book.]

Issue 5 (November/December 2006) - Trouble on Treasure Island - a lighter Beer & Pretzels game.
Issue 6 (January/February 2007) - Napoleon's troops rob Egypt of Ancient Antiquities
Issue 7 (March/April 2007) - River Convoy, or "Messing About on the River".
Issue 8 (June/July 2007) - Seize the Pass, "The Battle of Soggy Bottom".
[NOTE: this issue also has an article about a recreation of the Grant "Mollwitz" scenario at Partizan. Grant himself participates in the game and brought all of the original plastic Spencer Smith figures that featured prominently in the book, "The Wargame".]

Issue 9 (August/September 2007) - Turning the Flank, or "Losing Two Fords".
Issue 10 (November/December 2007) - Siege Train, or "Caught on the Move".
Issue 11 (January/February 2008) - Insurgency, or "All's Well That Ends Well".
Issue 12 (March/April 2008) - Fighting rearguard actions.
Issue 13 (May/June 2008) - Fighting withdrawal, or "Over the hills and far away".
Issue 14 (July/August 2008) - Reconnaissance in Force
Issue 15 (September/October 2008) - Visitors with Intent. 3 different sides, each with own agenda.
Issue 16 (January/February 2009) - Confrontation on the Islands. Crossing 2 islands in a major river.
Issue 17 (March/April 2009) - A Dashing Rescue. A small skirmish raid style of game.
Issue 18 (July/August 2009) - Breakout! or "Tonight there's going to be a jailbreak".
Issue 19 (September/October 2009) - Gaining the Initiative (by Charlie Grant) - a battle that carries over to a second day's new action.

Issue 20 (November/December 2009) - An Affair of Outposts - an introduction to map moving.
Issue 21 (January/February 2010) - Night Moves. Preliminary action leading to main action.
Issue 22 (March/April 2010) - The Defense of Twin Peaks. A desperate rear-guard action.
Issue 23 (September/October 2010) - Cavalry Encounter. An exciting all-cavalry scenario.

Going forward, Battle Games were only numbered by issue number, without the month dating.

Issue 24 - Run on the Bank, or "A Bridge too Far?" This is the last Grant Table Top Teaser to appear in Battle Games, as Charles needed to devote more time to his growing book publishing commitments. Going forward, Battle Games used the Table Top Teaser format in a new series called "Command Challenge". Similar to TTT, but writen by different authors, including several that I wrote.


Refighting History Series

After Ken Trotman ceased publishing new books in 2015, Charles started a series of larger format hard cover, full color books that are published by Partizan Press. The first three titles (I assume that more are in the works since this is an on-going and active series) are listed below:

Volume 1 - SYW Fighting Withdrawals (2016 - Partizan Press)
Volume 2 - WAS Mollwitz, Chotusitz and Sahay (2016 - Partizan Press)
Volume 3 - WAS Hohenfriedberg, Soor and Rocoux (2016 - Partizan Press)

Charles S. Grant's Mini-campaign Series
Charles has developed and published (via Caliver Books) a series of six mini-campaigns, each of which are independent of the others. Each campaign has five Table Top Teasers that you can play linked together in a campaign, or fought as an independent scenario.

This is a nice way to fight a series of related battles in a short period of time, wherein the results of the earlier battles bear on the troop strengths of the succeeding battle. The campaigns generally involve Grant's own Grand Duchy of Lorraine (France) army fighting the Vereingte Frei Stadt or "VFS" for short (Prussia and its Electoral allies), but one could easily substitute one's own SYW armies or any other Horse and Musket period wars and armies.

"Raid on St. Michel" - (2008 - Caliver Books) a collection of 5 table top teasers.

"Annexation of Chriraz - (2008 - Caliver Books)

"The Wolfenbuttel War" - (2012 - Caliver Books) a mini-campaign based on the 1815 Waterloo Campaign, but played with SYW era armies.

"The Seige of La Crenoil" - (2013 - Caliver Books)

"Attack on the Junger" - (2014 - Partizan Press)

"Border Raid - Pillage of Procraster" - (2015 - Partizan Press)

The Wargamers' Annual

In 2009, Charles commenced publishing an annual magazine on wargaming which featured written contributions by an All-Star list of wargamers including Phil Olley, Barry Hilton, Stokes Schwartz and many, many more including, ahem, myself. I apologize for leaving anyone's name off of this short list. The magazines were probably inspired by the ones that Duncan MacFarlane did for his Wargames Illustrated publication (these were the four issues with the yellow covers). All of these new Annuals are published by Partizan Press. In 2014, Charles had so much content available that he added a second Summer Special issue for each year.

2010 - Volume 1 Annual for 2010 (78 pages)
2011 - Annual for 2011 (88 pages)
2012 - Annual for 2012 (88 pages)
2013 - Annual for 2013 (increased from 88 pages to 112 pages)
2014 - Annual for 2014 (120 pages)
2014 - Summer Special for 2014 (72 pages)
2015 - Annual for 2015 (72 pages)
2015 - Summer Special for 2015 (72 pages)
2016 - Annual for 2016  (72 pages)
(there might be a Summer Special, but I am not sure of this)


Links to Book Reviews that I have done on my blog

The following is a list of book reviews (click on the links to my blog reviews) that I have done on my blog. It looks like I need to do a few more:

Wargaming in History Volume 1

Wargaming In History Volume 4

Wargaming in History Volume 9

The Siege of La Crenoil


Conclusion

Well there you have, nearly all of the articles and books writen or published by Charles S. Grant listed in one place and at your disposal to find and peruse. For a long time I had been trying to find the TTT scenario that I finally found in Issue 17, so in the course of gathering all of the information, I happened to stumble upon the scenario, much to my joy.

There are probably a number of other Charles S. Grant articles that I have missed, notably those prior to 2008 when I first became acquaited with Charles' articles and books. I like his writing so much that I will usually buy the books sight unseen, because I know that the content therein will provide many enjoyable hours of reading or the playing of wargame scenarios. There are some other Grant articles in Practical Wargamer magazine, which is now out of print, edited and published by Stuart Asquith.

I continue to be enamored by the continuing conflict between the Grand Duchy of Lorraine and the Vereingte Frei Stadt armies. I am a bit partial to the VFS side of the frey since it has a Prussian-like quality to it. I have no doubt that there will be many more books to add to this list in the future.


mm

Saturday, October 7, 2017

Fort Donelson ACW Site

The Confederate view of the Cumberland River from one of the river batteries. The Union ironclad gunboats sailed right down the middle of the river and got hammered by the Confederate shore batteries.

This week I was had the opportunity to visit Fort Donelson National Military Battlefield located in Dover, Tennessee. I was visiting my daughter in nearby Carbondale, Illinois for her birthday and decided to take advantage of the site's proximity to pay it a visit.


Entrance to Fort Donelson National Battlefield Park.
It was about a two hour drive from Carbondale and I had to be back by 2PM, so I hit the road by 8AM so that I would have time to make the round trip and hopefully spend at least an hour at the battlefield site.

I spent about fifteen minutes at the visitors' center, which currently shares space with the local county tourist office while a new visitors' center is being constructed. There is not much to see here, but the bookshop is decent with plenty of books available for the campaign and the eventual battle.

An overview of the campaign, as provided by one of the park brochure handouts that are available to visitors:

Winter 1862 marked a turning point in the Civil War. The North finally achieved its first major victory and gained an unlikely hero nicknamed "Unconditional Surrender" Grant. The Confederacy lost control  of major rivers (the Tennessee and the Cumberland rivers) and supply lines, territory in Western Kentucky and Middle Tennessee, and over 13,000 Confederate soldiers were imprisoned in Northern prison camps.

Today, Fort Donelson National Battlefield interprets the story and the legacy of the 1862 campaign between Union forces commanded by Ulysses S. Grant and Confederate forces commanded by John Floyd and others. The National Park Service preserves the earthen fort and outer defenses, surrender site, and National Cemetary.

The Campaign -Winter of 1862

Union Brigadier General Ulysses S. Grant, a relatively unknown commander in the backwater districts of the Western Theater under the overall command of Major General Henry ('Old Brains') Halleck, endeavored to attack both Fort Henry on the Tennessee River and Fort Donelson on the Cumberland River. Both forts were within a dozen miles of each other and they commanded key points of these two rivers, both of which flowed into the heartland of the Confederacy.

Fort Henry was ill-situated on low ground that was subject to flooding and surrounded by higher ground. The Confederates had begun construction of a supporting fort, Fort Heiman, on the opposite side of the Tennessee River. The Tennessee River flows southward into the heart of the Confederacy as far as Alabama, so that gives one an idea of that river's importance in the Western Theater campaigns of the Civil War. On February 6, 1862, ironclad gunboats commanded by Flag Officer Andrew Foote approached Fort Henry and opened fire with a bombardment that lasted for an hour. Foote's gunboats moved into point blank range and pounded the fort into submission. About 2,500 Confederate soldiers escaped to nearby Fort Donelson just before General Lloyd Tilghman surrendered the fort to Foote. The action was so quick that Grant's infantry were still approaching Fort Henry from the land side prior to its surrender.

Fort Donelson was located on high ground overlooking a bend in the Cumberland River, which flowed southward to Nashville, TN.  It contained two river batteries having 12 heavy guns that effectively controlled the river. An outer defensive line protected the land side from attack. Grant took about a week to build up and consolidate his infantry force and allow time for Foote to sail his gunboats back up the Tennessee River to Paducah, Kentucky on the Ohio River, and then sail south on the Cumberland River to Fort Donelson. The idea was to stage a combined river and land assault of the fort.

On February 13, 1862, the Union army of 15,000 men began to invest the perimeter of Fort Donelson. Nightfall arrived along with bitter cold temperatures and the men on neither side could afford to build fires, given the proximity of the two lines.

On February 14th, Foote's gunboats commenced a bombardment that lasted 90 minutes, but the Confederate shore batteries were so dominant that Foote suffered much damage and had to retire back down the Cumberland River. The Confederates rejoiced at their victory, but soon it became evident that the greater danger was being starved out by the encircling Union army.

On February 15th, the Confederates organized an attack on the Union right flank with the objective of clearing an escape rout to Nashville for the Confederate army. The attack was so successful that the Union flank was bent all the way back to the middle. The rout to Nashville was now clear. Except that indecision by the Conferate high command threw away the victory when the army was ordered to return to its entrenchments rather than to execute the planned escape. Grant's counter-attack late in the afternoon restored the Union lines to their original positions and gained a lodgement in the trenches on the Confederate right flank. This would compromise the entire forward line of trenches on the following day as the Union forces could roll up the Confederate lines from an enfilading attack.

The Confederates were now completely demoralized and the army surrendered to General Grant on the morning of February 16th. A small force of Confederates, including General Nathan Bedford Forrest's cavalry, escaped during the early hours of the morning.


The Fort
Fort Donelson basically had two defensive positions. First there was the fort proper which stood guard, with 12 heavy cannon, over the bend in the Cumberland River. Since the river flows south to Nashville, Tennessee (the capital of the state of Tennessee), control of the fort gave its owner control of the river and its easy access to Nashville. The loss of Fort Donelson and Nashville was a crippling blow to Confederate control of Tennessee during the Civil War.

Confederate river battery overlooks the Cumberland River.

The fort was protected on the land side by long series of trenches and rifle pits. The trenches seen in the pictures below are those of the fort only. The forward trenches and rifle pits are on private property and thus not part of the national battlefield site. The outer works were manned by 12,000 Confederate troops under the triumvirate command of generals John Floyd, Gideon Pillow and Simon Bolivar Buckner.

Inside entrenchments of the main fort area

Confederate Command and Final Surrender
The Confederate command was rather comical, with three generals and none of them willing to step up and take charge of the situation. John Floyd was a politician turned general, who took the initial command of the fort. When the situation grew worse, he basically turned command over to Brigadier General Gideon Pillow. Pillow wanted nothing to do with the responsibility of surrendering to Grant, so he turned over the command to Simon B. Buckner. Both Floyd and Pillow legged it out of the fort and eventually escaped upriver to Nashville and left poor Brigadier General Simon Buckner holding the bag and the dishonor of surrendering the fort to  the Union general, Ulysses S. Grant. 

When Buckner asked Grant for surrender terms, he received the terse and now famous reply:

Yours of this date proposing armistace and appointment of commissioners to settle terms of capitulation is just received. No terms except unconditional and immediate surrender can be accepted. I propose to move immediately upon your works.

After the surrender, Grant telegraphed his superior, General Henry Halleck in St. Louis, that:

We have taken Fort Donelson and from 12,000 to 15,000 prisoners including Generals Buckner and Bushrod Johnson, also about 20,000 stand of arms, 48 pieces of artillery, 17 heavy guns, from 2,000 to 4,000 horses and large quantities of commissary stores.

Fort Donelson marked the first of three Confederate armies that surrendered to Grant during the Civil War (the others being Pemberton's army at Vicksburg, MS in 1863 and Lee's Army of Northern Virginia at Appomattox in 1865).

12 pound Napoleon behind the Confederate trenches
Close-up view of the Napoleon

A view down the length of one of the Confederate trenches provides and idea of the height and protection provided.


One of the Confederate batteries in the main area of Fort Donelson

Another view of the fort trenches.


This looks like a 10-pound Parrot cannon to me. You can get some perspective of the height of the trenches from this angle.


One of the large Columbiad rifled cannon in the river battery. Some old coot photo bombed the picture.

The Confederate Lower Battery overlooking the Cumberland River.

A big gun.

Some more big guns!


One of the Columbiad rifled cannon. This is allegedly the one that put the USS Carondolet out of action.

The battlefield site is interesting and well worth the visit. I had read a book titled "Grant Invades Tennessee - The 1862 Battles for Forts Henry and Donelson" by Timothy B. Smith, which I highly recommend if you have any interest in the American Civil War. The book was well written, easy to follow with some great maps, and an overall joy to read.

I only had an hour's time to visit the battlefield and limited my visit to the Confederate works. I would like to return for a visit to the surrender site at the Dover Hotel in Dover, TN and to explore some of the outer works on the Confederate left flank (Union right flank). Most of the Union lines are on private property outside of the National Park boundaries, but organizations such as the Civil War Trust have been buying up some of the property to save the ground from development. The work of the Civil War Trust is a boon to ACW history buffs and to future students of the battle going forward.


ccc