Thursday, June 30, 2022

Fourth of July Sale - 20% Discount


Fife and Drum Miniatures and Minden Miniatures is holding its first ever Fourth of July Summer Sale starting June 30, 2022 and running through July 6, 2022.


The Spirit of '76 Vignette


When you check out your shopping cart in our web store, enter the coupon code Spirit76 and the 20% discount will be automatically applied to your order.


Fife and Drum Miniatures web store link


George Washington (left) and Nathaniel Green (right)


General Nathaniel Green and 1st Continental Dragoon Standard Bearer


Mounted American Militia
Fife and Drum Miniatures

AWI Hessian Musketeers
Fife and Drum Miniatures


SYW Minden Personality Figures.
French Marshall Broglie (left) and Lt. General Chevert (right)

Minden Austrian Cuirassiers

French Marshall Maurice de Saxe

Minden Miniatures Prussian Musketeers


Minden Miniatures French Fusiliers


vvv


Tuesday, June 28, 2022

Prussian Guard Grenadiers (painted unit)


Third battalion of the Prussian Guards (IR15/III) - Minden Miniatures


CLICK ON ALL PICTURES TO ENLARGE


I finished, finally, the painting and basing of the third battalion of the Prussian Guard infantry during the Seven Years War. It's numeral designation was IR15/III meaning that it was the third battalion of the regiment numbered "15" in the Prussian establishment.

The first battalion was the ceremonial battalion with all of the fancy and expensive uniform lace. They appeared in only one SYW battle (Kolin), spending the rest of the war stationed at the royal residence at Potsdam.

The second battalion (IR15/II) wore tricorn hats and the third battalion (IR15/III) wore grenadier miters. Regardless of the type of headgear that they wore, all guards were considered to be grenadiers.

Here is a link to the Kronoskaf site for more information on the Guards Regiment. IR15 Prussian Guards


Here are two views of the battalion from the rear ( I have removed two of the stands from the unit so that it would be easier to take a photograph).


As per my new basing system, the figures are mounted on 3mm thick MDF bases that measure 60mm frontage and 80mm depth. The stands hold either 8 or 9 figures. The officers, NCOs and musicians form a third rank. Flags are from GMB Designs.

Here are pictures of the full battalion with five stands of figures. My recollection is that there are 44 figures in this one battalion compared to my line regiments' strength of 32-34 figures.


Both the Guard musketeers and grenadiers are available from Minden Miniatures as distinct castings (these are not line regiment figures converted with paint). The main distinction between the line and guard units is that the Guards wore an aigulette on their right shoulder.

Here is a link to the Fife and Drum Miniatures web store Prussian figures section of the catalog.

Minden Prussian figures

The relevant product codes are:

MP-020 Prussian Guard Command in Tricorn Hats  

MP-021 Prussian Guards in Tricorn Hats

MP-022 Prussian Guard Command in Grenadier Miters

MP-023 Prussian Guards in Grenadier Miters


I Am The Bagman


50 kilos of metal

Yesterday three boxes of metal castings arrived from Griffin Moulds and I spent the better part of today breaking down the bags and rebagging them into their retail packaging. For example, a bag of infantry contains 16 figures, which equals the number of figures in the mould. So if a retail SKU has eight figures then I break down the bag and put 8 figures into two separate bags. Then I staple a header card onto each bag.

You can imagine how tedious this work can be, but it is necessary in preparation for my Fourth of July Weekend Summer sale which will start on Friday July 1, 2022. Stay tuned for more information on this sale, including the discount coupon code to enter when you check out your shopping cart.


Wednesday, June 22, 2022

Picture of the Week: Leuthen Churchyard


Click on pictures to enlarge.


Here is a picture of one of my favorite pieces of war gaming terrain in my collection. It is a model of the Leuthen Church in the Winter. Herb Gundt made the church and buildings, complete with snow on the roofs, as well as all of the roads and trees that you see in the picture.

The picture was snapped at the Seven Years War Association Convention, circa 2007.

The buildings were designed with lift off roofs to allow for skirmish gaming. As a matter of fact, my thought when I commissioned this terrain was to run a skirmish level attack of the Prussian Guards on the churchyard, defended by the Rot Wurzburg regiment.  


Here is another view of the church and the surrounding buildings in winter mufti:


In the above picture you can see some of the firing steps that Herb made so that figures could stand at the walls and be able to look over the top. Most of the Austrian figures are from Crusader Miniatures while the Prussians are a mix of Stadden, Suren, Elite Miniatures, and Crusader Miniatures.


Monday, June 20, 2022

Kolin at the 2018 SYW Convention


Der Alte Fritz, Himself, (right) supervises the action in his domain.

In 2018 I ran my Kolin scenario again at the Seven Years War Convention in South Bend, Indiana. The Austrians prevailed again as their left wing descended the Pohbor Hill and overwhelmed the Prussian refused right flank with their sheer numbers. The contest was somewhat even in the center of the battlefield near Chosenitz, while the Prussians were mopping up the Austrian cavalry near the Oak Wood, on the Austrian right flank. The pictures below tell the story of the battle. Please click once or twice on each picture to enlarge the view.


Hulsen's Prussian Advance Guard Deploys in Front of Krechor

Hulsen's Prussian advance on the village of Krechor and drive out the defending Croats.


Croats have decided to leg it out of Krechor rather than face the bayonets of Prussian grenadiers.


Austrian right flank. Saxon cavalry and Austrian light cavalry deploy to the right of the Oak Wood


Treskow's Prussians march down the Kaiserstrasse to support Hulsen's attack

Austrian right wing, anchored on Krechor and the Oak Wood.


Prussian right wing - refused flank - pause near the Inn of Slati Slunce


Zieten's Prussian cavalry cover the left flank of Hulsen's attack.


Seydlitz leads the Prussian cavalry to route the Austrians in the Oak Wood.


Action in and around the Oak Wood near Krechor


A huge cavalry melee breaks out on the Austrian right (Prussian left) flank.


Meanwhile in the center, Treskow's brigade advances towards Chosenitz instead of supporting Hulsen's attack.


Austrians on the left flank decide to descend the high ground attack the Prussian refused flank.


In fact the entire Austrian left wing goes on the attack and look
to overwhelm the Prussian refused flank with their advantage in numbers.


A rather complicated melee for the game judge to work out
as the Austrian cavalry go  all in on the Prussian cavalry.


Thursday, June 16, 2022

June 18, 1757 Battle of Kolin


First battalion of the Prussian Guard (IR15/I) being overrun by Austrian cavalry for the third time of the day.

It is interesting that two great battles were fought on the same day in June (June 18th), albeit in different years: 1757 for the Battle of Kolin and 1815 for the Battle of Waterloo. In the grand scheme of history Waterloo was probably the more noteworthy battle and had a greater impact on western European history than did Kolin. 

Here are some links to websites that have information about the battle. The best site is the Obscure Battles blog - I mean it is downright fantastic and well worth the look. Everything that you would want to know about Kolin is here. The Kronoskaf site is also very good while the Wikipedia link provides a minimal overview of the battle.

Battle of Kolin - Wikipedia


Obscure Battles -Kolin


Kronoskaf - Battle of Kolin


I have war-gamed the Battle of Kolin more times than I can remember and usually the Austrians follow history and win the game. I can think of only one time when the Prussians have won Kolin in a wargame.

Here are some pictures of the Kolin game played at Chez Fritz a few years ago. The Austrian and Prussians  fought to a draw this time. I suppose that one could opine that a "draw" favors the Austrians? All figures shown are Minden Miniatures. The buildings were made by Herb Gundt. I have also provided the link to the full report of this game that I posted on my blog on June 21, 2015.


Kolin Wargame in 2015


Croats defending Krechor village

The Prussian army marches down the Kaiserstrasse

Hulsen's advance guard is deployed and ready to kick off the game,

Austrian division of Sincere marches to reinforce the position at Krechor.


Austrian artillery drops trail on the Krechor Hill near Chosenitz


Hulsen's Prussian advance guard has captured Krechor village and advance
towards the Oak Wood where they encounter the Austrian division of Wied.

Seydlitz leads the Prussian cuirassiers in counter-attack.

A grand cavalry melee develops on the Austrian right flank near the Oak Wood.
Austrians on the left, and Prussians on the right.

Treskow's Prussian brigade reinforces Hulsen's advance guard and take control of the Oak Wood.
Wied's Austrians have routed, but Sincere's division arrives on
Krechor Hill, but are vastly outnumbered by the Prussians,

Here are some links to earlier posts about the Battle of Kolin that I ran as a solo play test in May 2015.  The game was the prelude to the game that we fought on June 21, 2015. This solo game resulted in a Prussian victory. Honestly, I played it straight and didn't favor the Prussians. When I play a solo game, each turn I ask myself what type of move best favors the Austrians and what type of move best favors the Prussians. This generally results in a balanced and unpredictable wargame.


Battle In The Oak Wood     (May 14, 2015)


Grand Cavalry Melee At Kolin  (May 10, 2015)


Hulsen's Advance Guard Attacks Krechor  (May 9, 2015)


So Happy Kolin Day everyone! A great day for Austria and a bad day for Prussia.

Saturday, June 11, 2022

Painting & Basing Methods Tutorial


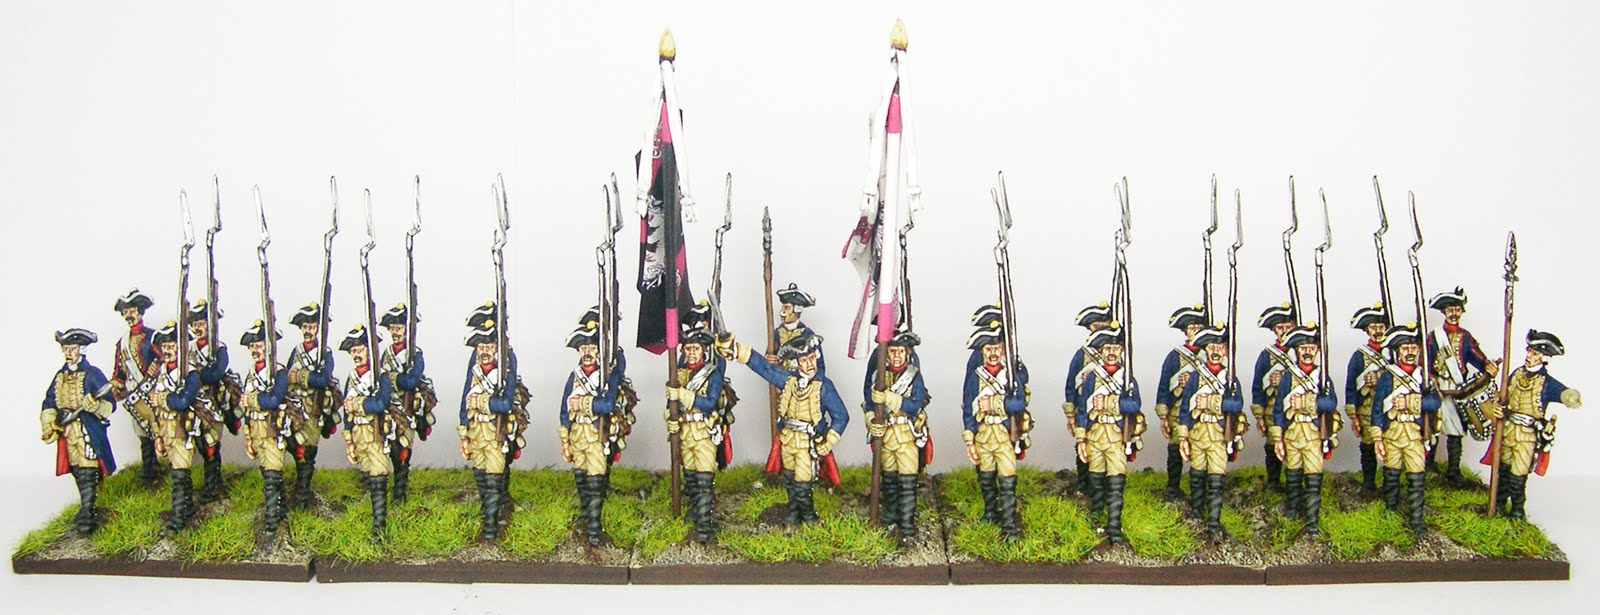
Newly painted third battalion of the Prussian Guards, wearing mitre hats.
The second battalion wore tricorn hats.


CLICK OR DOUBLE CLICK ON ALL PICTURES TO ENLARGE


Yesterday I finished painting a 42-figure unit of the 15/III third battalion of the Prussian Guards for my Seven Years War army. The unit had been sitting on the painting table for several months now and I just couldn't find the gumption to finish them off. So I decided that enough was enough and it was time to finally get them finished and on the game table. 


Front view of the Guards unit.


Rear view of the Guards. The officers and NCOs form a third rank to the line.

I had previously painted the second battalion of the Guards - they wore tricorn hats whilst the third battalion wore grenadier miters. The first battalion was the ceremonial guard unit that only saw action at the Battle of Kolin during the Seven Years War. The second and third battalions saw a lot of action over the course of the war. All of the figures, both second and third battalions, are Minden Miniatures figures that are specifically sculpted to the uniform details of the guards battalions.

I really had to power through the project at first, but eventually momentum kicked in and I started to make progress on the final 20 figures that I needed. The early stages of my painting method gets very tedious, especially when it comes around to painting all of the black bits on the figure. Here is step by step list of how I paint my figures:

1. prime the figures with a light grey color of spray primer. The Vallejo "Wolf Grey" is my favorite.

2. paint the skin areas an undercoating of red brown

3. paint the uniform coat a dark navy blue

4. paint the small clothes next (waistcoat and breeches) a dark yellow

5. paint the red facings (cuffs, lapels, turnbacks and collars)

Now comes the hard part, painting the equipment a black undercoat

6. paint black to all of the equipment such as cross belts, bread bags, knap sacks, water bottles, muskets, scabbards, gaitors, and headgear. This stage takes about 5 minutes per figure, but it becomes extremely tedious after the first couple of figures. I use black as an undercoat for anything that I paint brown or white.

At this point, most of the major colors are "blocked in" and cover the entire figure with various paint colors. Now I advance to applying highlights and details such as buttons and facial features .

7. paint a tan skin or ruddy flesh color over the red brown skin areas, leaving the red brown undercoat showing in the eye sockets and mustache.

8. paint the knapsack and musket dark brown.

9. block in the cross belts and bread bag with a light grey color

10. apply highlight colors on the blue coat, red facings and yellow small clothes.

11. apply white to the cross belts and bread bag.

12. paint the mitre plate on the grenadier mitre silver, paint the cartridge box emblem silver and paint the buttons and lace silver. Anything that has a metallic color must always have a black undercoat in order to make the metallic color be noticeable and have a "pop".

13. paint the musket barrel and water bottle a pewter color. I really do not like painting musket barrels and bayonets for some reason, so this stage is rather tedious for me.

14. paint the buckles, musket butt, sword hilts and scabbard tips Old Gold or brass.

15. (optional) paint all of the leg gaitor buttons with the Old Gold color. Again, this is a tedious step.

16. Add a skin color highlight, touching a small dot on the chin, bridge of the nose and cheeks. Hands get two stripes of highlight on the broad part of the hand. I generally do not paint knuckles. That is borderline ridiculous. 

17. (optional) add another highlight red color. This is generally not necessary but it sometimes provides a color "pop" to the lapels.

18. paint the base dark green

The figure is finished at this point. Note that I do not paint eyes anymore, other than to put a black dot in the eye socket sometimes, nor do I highlight anything that I've painted black. I mean, black is black and it doesn't really lend itself to highlighting. My one exception to the "no black highlighting" rule is horse manes/tails and black horses. I mix a bit of flesh color to a basic black which produces a very dark grey color, which I use sparingly.

And that's how I paint my wargame figures. Once I have passed Step 12 then things seem to speed up and the feeling of tedium passes. I like painting the details on my figures because these seem to bring the figures alive.

Once all of the painting is completed then I move on to basing the figures. I use either MDF bases or buy thin plywood bases from Litko Bases. I glue the figures to the wood using white "Elmer's Glue" and let the glue dry overnight.

Next, I trowel in the "mud", which is a goop made of premixed wallboard paste (get the light paste and not the heavy paste - you can tell the difference just by picking up the quart container by hand). I like the Red Devil Pre-mixed Spackle Compound brand the best. I stir in a dark brown acrylic paint to the Spackle and stir it up until all of the white Spackle color is gone, with the final mix looking like chocolate pudding (but don't eat it!). I use a tiny artists' palette knife or scalpel to trowel the goop between the figures. Sometimes a toothpick or an old paint brush are used to get the goop between the feet of the figures.

While the goop is still wet, I dunk the base into a tray of extra fine railroad ballast made by Woodland Scenics. Then I let the base dry over night.

The next day I stir up some highlight colors and dry brush the paint over the bases. I might use two or three different highlight colors until I get something that looks right to my eye.

Now comes the foliage. I glue on pieces of tufts, which are long clumps of grass. Army Painter makes a nice variety of tuft colors. I use Swamp Grass tufts for the most part. I let the white glue dry for about an hour and then add static grass to the base. Let the tufts dry before you glue on the static grass, otherwise some of the static grass will adhere to the glue on the tufts and, well you won't like how that looks so it's better to let the tufts dry for a short while. You can also add flowers tufts and bits of ground clutter at this stage, if you like.

Now I paint white glue randomly on the base of the figures and dip the base into a tray of static grass, or I sprinkle the static grass onto the base. Then I turn the base sideways and tap the back of the base to remove excess static grass. Then I blow on the top of the base to make the static grass stand up.

The bases are now finished and the final step is to give everything a spritz spray of matte finish (Dull Kote or similar brands). Actually, oftentimes I spray the figures before I start adding the goop to the bases. One note of caution - if you are using GMB Designs flags or similar brands of pre-printed flags, I'd recommend spraying the flag bearer(s) separately, then all of the other figures get sprayed, and then you glue your flags to the flag poles. Then you glue the figures to the bases and then trowel on the goop. Some people like to spray the matte finish to the grassed bases but I don't find this to be a necessary step. Do be careful though to NOT SPRAY YOUR FLAGS with matte or gloss spray because the sprays make the ink colors run.


With the completion of the third battalion of the guards I now have seven units for my War of Austrian Succession Prussian army consisting of the following units:

IR1 Winterfeldt musketeers - 2 battalions

IR18 Prinz von Preussen musketeers - 2 battalions

IR15/II second battalion of the Guards - 1 battalion

IR15/III third battalion of the Guards - 1 battalion

Bornstadt Grenadier Battalion (5/20) - battalion

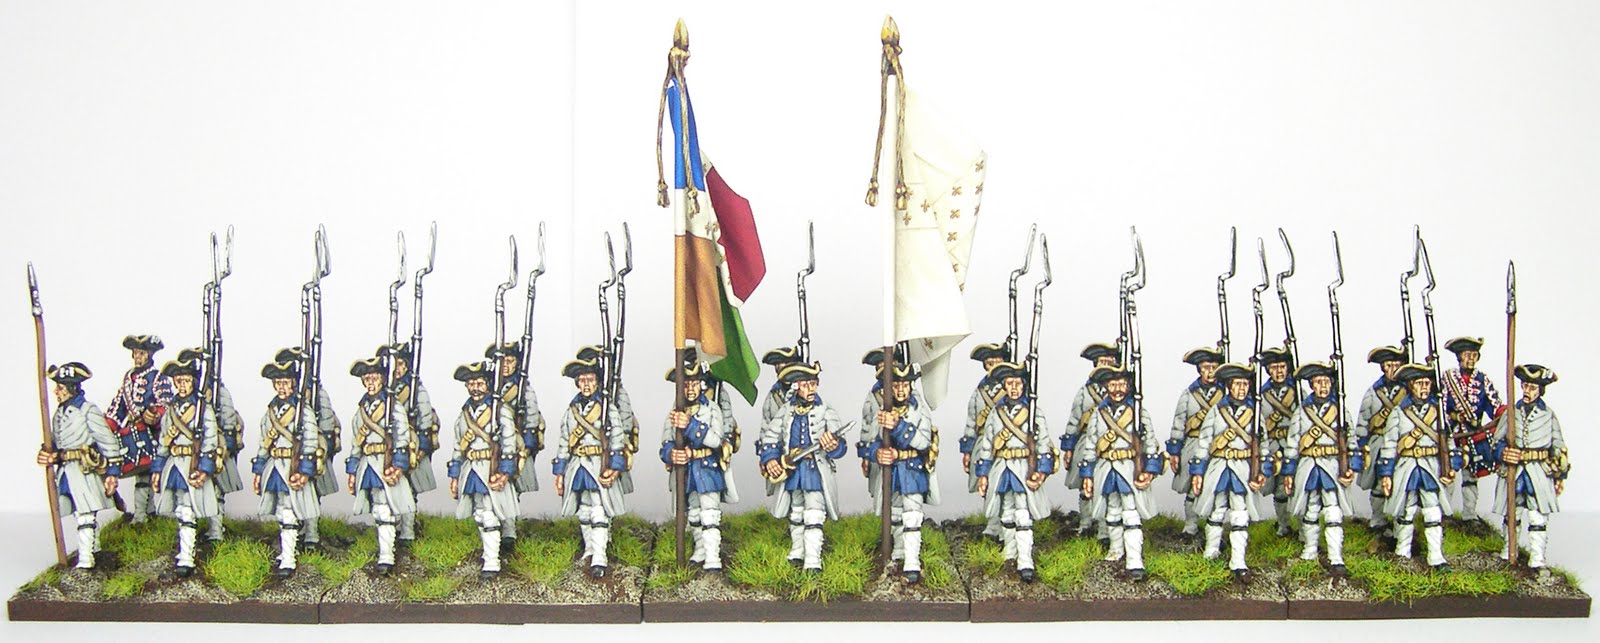
Plus the 36-figure Bayreuth Dragoons in white coats cavalry regiment.


Next on the painting table: Austrian Grenadier Battalion with 32 to 36 figures.

Tuesday, June 7, 2022

Picture of the Week - Prussian General Staff


This is one of my favorite pictures of all of the Prussian personality figures in the Minden Miniatures figure range.

From left to right: Zieten and courier; Prinz Moritz (back row left); Frederick with some of the officers on foot pack (PER-001); the PER-001 pack of officers on foot; Seydlitz in the back row right. As you can see, I like to mix in some of the figures from the PER-001 pack to create little vignettes on my command stands.

Sunday, June 5, 2022

I've Gotta Have More Windmill!


A group of Prussian officers meet atop of Windmill Hill to get a better view of the battlefield.


Click on all pictures to enlarge 


As Phil Olley once said to me, "Jim, every game table needs to have a windmill" and I have to say that I agree with Phil. I have quite a collection of windmills: two for Europe, one for Colonial America, one for Spain, and one for the Winter season in Europe (part of my Leuthen Winter terrain).


The windmill in these pictures was made by Ian Weekley back in the late 1980s and I think that it holds up very well to today's standards of model making.


Prussian officers and staff try to figure out where they are.

The dismounted dragoon looking through his spy glass is a conversion that I made from a Prussian Jager in the standing firing position. I cut off and carved out the carbine, did some work on the hands with green stuff, and then made a spy glass from a piece of flag pole cut off that I had in the Bits Box.

The general on the left is an RSM figure with a Minden horse holder figure. The general on the right is a Minden figure with a RSM officer pointing. Behind the mounted officer stands you can see a group of Prussian staffers looking at a map (PER-001 set in the Minden range). The gentleman standing on the windmill platform is a Fife and Drum Hessian officer.


I think that you would have to agree that the windmill in this scene 
enhances the visual appearance of the table top

So to paraphrase Christopher Walken, "I gotta have more windmill" any time I set up a table top battlefield. LOL!