 |
| British Heliograph & Signal Corps team and Indian screw gun (Little Legion 54mm toy soldiers) |
NOTE: click or double click all pictures to enlarge the view. They are spectacular when you look at the full size picture.
Yesterday six of us gathered in the cellar of Schloss Seewald to play with our toy soldiers, um I mean, to conduct a serious study and re-enactment of the Battle of El Teb, complete with all of the excruciating fine details.
Nah, we were just having some fun with our toy soldier collections. It is nice to get the big 54mm figures out on the tabletop every once in awhile because they are fun to play with and they photograph nicely. This was a real visual treat.
El Teb was fought in the eastern Sudan on February 24, 1884 between the British force commanded by Lt. General Sir Gerald Graham, VC. and the Mahdist forces commanded by the wily Osman Digna. Historically, the battle was a British victory and was also the first encounter with the Dervish. Enough of the potted history, let's get on with the wargaming! The story will be told through the picture captions of the pictures below.
 |
| British scouting outpost established to the east of Suakin. Its apparent isolation was to be the bait that would draw Osman Digna to battle. |
 |
| The view towards the village of El Teb as seen from the British outpost. |
 |
| Dervish camel riders observe the goings on in the British camp. |
 |
| A patrol of Camel Corps signal back to the camp that they have found Osman Digna's army. The Camel Corps mounted figures are from Red Box Miniatures and the foot soldiers are from Little Legion. |
A scouting patrol of Camel Corps was sent out into the desert from the outpost to see if they could find any signs of Osman Digna's army of Beja, Haddendowa and other Eastern Sudan tribes. These were the famed and fierce "Fuzzy Wuzzies", so named due to their distinct hair style.
With the location of Osman Digna's army, General Graham ordered the brigades of Sinclair (newly promoted to brigadier general from colonel) and Sir Charles Barclay to advance towards El Teb and attempt to attack the Dervish on their left flank. Sinclair's brigade square would lead the advance, with Barclay's brigade square initially "refused" on the right flank.
 |
| Captured Krupp gun and Egyptian gun crew overseen by several Dervish to provide "encouragement". This gun played havoc on the British forces as they marched towards El Teb. |
In our previous game, the Dervish howled and complained about the lack of artillery in their army. So being the Good Host that I am, I drafted an Egyptian Krupp gun crew into Osman Digna's army and added a couple of Dervish officers to keep the Egyptians from running away.
This sole gun seemed to have Sinclair's Brigade zeroed in with its sites all day and I lost the majority of my casualties from the artillery fire of this one gun. Yikes! I don't care to run into that death machine again. My Gatling Guns did not have the range to reply to the Krupp's fire for several turns. So I sent a company of skirmishers out ahead of the square and they were able to mow down 3 of the 4 gun crew (the Dervish officers having bolted before the British skirmishers fired), causing the Krupp to fall back below the crest of the ridge where they were deployed.
 |
| An abandoned sugar refinery - the boiler is all that remains, but the site provides good cover for Dervish riflemen. |
 |
| Brigadier General Sinclair's square of Camel Corps and the York & Lancaster Regiment, augmented by some Naval gun crews manning the Gatling Guns. These figures are the Britains "War on the Nile" range of large matte painted figures. |
 |
| A close up (a Selfie?) picture of one of the Navy Gatling Guns (Trophy Miniatures) and the Camel Corps. |
 |
| A 16-figure squadron of the 21st Lancers were all the cavalry that the British had today. They protected the rear of my square for much of the game, enabling me to keep one side of the square open so that I could place more men in the firing line. The Lancers are Britains figures. |
 |
| Bill Protz sets up the second square of British infantry: Marines Light Companies, Naval Ratings (sailors), and several companies of Black Watch and Gordon Highlanders. |
Most of the figures used in the game were single figures and not mounted on any kind of a movement base or tray. Bill and I were getting fairly adept and moving our British figures with speed and it was no big deal to move 100+ figures each turn.
One of the Dervish players (scheduled as such) asked if he could have a British command, so we carved out a few units of Camelry and Sudanese regulars for him, also giving him most of our artillery pieces to game with. He did a rather fine job of holding down the British right flank against overwhelming Dervish numbers, although by the end of the game, the Dervish were about to move into the British camp.
 |
| A small Sudanese command in the Imperial service. Approximately 35 figures consisting of Aylmer and Trophy Miniatures figures. |
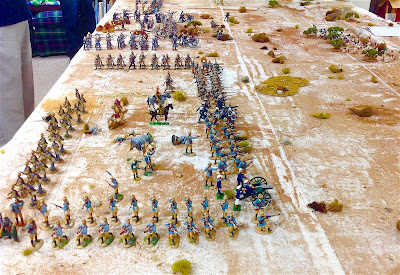 |
| An overhead view of the British squares forming up. Sinclair's square is in the foreground and Colonel Barclay's second square is forming up in the background. |
 |
| Barclay's square begins its advance across the tabletop. Figures are from Britains and John Jenkins Designs. A few single King & Country personality figures are sprinkled in amongst the troops |
It took the two British squares maybe four turns to advance towards the center of the table. We halted our advance in front of the ridge where the Krupp gun had been deployed, figuring that the whole Dervish army must be hidden on the other side of the ridge.
And they were:
 |
| The first wave of Dervish attack Sinclair's square and are largely whittled down by gun fire before they can get within melee range. The Beja are easily driven off. |
 |
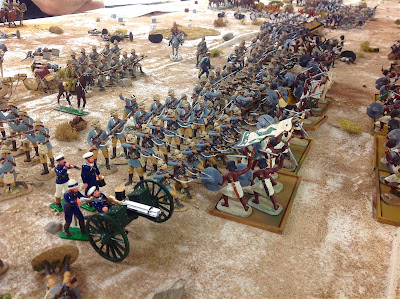
| But this is different! A wave of fierce Beja and Hadendowa warriors crash into the York and Lancaster Regiment. Many of the Beja warriors are plastic figures from Armies in Plastic. |
We were feeling rather cocky at this point in the game, having driven off two major Dervish attacks. It was then that the Mahdists remembered that they had a large contingent of River Arabs, perhaps as much as 25% of their entire army. I allowed them to have the Arabs arrive at ANY point along the table edge and how do you think that they repaid my kindness? Why of course, sending them ALL after Sinclair's command (me). I felt like the poor colonel in the Normandy beach bunker when he first sees the allied invasion fleet in front of them - THEY ARE ALL COMING AT ME!!!!!!
The British had little in the way of reserves that could be used to shore up the right flank, save for the squadron of the 21st Lancers. Sinclair cobbled a weak defensive line facing to the right, hoping to at least slow down the expected Arab assault. The Lancers would have to pull a forelorn hope charge into the Arab infantry (well it worked for Winston Churchill at Omdurman) with the hope of scattering them before they could attack.
You can see the awfullness in the pictures below.
 |
| Late in the day, after most of the Beja have been driven off, a new threat arrives on the British right flank. There is a risk that the Arab river tribesmen might roll up the British army from its right flank. |
 |
| A few scattered remnants of the Camel Corps and the York & Lancaster regiment throw up a last ditch defensive position on the army's right flank. These are desperate times! |
The above picture is one of my favorite snap shots of the day. You can almost feel the sense of desperation as a few soldiers crouch down behind their kneeling camels. They also have one Camel Corps Gatling Gun at their disposal. There are a number of instances where the Dervish broke a British square, but the British soldiers were able to rally behind all of the camel baggage train that was placed in the center of the square.
 |
| The Arabs commence their advance around the right flank of the British. |
We actually ran out of time so we will never know how the remnants of Sinclair's brigade would ahve fared against a hoard of 80+ Arab figures. Barclay's brigade was engaged with another hoard of Beja, who had rallied and were coming on for a third attack. So they would not be able to assist Sinclair.
Who won? I can't say for certain, but we all had fun playing the game, so everyone was a winner in my book.
 |
| One of the hazzards of playing with toy soldiers - a good solid bump of the table with one's knee can send a line of troops tumbling into the sand. The 21st Lancers are Britains figures. |
The Butcher's Bill: I didn't keep track of the Dervish casualties but in my own brigade of around 100 figures I lost 45 killed or wounded or missing. That is a fairly high casualty percentage and reflects the number o melees that I was in. Approximately 15 casualties were sustained from the Krupp gun before I could even close with the Dervish. I think that Bill suffered a similar percentage of casualties in his brigade.
York and Lancaster Regt. = 19 casualties out of 60 figures
Camel Corps = 22 casualties out of 46 figures
Naval Crew = 4 casualties out of 8 figures (one gun was wiped out- 4 figure crews)
The Next Day: This morning, rather than putting all of my soldiers away in their boxes, I decided to set up a diorama of a British square under attack from the Dervish. I will leave this setup for a week or so and then take it down so that I can set up some European scenary for 28mm Seven Years War games.
 |
| This morning, after clearing the battle debris off of the table, I set up a new square of just my troops: York & Lancaster Regiment and the Camel Corps. |


