
Sunday, May 16, 2010

IR49 Diericke Fusiliers


IR49 von Diericke fusilier regiment - first battalion (Minden Miniatures). Click pix to enlarge. Double click for a really close up look.

I finished my first battalion of Minden SYW Prussian fusiliers late friday evening and finally finished the basing and the flaging of the unit yesterday. For my first fusilier regiment, I decided to paint IR49 von Diericke for the sole reason that I like the regiment's unique orange breeches and waistcoat. Add to that that GMB Designs makes a very cool looking set of flags for this regiment, and the choice to paint IR49 was an easy one to make, to say the least.
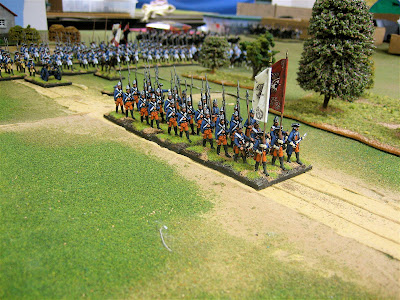

IR49 shown in a column, providing a closer look at those nice GMB Designs flags.

Originally, I was contemplating only having one battalion of fusiliers, or possibly painting only one battalion of IR49 and one battalion of IR40 (in pink small clothes for added color) to maximize the color variations in my SYW Prussian army. However, I really like the way that this battalion turned out. The orange is very striking and is also very different from the standard white or straw small clothes worn by most regiments. Undoubtedly, I will have to order some more figures and paint the second battalion of the regiment. I always say that a good plan can still be adjusted in mid-course, and so I will have a full regiment of IR49 fusiliers in my Prussian army.
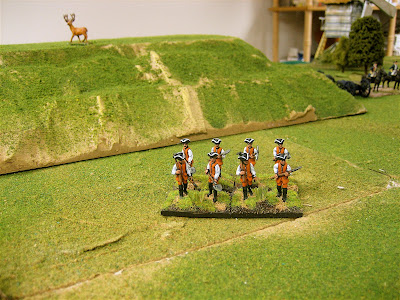

Minden labourers painted as Prussian pioneers.

I have been using the Minden generic labourers as everything but pioneers, so I finally decided to paint a few of them as what they were meant to be - pioneers. I placed two figures on each stand 40mm by 30mm. I will paint at least 12 figures as pioneers and eventually increase the unit up to 20 or 24 figures. These can be used for digging field entrenchments, seige works or as for use as a pontoon corps to go with my Berlin Zinnfiguren pontoon wagons. They make a nice complement to my growing artillery park and technical corps.

Within the next couple of days I will post some pictures of an artillery battery with its full complement of crew, matrosses and supply wagons. I have been going back and forth in my mind about the size the bases to use. My original idea was to use 40mm wide bases, but after looking at the artillery vignettes on their 60mm wide bases, I have grown to like and appreciate the wider bases.

Sunday, May 9, 2010

The 200,000 Visitor Milestone Is Reached


The Minden Prussian army turned out on the marchfeldt today to fire a salute in honor of the 200 thousandth visitor to the site today. Click on the pictures to view the proceedings up close. Double click for an even closer view.

At approximately noon today, Sunday May 9, 2010, the 200,000th visitor to this blog paid a visit to see what was going on at Der Alte Fritz Journal. I never imagined that this little blog would attract so many visitors in such a short time. I want to thank everyone for taking the time to look at my pictures and read my musings on the wargame hobby. I am honored to have so many wonderful readers.


To celebrate the passing of this milestone, the color bearers of the Prussian Regiments (left to right) IR13 Itzenplitz, IR5 Alt Braunschweig, and IR1 Winterfeldt presented their colors to King Friedrich II and Major General von Winterfeldt on the marchfeld.

It seems that most of 2010 will be devoted to my Minden Project covering the armies of Austria and Prussian using Minden Miniatures 1/56 scale figures. As of this writing, I have completed 8 Prussian battalions and four sections of 12-pound artillery, plus a dozen Bayreuth Dragoons. I would imagine that if all goes according to plan, that I will begin to tackle the Austrian army starting in July 2010.

My latest addition to the Prussian army is the second battalion of IR13 Itzenplitz, which is pictured below.


The complete IR13 Itzenplitz Regiment on review. I haven't added the flags for the second battalion yet, so I will not base the command stand until the new flags arrive. I like to Dull Kote the figures, but the flags are added after the Dull Kote is sprayed on so as not to fog up the flags.

I finished the second battalion on Saturday and prepared to base the battalion that afternoon. To my horror, I discovered that I did not have a set of GMB Flags for IR13 - second battalion, which would have two black flags. I was sure that I had some duplicates in my hoard of GMB Flags that I have accumulated over the past couple of years, but alas, no IR13. So I fired off an order to Grahame Black and hopefully the flags will soon be on their way, provided that darn volcano doesn't interfere with things again.

I really had a hard time getting this second battalion of Itzenplitz completed. The unit had been sitting on my painting table for a couple of weeks as I delved into creating vignettes. There is something about those all white facings that just didn't appeal to me. I prefer red or straw when it comes to painting Prussians. Oddly enough, Itzenplitz was one of the best regiments in the army, and it has a rather spiffy looking regimental flag - all in black, sure to strike terror into the hearts of the Austrians.

This evening I primed up 30 fusilier figures for IR49 and plan to start painting them this week. I also put together some of the pioneer figures so that I could increase the pioneer company from 2 to 12 figures, and also plan to add some more artillery labourers to my artillery park. So I have replenished my inventory of primed Minden figures and am ready to finish off the month of May with IR49 and a few other goodies for the table top.


c


s

Saturday, May 8, 2010

Supply Wagon & Pioneers


Artillery & crew (left), matross stand (center) and supply wagon (right) will make up my artillery batteries in my Minden Project.

I have been working on some Front Rank ammunition wagons from their 18th Century equipment range and the picture above gives you some idea as to how I will eventually organize my artillery batteries for the Minden Project armies. A battery will consist of two gun models, a small stand of matrosses to drag the guns back into place, and finally, a supply wagon that will set on the table perpendicular to the gun models. This will provide the necessary depth to depict all of the equipment that is placed behind the battery in the field. There will also be limber teams.

The picture above provides a general impression of how it all might look, although I haven't painted any extra matrosses for the middle stands yet. The actual artillery pieces will be Berlin Zinnfiguren 12 pounders with Minden Prussian artillery crewmen in blue coats.


A picture of the Front Rank wagon. Minden drover, artillery crewman carrying a round, and a Minden horse holder walking alongside the wagon. A stack of powder bags completes the vignette.


Minden pioneers painted as IR49 Prussian pioneers. I really like their orange waistcoats and breeches, although the pioneers actually wore fusilier mitre hats. Still, they look very nifty.

I like the way the pioneer figures turned out in the above picture. My plan is to base them two per stand and have approximately ten or twenty figures for pioneer work. Thus a few stands could be working on constructing gun emplacements, filling gabions or working on pontoon bridges.

This has inspired me to paint a unit of Minden Prussian fusiliers next, as IR49, the pioneer regiment. This was eventually turned into a regular fusilier regiment for battlefield use when Frederick needed the extra manpower to fight on the field.

At some point on Sunday morning, the 200,000th visitor will have visited the Der Alte Fritz Journal. We were about 170 visits short of that milestone as I entered this posting this evening. Thank you everyone for your support. It is much appreciated.

Thursday, May 6, 2010

Dragoon Vignette Painted


Dragoon officer (center) dismounted peering through his spyglass while on recon. Previous dragoon vignettes are shown with the new model, in situ.

I was able to paint the dragoon vignette this evening, having had the foresight to prime all of the figures last night. I opted for the smaller round base that I use for my command figures, mainly because Mrs. Fritz liked the smaller base better than the larger base. I also decided not to include any other foot figures on the stand. I kind of like the tighter look to the officer vignette and in theory I could use this as a command stand.


A picture of the dragoon officer by himself. The fence is from Irregular Miniatures, the horse is from RSM, and the dragoon officer is a Minden Prussian jager standing firing, that I have converted.

Tomorrow night I can apply the brown ink to the base and after the ink dries, apply the static grass. So it is a couple of steps away from being finished.

Tuesday, May 4, 2010

Dragoon Conversion


Minden Jager turned into a dragoon officer, with RSM standing horse tied to an Irregular Miniatures rustic fence post.

I have been looking at the Minden Prussian jager standing firing and have decided that he would be a suitable candidate for a conversion project. I envisioned cutting out the jager's rifle and substituting a spyglass or telescope and turning him into a dragoon officer on recon.

The jager/dragoon conversion was fairly simple to do. At first, I tried to just cut out the rifle and use both arms/hands. Sometimes you can make a good conversion by simply bending arms and heads and doing some minor cutting under the arm pit or at the elbows. But in this case, it was apparent to me that the bend in the right arm would be unnatural. So I decided on an amputation.

Once I sawed off the right arm, I filed the stub flat and then drilled a hole in the shoulder socket. Here I cut off a pin to 12mm, the same length as the now discarded arm, and glued it into the hole. Once the glue dried, then I applied a sausage roll of green epoxy putty and shaped the arm until it looked about right. Then a small flat piece of putty was rolled out to create the cuff of the gauntlet and the right hand. This worked out much better than the hand conversion that I attempted on Marshal Schwerin last week.


RSM horse with epoxy putty horse furniture added.

I used the standing horse from the RSM range to create a saddled horse that I could use in the vignette. I filed off the reins and drilled a hole into the muzzle so that I could replace the reins with wire reins for a more realistic look. Since the horse comes without a saddle (I wish that someone would make saddles with shabraque accessories for the 18th century to use on this type of project) I had to make my own shabraque and saddle out of green stuff. I'm not entirely happy with the result of the horse furniture -- it looks a little lumpy and lacks sharp definition, but it will probably look all right after it is painted. I could have used one of the Mirliton saddles, but I didn't have any left. That would be a better choice if I want to do a line of four or five horses tied to a hitching post.


A view of the original jager figure (left) and the conversion figure (right) for comparison.

I finished the sculpting last night around midnight so I am going to let it cure all day tuesday, before priming the figures on Wednesday night and then painting them on Thursday.

I am still deciding whether I should use one of the Minden horse holder figures to hold the officer's horse, or dispense with the extra foot figure and tie the reins to the Irregular rustic fence. Or, I could add one of the RSM officers pointing and perhaps directing the attention of the dragoon with the spyglass to something that he has spotted.

Sunday, May 2, 2010

Artillery Hoist Is Completed


A front view of all three artillery park vignettes after completing the static grass phase of the basing process. On the left, a Minden Prussian dragoon officer has been converted into an infantry officer. All I did was file off the aigulette on his right shoulder. He is slightly different from the mounted colonel in that his right arm is bent and his hand is in a jaunty pose, resting on his hip.

Note: click the pictures to enlarge the view. Double click for a really large picture.

I completed the final phase of the artillery hoist vignette that you saw yesterday. All that I had to do was to affix the static grass onto the base with Elmer's White Glue (pva glue in the UK) and then it was ready for its photoshoot. In the picture above, you can see how all three artillery vignettes fit together and complement one another.


A view of the model during its construction.

In the picture above, you can see the hoist frame during its construction phase. The legs are made from bass wood (1/8 inch square) cut to 2.5 inches in length. A spare offcut from a North Star flag pole was used to provide the connecting rod at the top of the A-frame and similar pieces were used to make the turning handles on the lower axle. The lower axle is a piece of dowel rod. I used wooden bead sleeves to act as a sort of washer at the ends of the lower axle. Since these were made from wood, it was easy to drill four holes in the bead to accomodate the turning handles. Florists' wire was used for the rope on the block and tackle suspended from the top of the hoist.


Left side view of the hoist vignette. The officer in the blue coat is from RSM. I clipped off the lapels on the figure since Prussian artillerists did not wear lapels. Note the coiled rope on the ground running from the hand of the labourer in the foreground. The rope was made by twisting two pieces of florists' wire together.


The view of the front of the model.


A view of the right hand side of the vignette.


Another view of the complete artillery park and a long view of how it fits with the rest of the Minden Miniatures Prussian army. Supply wagons are now in the painting que.

The will be it for the vignettes for the rest of this week, unless something strikes my fancy and I embark on some new project that catches my eye. I was working on the second battalion of Itzenplitz (IR13) this evening and I want to finish it this week. So after Itzenplitz is completed, I may work on some more vignettes. I am almost out of Minden labourer figures to use in these projects, but never fear, a new package of inventory is winging its way across the ocean, even as you read this post.

By the way, I am very close to surpassing my 200,000th visitor and we should pass that milestone sometime this week. Click on the little Sitemeter logo at the bottom of this page to see how many visitors have passed through. You can also click on the map inside Sitemeter to see where other readers of this blog come from. It's kind of a cool thing to see.

Oh, and keep the comments coming -- I love to read the feedback. There is no telling what might come next as I build on and expand this wonderful Minden Project.

Update
A big fat box of miniatures arrived this evening chock full of Minden figures including Prussian fusiliers, Austrian grenadiers and labourers for vignettes. I've got my work cut out for me now. Kudos to Frank on the super fast service. I am looking at some of the Prussian fusilier NCOs and I see pioneers holding their tools in their hands. I was going to lop off heads and do some swaps, but the NCO figure for the fusiliers is a ready made pioneer in mitre hat.

Update II - Monday Night
This evening, after watching the Blackhawks vs. Canucks Stanley Cup Hockey game, I went down to the basement and started converting the Prussian jager standing firing into an officer holding a telescope.

I cut out the rifle and kept the left arm and hand that held the rifle. This would eventually hold the telescope. Then I had to amputate his right arm at the shoulder - I tried but I couldn't save it and use it by bending the arm into position. I measured out the length of the old arm at about 11-12mm and cut a piece of wire the same length.

Then, after drilling a hole in the shoulder socket, I glued the wire armature into the shoulder and started applying green epoxy putty to form the arm. The hand is much better on this model. I seemed to learn a thing or two from my last arm conversion. Then, as an afterthought, I decided to remove the jager belly box and turn the figure into a dragoon instead of a jager officer. So I filed away the belly box and covered up the scratchings with a new officer's sash around the waist. It looks fairly decent. The telescope was just a piece of brass with some putty building up the end of the spyglass.

Then I got really crazy and decided to make a dragoon shabraque and saddle set for a standing RSM horse. The idea is that this will be the officer's horse as he will be dismounted. I may add a horse holder to the stand using one of the existing Minden generic horse holders, or I could just have the horse and the officer on the vignette stand. I will decide on that later.

It will probably take a couple days for the epoxy putty to cure, so I will prime the figures on Wednesday and start painting on Thursday, if all goes well. Preliminary basing on Friday and then I can finish off the base and shoot some pictures on Saturday May 8th. Stay tuned for that.

Saturday, May 1, 2010

The Die Hard Dragoon


Reiter Christoph Steiner makes his last stand after losing his mount, determined to take a few Austrians with him. Minden Prussian jager painted as a Prussian dragoon, Minden generic casualty figure painted as an Austrian, Foundry or Perry dead horse, and RSM sword.

Here is another vignette that I added to my collection this weekend. This was was relatively easy to do and required only a minimum amount of conversion work. I already had the horse casualty (which comes from either Perry or Foundry - I forget which one) and the Minden generic casualty, and when I saw the dead horse figure, I immediately began to envision a dragoon firing his last rounds of ammunition from his carbine.

I used the Minden Prussian jager figure for the dragoon. The conversion work consisted of cutting off the cartridge box on the jager's belly and making a new dragoon cartridge box from epoxy putty. The belting was made from a spaghetti string of putty, which I placed over the shoulder and then flattened out with the eraser end of a pencil. The rectangular box was easy to fashion out of putty. I also cut off the hilt of the sword that the jager was wearing.

I envisioned Reiter Steiner being a bit ticked off over losing his horse, so he has unsheathed his sword and has jammed it into the ground in defiance. Then he crouches behind his dead mount and fires his last few rounds at the on-coming Austrians. You can see one of his victims, dead, in the foreground. Reiter Steiner intends to die hard and take as many Austrians down as he can before they finish him off.


Artillery Vignette Preview


Prussian artillery crew removing a gun barrel from its carriage for some repair work. I will ink the gravel tomorrow morning, after the spackle terrain has dried, and then apply the static grass to complete the base.

I spent a good part of friday evening and saturday night constructing and painting the latest vignette addition to my artillery park. This is a vignette of the Prussian artillery crew using a hoist to remove the cannon barrel from the gun carriage for some type of repair work. Since a gun barrel could weigh anything from 700 pounds on up to 1,500 pounds, this was no easy task to remove the barrel.


A side view of the vignette.

I will post some pictures of the completed artillery vignette tomorrow after I complete the base work. The spackle on the ground needs to dry for a couple of hours. After that, I will cover the ground with brown ink, leaving a few exposed areas of gravel un-inked, for contrast. Then, after a quick dry brushing of some tan paint, I will apply the final touch of the static grass and then the model will be ready for some "show and tell" photography.

This model was a bit fiddly to figure out and construct, but now that I have done one, it probably would not take me as much time to build another one. I will tell more of the construction story when I post the finished pictures tomorrow.