Showing posts with label Britain's toy soldiers. Show all posts

Thursday, September 8, 2022

Battle of Abu Klea in 54mm


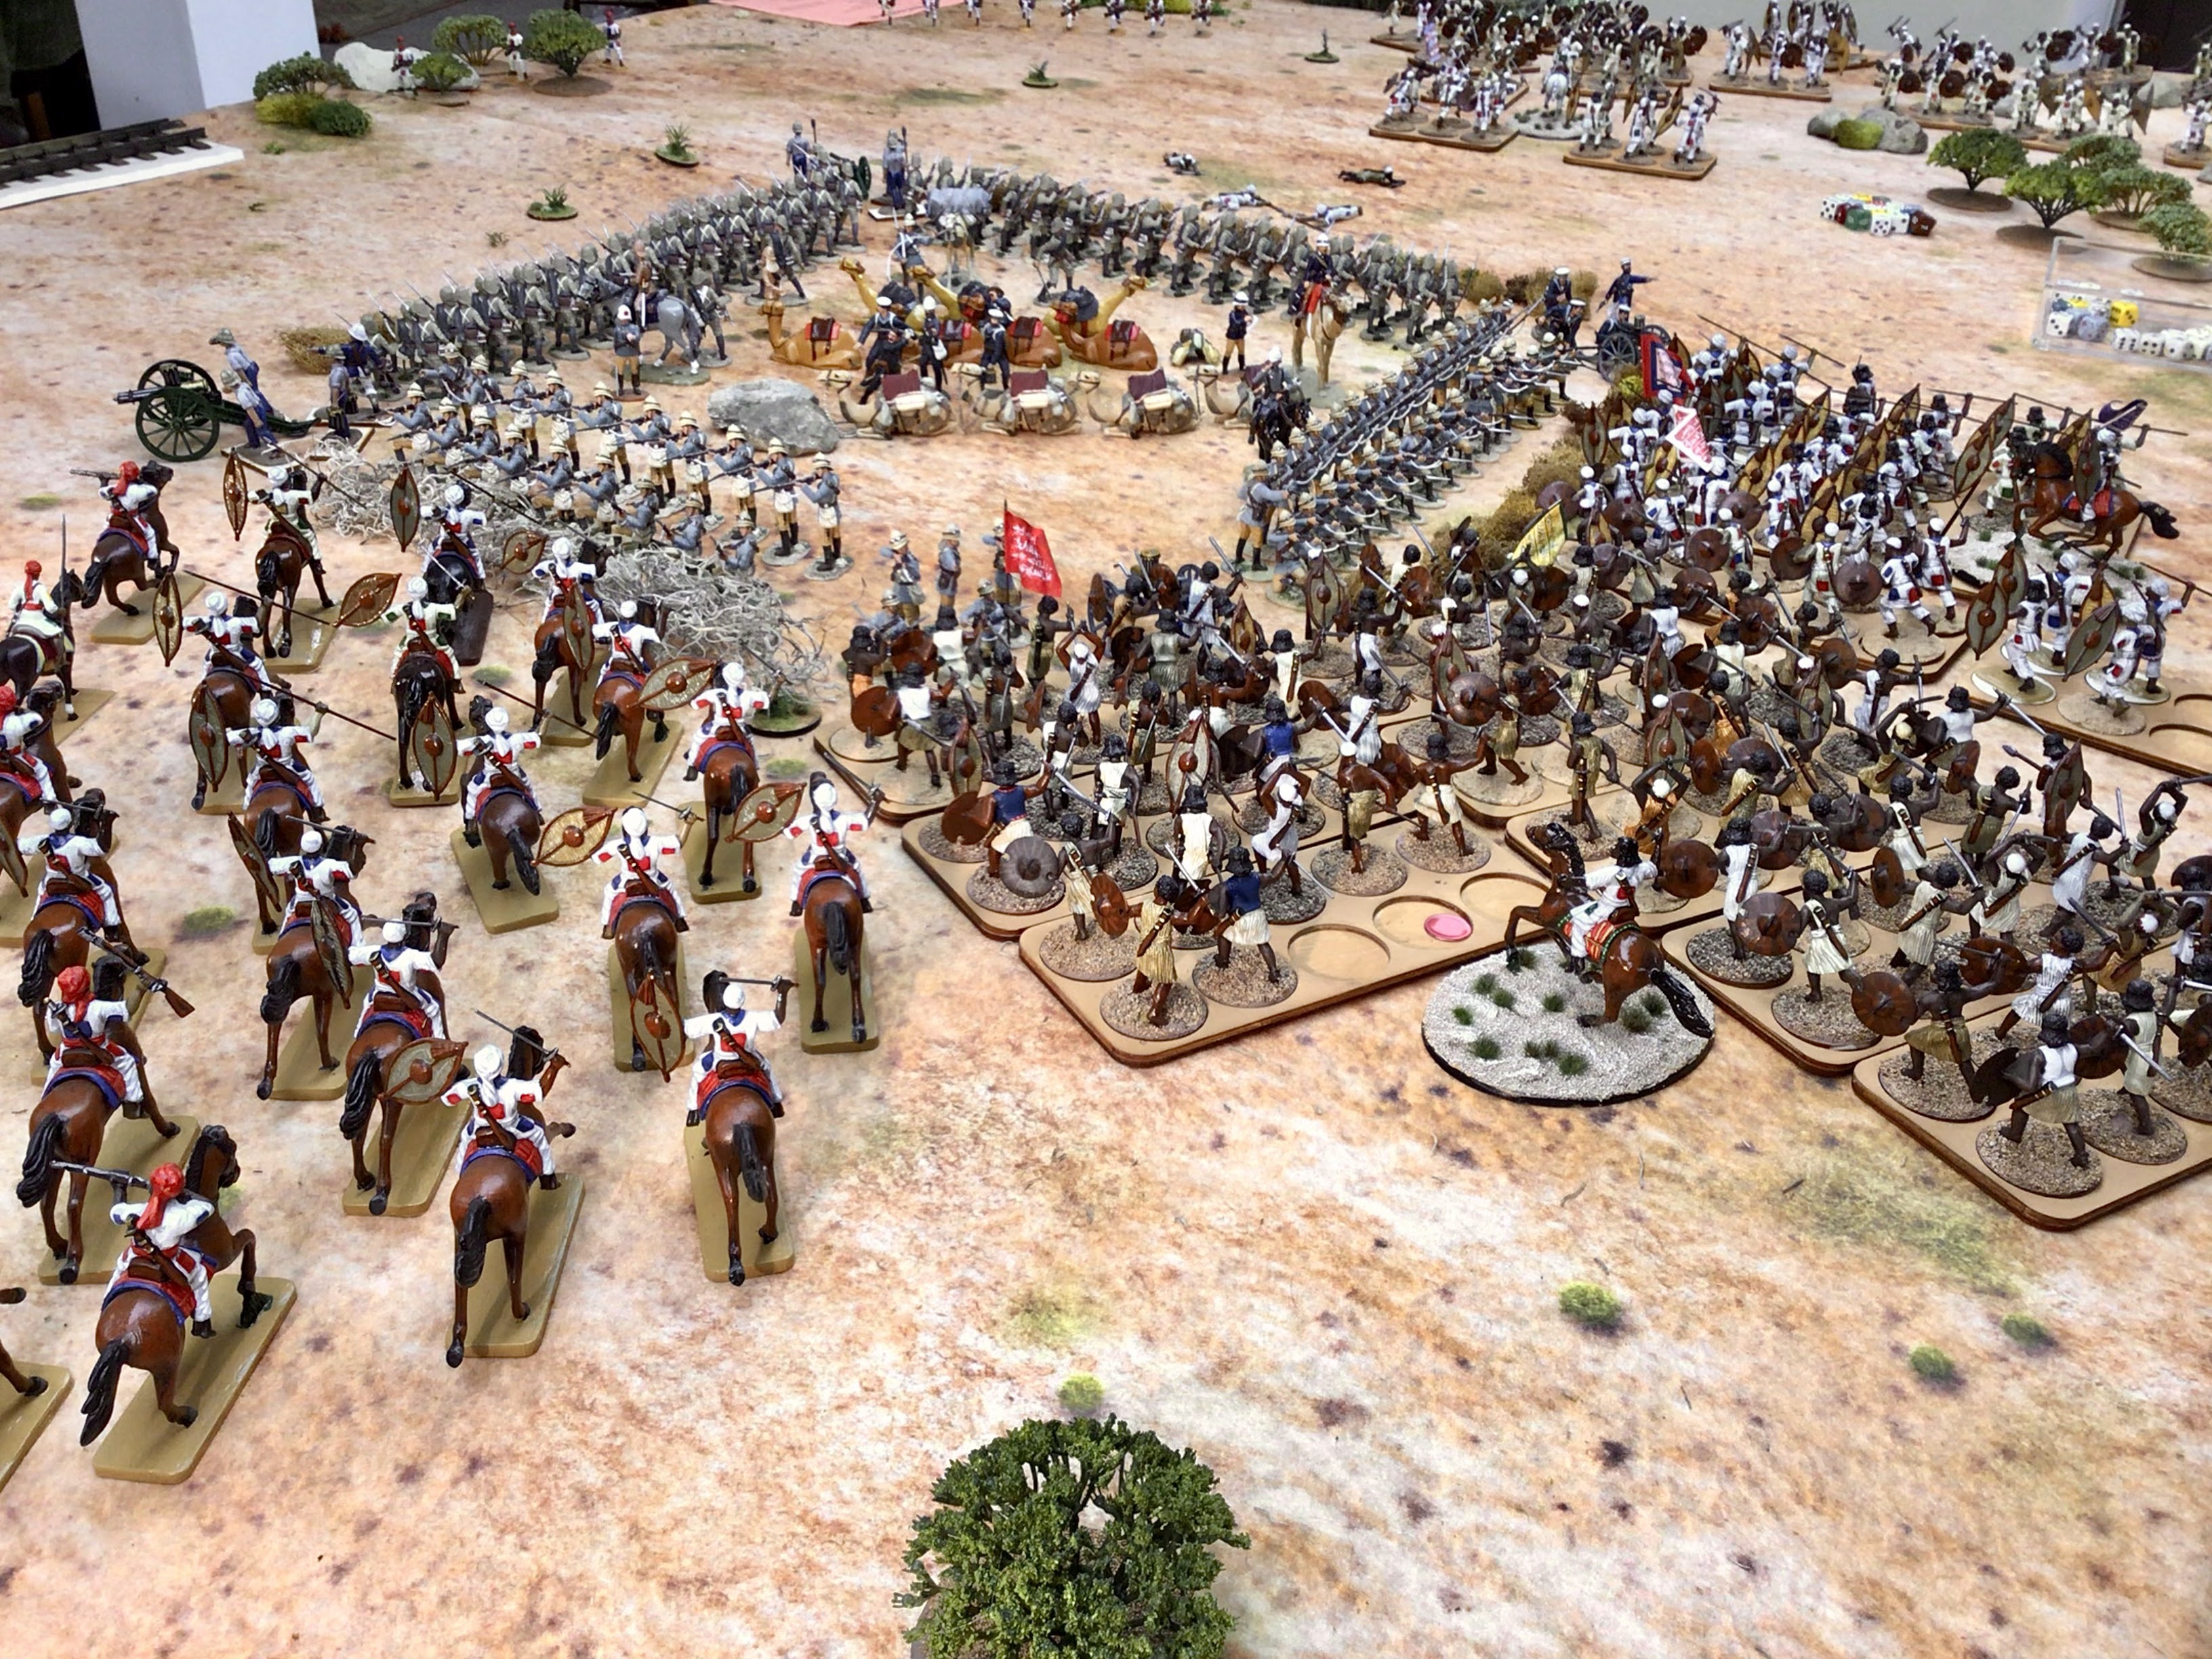
British square at Abu Klea
The figures are from the new Britain's range of 54mm collectors' figures.

Yesterday I took my 54mm Sudan collection of figures out for a spin and decided to refight the Battle of Abu Klea. The actual battle was fought on January 17, 1885 between the British Desert Column, commanded by General Herbert Stewart, and the Dervish army of The Mahdi.

The Desert Column consisted largely of the British Camel Corps, which was an amalgamation of a number of British cavalry regiments that were trained to ride camels. The approximate forces were 1,200 British and 14,000 assorted Dervish war bands (only 3,000 fought in the battle). Briefly, Lord Wolseley was commissioned with the task of relieving General Charles Gordon's doomed command in Khartoum, Sudan. Wolseley sent the bulk of his command ("the River Column") up the Nile River towards Khartoum. A second army, titled "the Desert Column" was tasked with cutting across the great bend in the Nile River, traveling from Korti on the Nile, across the desert, and arriving back at the Nile at the town of Metemmeh. There, the Desert Column would be a near 50 miles north of Khartoum and be in a position to advance and rescue Gordon.


Map of the Battle of Abu Klea from the 
British Battles web site. Click on link below.


Major General Herbert Stewart (on camel) and war correspondent Melton Pryor.
Note the baggage and camels in the center of the square.


Click on the link to the British Battles web site  here: Abu Klea for a very good overview and summary of the battle. For those who are interested in a more detailed analysis of the battle, I highly recommend Mike Snook's book "Go Strong Into the Desert".

There is, of course, the famous poem about the battle, Vitai Lampada, penned by Sir Henry Newbolt, the most famous part of the poem, shown below, that is probably well known by war gamers of the Sudan Campaign of 1884-1885:

The sand of the desert is sodden red, —
Red with the wreck of a square that broke; —
The Gatling’s jammed and the colonel dead,
And the regiment blind with dust and smoke.
The river of death has brimmed his banks,
And England’s far, and Honour a name,
But the voice of schoolboy rallies the ranks,
“Play up! play up! and play the game!”

OK then, we have got the potted history bit out of the way, so let's get on to the solo war game that I fought. Basically, Abu Klea is a classic battle of the British Square versus a mass of thousands of native troops. The British have crossed the desert and are in desperate need of water, of which there are water wells at Abu Klea. Therefore, the British Desert Column must defeat any Dervish that stand between them and the water wells. The Dervish objective is to prevent the British from reaching the water supply.

Here is a list of the forces that I used in my war game version of the battle:

British Forces:

60 x Lancaster & Yorkshire Regiment ("Lances. & Yorks." or "L&Y" in this account).

60 x British Camel Corps (dismounted)

3 x Royal Navy Gatling Guns

1 x Royal Artillery 7-pound screw gun

12 x 19th Hussars (mounted as scouts). - I substituted some Egyptian lancers

There are 3 British players: one each commanding one of the infantry regiments, and one player commanding all of the artillery and the cavalry.


Dervish Forces:

98 x Berber Dervish

100 x Metemmeh Dervish

100 x Beja warriors

50 x Dervish Rifles

30 x Dervish cavalry

There are 4 Dervish players: one each commanding the Berber, Metemmeh and Beja war bands, and one player commanding the rifles and the cavalry in the game.

RULES USED: Colonial Wars variant of Bill Protz's "BAR" rules. These rules feature big battalions, saving throws and lots of D6 dice.


The above forces are not absolutely historically accurate. For example, the Beja did not fight in the Nile River theater of war and the Dervish did not have/use cavalry at the battle. The cavalry charge in the movies is pure Hollywood. The British have more Gatling guns than they did at the battle, however, I wanted to have a machine gun or a screw gun on each corner of my square. Finally, I do not have any mounted Hussars so I substituted some Egyptian lancers from my collection.


Battle Account of the Game

The British were deployed in square formation with the Lancs. & Yorks. defending two faces of the square and the dismounted Camel Corps defending the other two faces. Three of the corners had Gatling guns and one corner had a 7-pound screw gun. The British players were informed that the Dervish could attack from any or all sides of the square over the course of the game. The Dervish players were told that they could only attack from any three of the four sides of the square. Of course, the British players do not know this.

The Dervish attack one of the faces of the British square.


Troop Deployments

Dervish: The Dervish deployed the Berber contingent on the west face of the square and the riflemen and cavalry on the east face of the square. The main attack would be launched by the Beja and Metemmeh Dervish on the North face of the square. The south face of the square would not see any Dervish troops deployed.

British: The British Camel Corps occupied the North and East faces of the square, the Lancs. & Yorks. the south and west faces of the square, and the cavalry patrolled the south face of the square.


Berbers open the game with the first attack

The Berbers launched a premature attack from the east and pitched into the face manned by the Lancs. & Yorks. There were 98 Berbers and 12 riflemen facing off against 30 L&Y soldiers and the screw gun. The Berber attack was a total failure as they lost 87 of their 98 figures and never made it to the zariba of the L&Y. This informs me that it probably takes at least 150 Dervish to attack a face of a square and have some chance of success in breaking into the square. 

While all of this was going on, the Dervish riflemen were peppering the Camel Corps soldiers on the opposite side of the British square.

I forgot to take pictures of the Berber attack so all of the pictures are of the attack on the Camel Corps sides of the square.

The Dervish main attack goes in

Next, it was the turn of the Metemmeh and Beja to launch the main attack on the north face of the square. Having seen what 30 men and a screw gun could do to 98 men, the two contingents ganged up and launched a combined 200 figures against the north face of the square. The rifles and cavalry would tease the the Camel Corps soldiers on the east face and only demonstrate a potential attack.

The Metemmeh Dervish charged right into the teeth of the Camel Corps while the Beja focused on hitting the corner on the Northwest corner of the square, where they would only face a Gatling gun.

Camel Corps soldiers and a single Gatling gun send a hail of bullets the Dervish' s way

The first 50 Beja aim for the corner of the square.

Freddy Burnaby and the Royal Navy Gatling Gun crew are about to be overwhelmed by the on-rushing Beja.
Note that if the Beja crash through the corner they will start hacking into the flank of the Camel Corps soldiers.

That didn't turn out very well for the Camel Corps. The Gatling gun crew fired off their gun and legged it out to the protection of the reserve line of troops in the center of the square. The Camel Corps soldiers on the left have fallen back and reformed into a second line in the middle of the square.


A Short Tale of a Cavalry Charge

Oops! I didn't follow the rules correctly. The Royal Navy gunners went on the lam back to the protection of the camel baggage. So there was no melee, thus the Beja could continue to advance and they hit the flank of the Camel Corps on the east face of the square. So I had to return the CC figures back to their place and conduct a melee with the Beja.

I forgot to mention that on this particular game turn, the Dervish army decided to go "all in" and send everyone, including the cavalry, into a charge against the square. The Beja unit that over ran the Gatling Gun were astonishingly defeated in their melee with some of the CC men on the flank. Thank God, better yet, thank high pips on the dice rolls for the British. So the Beja unit had to fall back, but it elected to charge yet again when the rest of the army went "all in".

The overhead view from the observation balloon. You can see that everyone is charging  the two sides of the square that are defended by the Camel Corps (the poor sods). The red chip on the Beja unit in the middle indicates that it is disordered from the previous melee, which it lost.

The cavalry charge did not go very well for the Dervish horsemen. They were mowed down by Gatling Gun fire and rapid fire volleys from the Camel Corps. Only 5 of 27 figures even made it to the zariba, and they routed off into eternity.

This time the Gatling Gun did not jam and the Dervish horse stopped short of the zariba. That's why you build a zariba.


The Dervish send in everyone this time.


The Dervish cavalry are a sight to behold. Charging infantry armed with rifles
and deployed behind a zariba is not a smart thing to do.

Here they come! Fire! Reload!
Independent fire at will!

And Now For The Finale - Ferocious Beja Charge

The cavalry charge had failed, but more importantly, the Metemmeh Dervish charge closed with the Camel Corps but were repulsed. The Dervish had one more card to play. It came in the form of a fresh, unblooded Beja war band. 
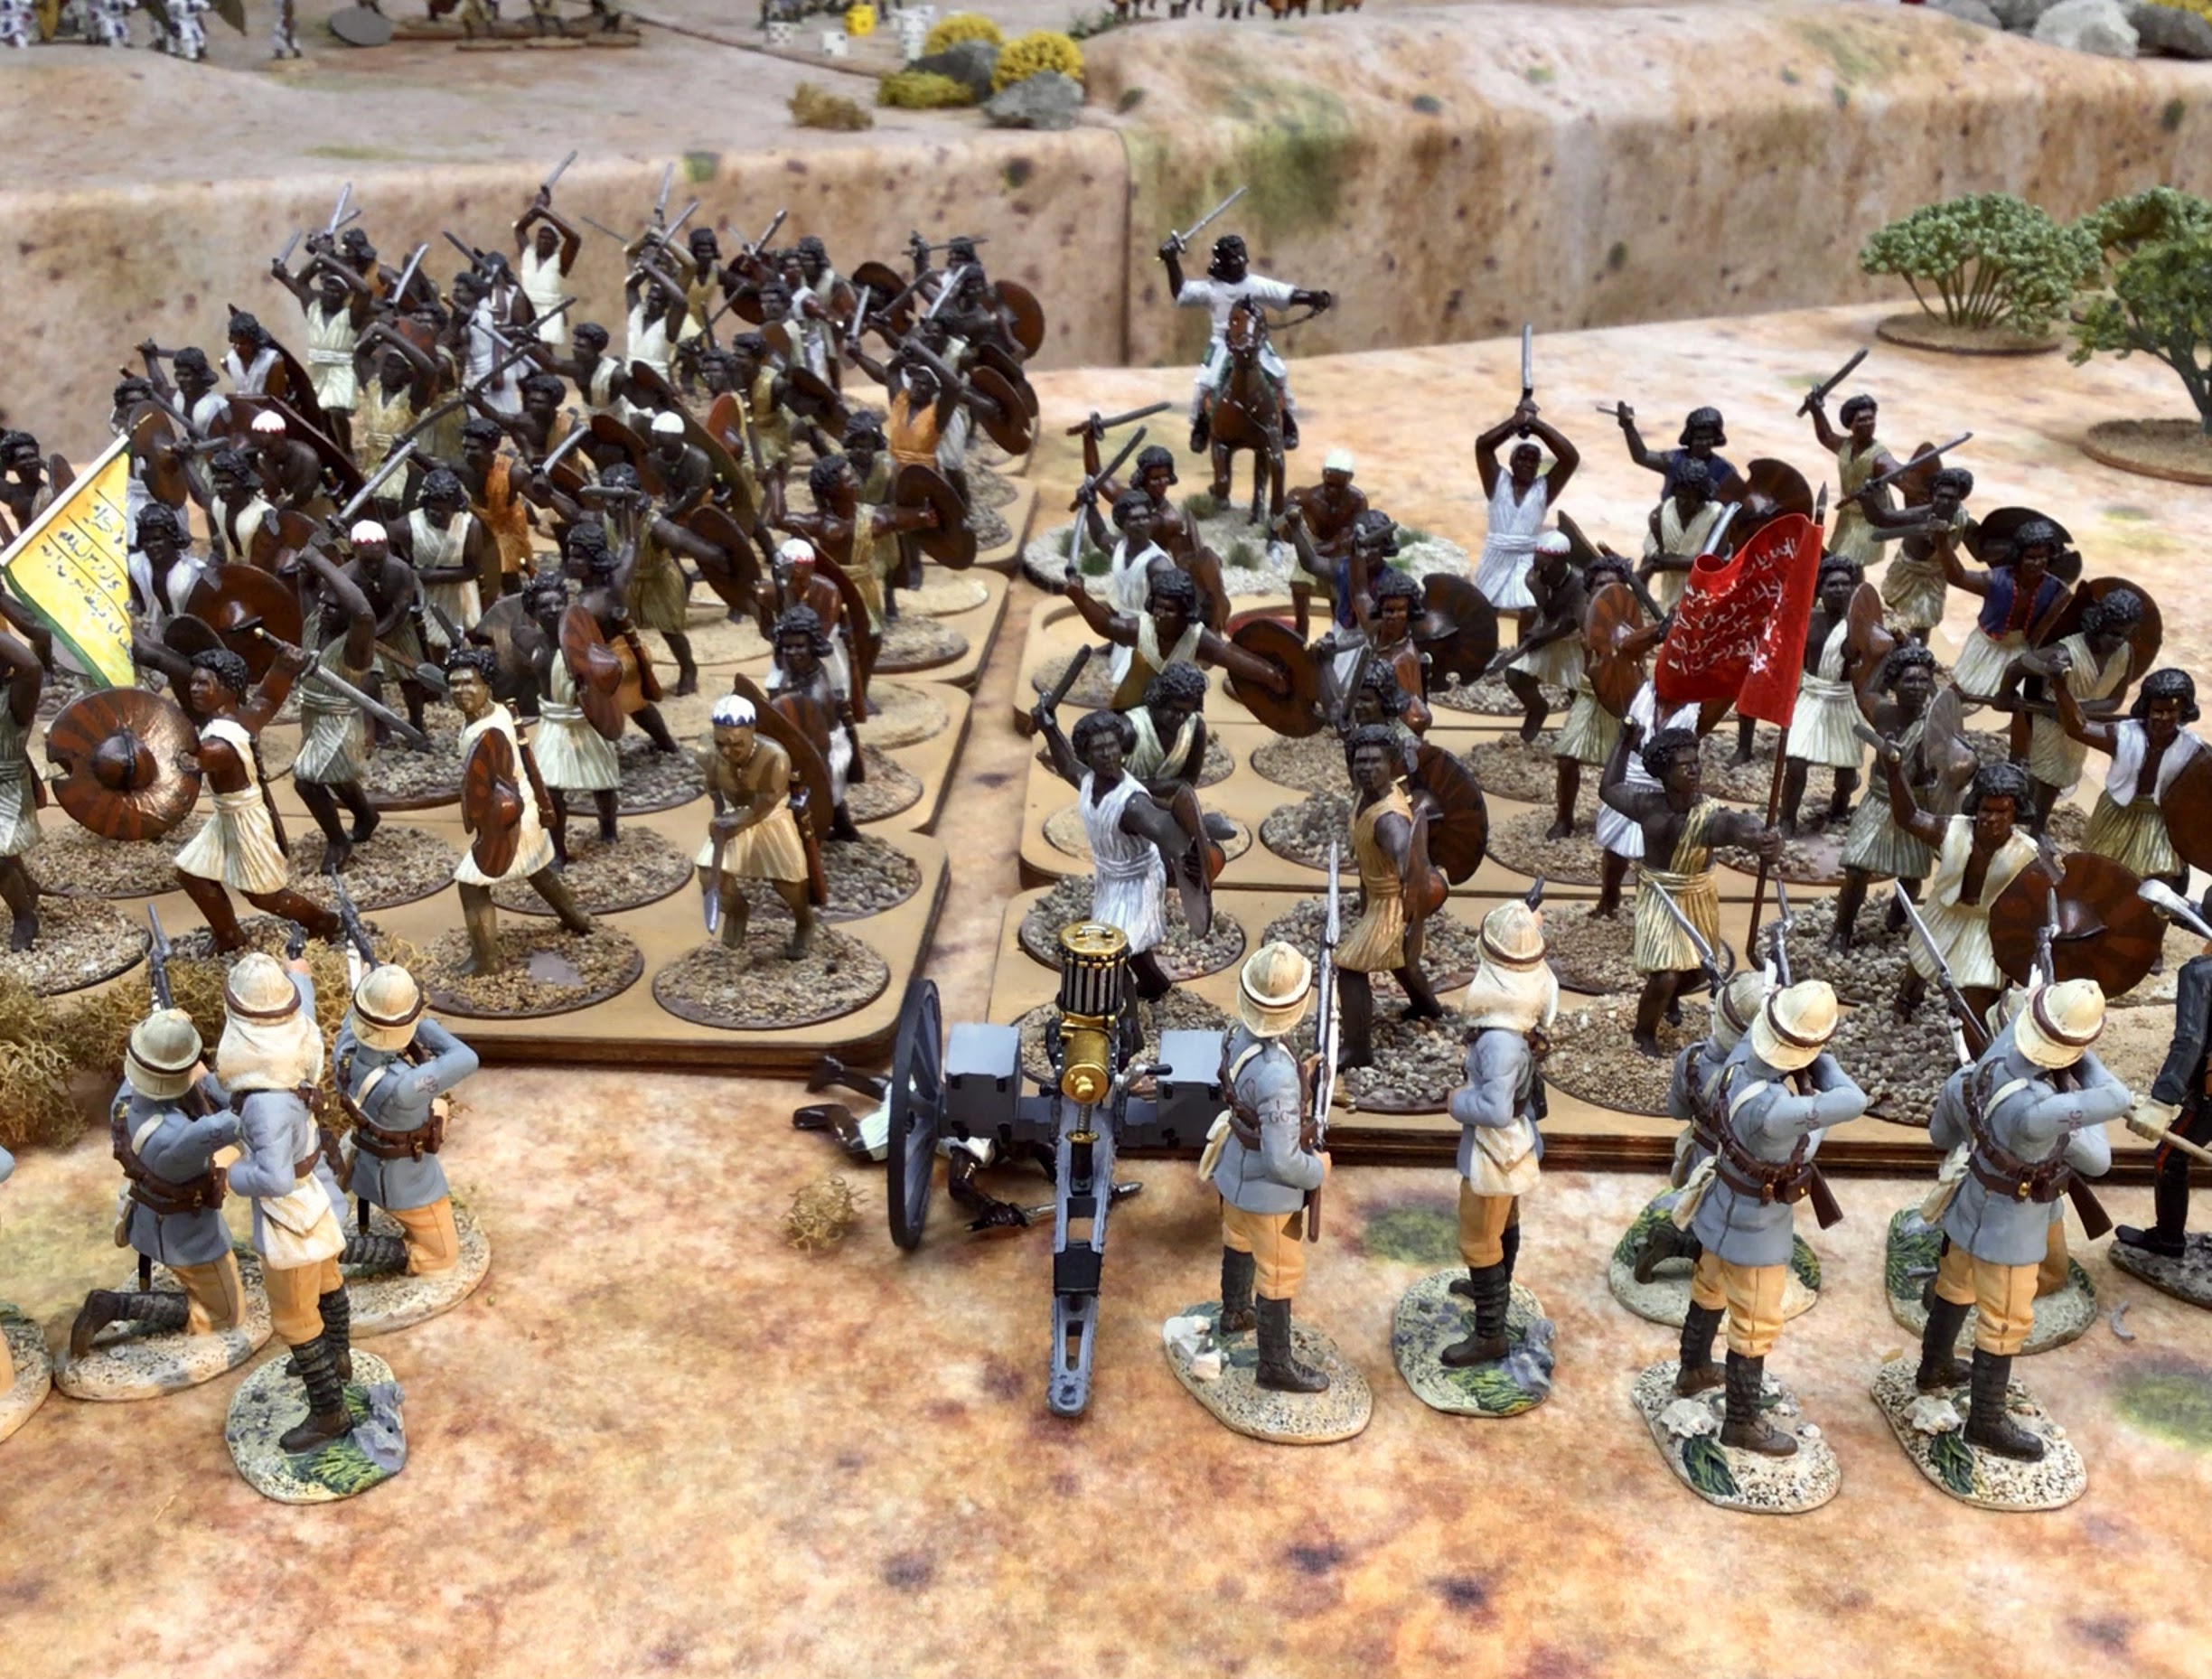
The Beja hit the weakest point in the square - at the Northeast corner
which is thinly defended by an ever smaller force of  grey coats.


At the other end of the square, on the Northwest corner General Stewart (on camel) shouts encouragement to his men.
Meanwhile, Colonel Freddy Burnaby is always there in the thick of things.
You can see some British khaki clad soldier in the background. These are men of the Lancs. & Yorks. regiment which has sent every other man to the center of the square to set up a second line of defense in case the Camel Corps breaks.

The CC vs. Beja melee lasted for three rounds. In each round, the Beja won the melee, but the CC soldiers had were made of iron and they refused to fall back to safety behind the L&Y regiment.


Camel Corps soldiers from the far left face of the square reinforce the melee, but keep a thin line of defenders just in case.
The British second line, amid the camels and baggage, can be seen in this picture. You can also see how the L&Y regiment has thinned out its lines at the zariba and have redeployed in the center of the square.


Note the thinned out line of Camel Corps soldiers on the left hand side of the square.
Most of its men have hived off to reinforce the melee over on the right hand side of the picture.


The Final Curtain Comes Down - What Happened?

In the Colonial BAR rules, melees can last up to three rounds, after which the attacker must fall back one full charge move (18" plus 1 D6 die roll). The Beja vs. Camel Corps melee went the full three rounds. The Beja won each melee round, but British morale was sky high and they never broke into a rout, thus they could continue to fight another round.


They have been repulsed. The remaining Camel Corps began to realize what they have accomplished.


The Beja have retreated. General Stewart and his men are frozen
in a stunned silence  as what they did begins to sink in.
Colour Sergeant (bandaged head): "It's a miracle.
Colonel Burnaby: "If it's a miracle, it's a short chambered Boxer Henry point 45 miracle."
Color Sergeant: "And a bayonet, sir, with some guts behind.


The aftermath of the battle. The Camel Corps took a hard pounding, but they prevailed.
Cue in the music "Rule Britannia."


Men are detailed to attend to the wounded and pick up the debris of the battle. A roll call will be taken to determine what the Butcher's Bill will be.


British Casualties:
33   Camel Corps soldiers. 16 of these would be saved by D6 dice roll. Thus 17 men died.
60  Lancs. & Yorks soldiers. No casualties.
16  Royal Artillerymen. No casualties

Total British killed: 33 (before recovery saving throws)


Dervish Casualties:

Berber Dervish lost 87 men out of 98,  11 survivors.

Metemmeh Dervish lost 61 out of 100,  39 survivors.

Beja lost 44 out of 100,  56 survivors.

Dervish cavalry lost 22 out of 27 horsemen,  5 survivors.

Riflemen lost 8 out of 52,  44 survivors.

Total Dervish killed: 222

Comment:

I intend to fight the follow on battle of Abu Kru with the remaining British figures, so casualties are deducted from the Camel Corps for the next battle. I did a die roll for each casualty. A 5 or 6 brings them back; a 4 is wounded; and a 1, 2 or 3 is a fatality.

The Dervish do not need to do an army casualty save because they are replenished with an entirely new Dervish army. The Mahdi has so many men flocking to his banner that he can afford such battle losses.

I played the game over the course of two days on my home pitch (field) and the Colonial BAR rules proved easy to use, even though they are a bit heavy on the charts. However, I have played these rules so many times that it is easy for me to negotiate my way through the movement, firing, melee and morale charts without too much effort. The rules worked very well for a solo game.

It was really spectacular to see so many large 54mm toy soldier size figures on my game table. I am really quite taken with 54mm figures these days. They are easy to see and to paint and their size almost gives each figure its own personality, which adds to the fun.

HISTORICON 2023 GAME

This game is a play test of one of the games that I will be hosting at Historicon 2023 in Lancaster, PA. I expect to run four or five games at the convention, including the assault on the walls of Khartoum, Abu Klea and perhaps another scenario to be determined. If you enjoyed this game report, then I think that you will enjoy seeing it in person at Historicon. Better yet, sign up and play in my Khartoum! series of games.


Saturday, August 20, 2022

Giving Old Britain's Figures A Make Over


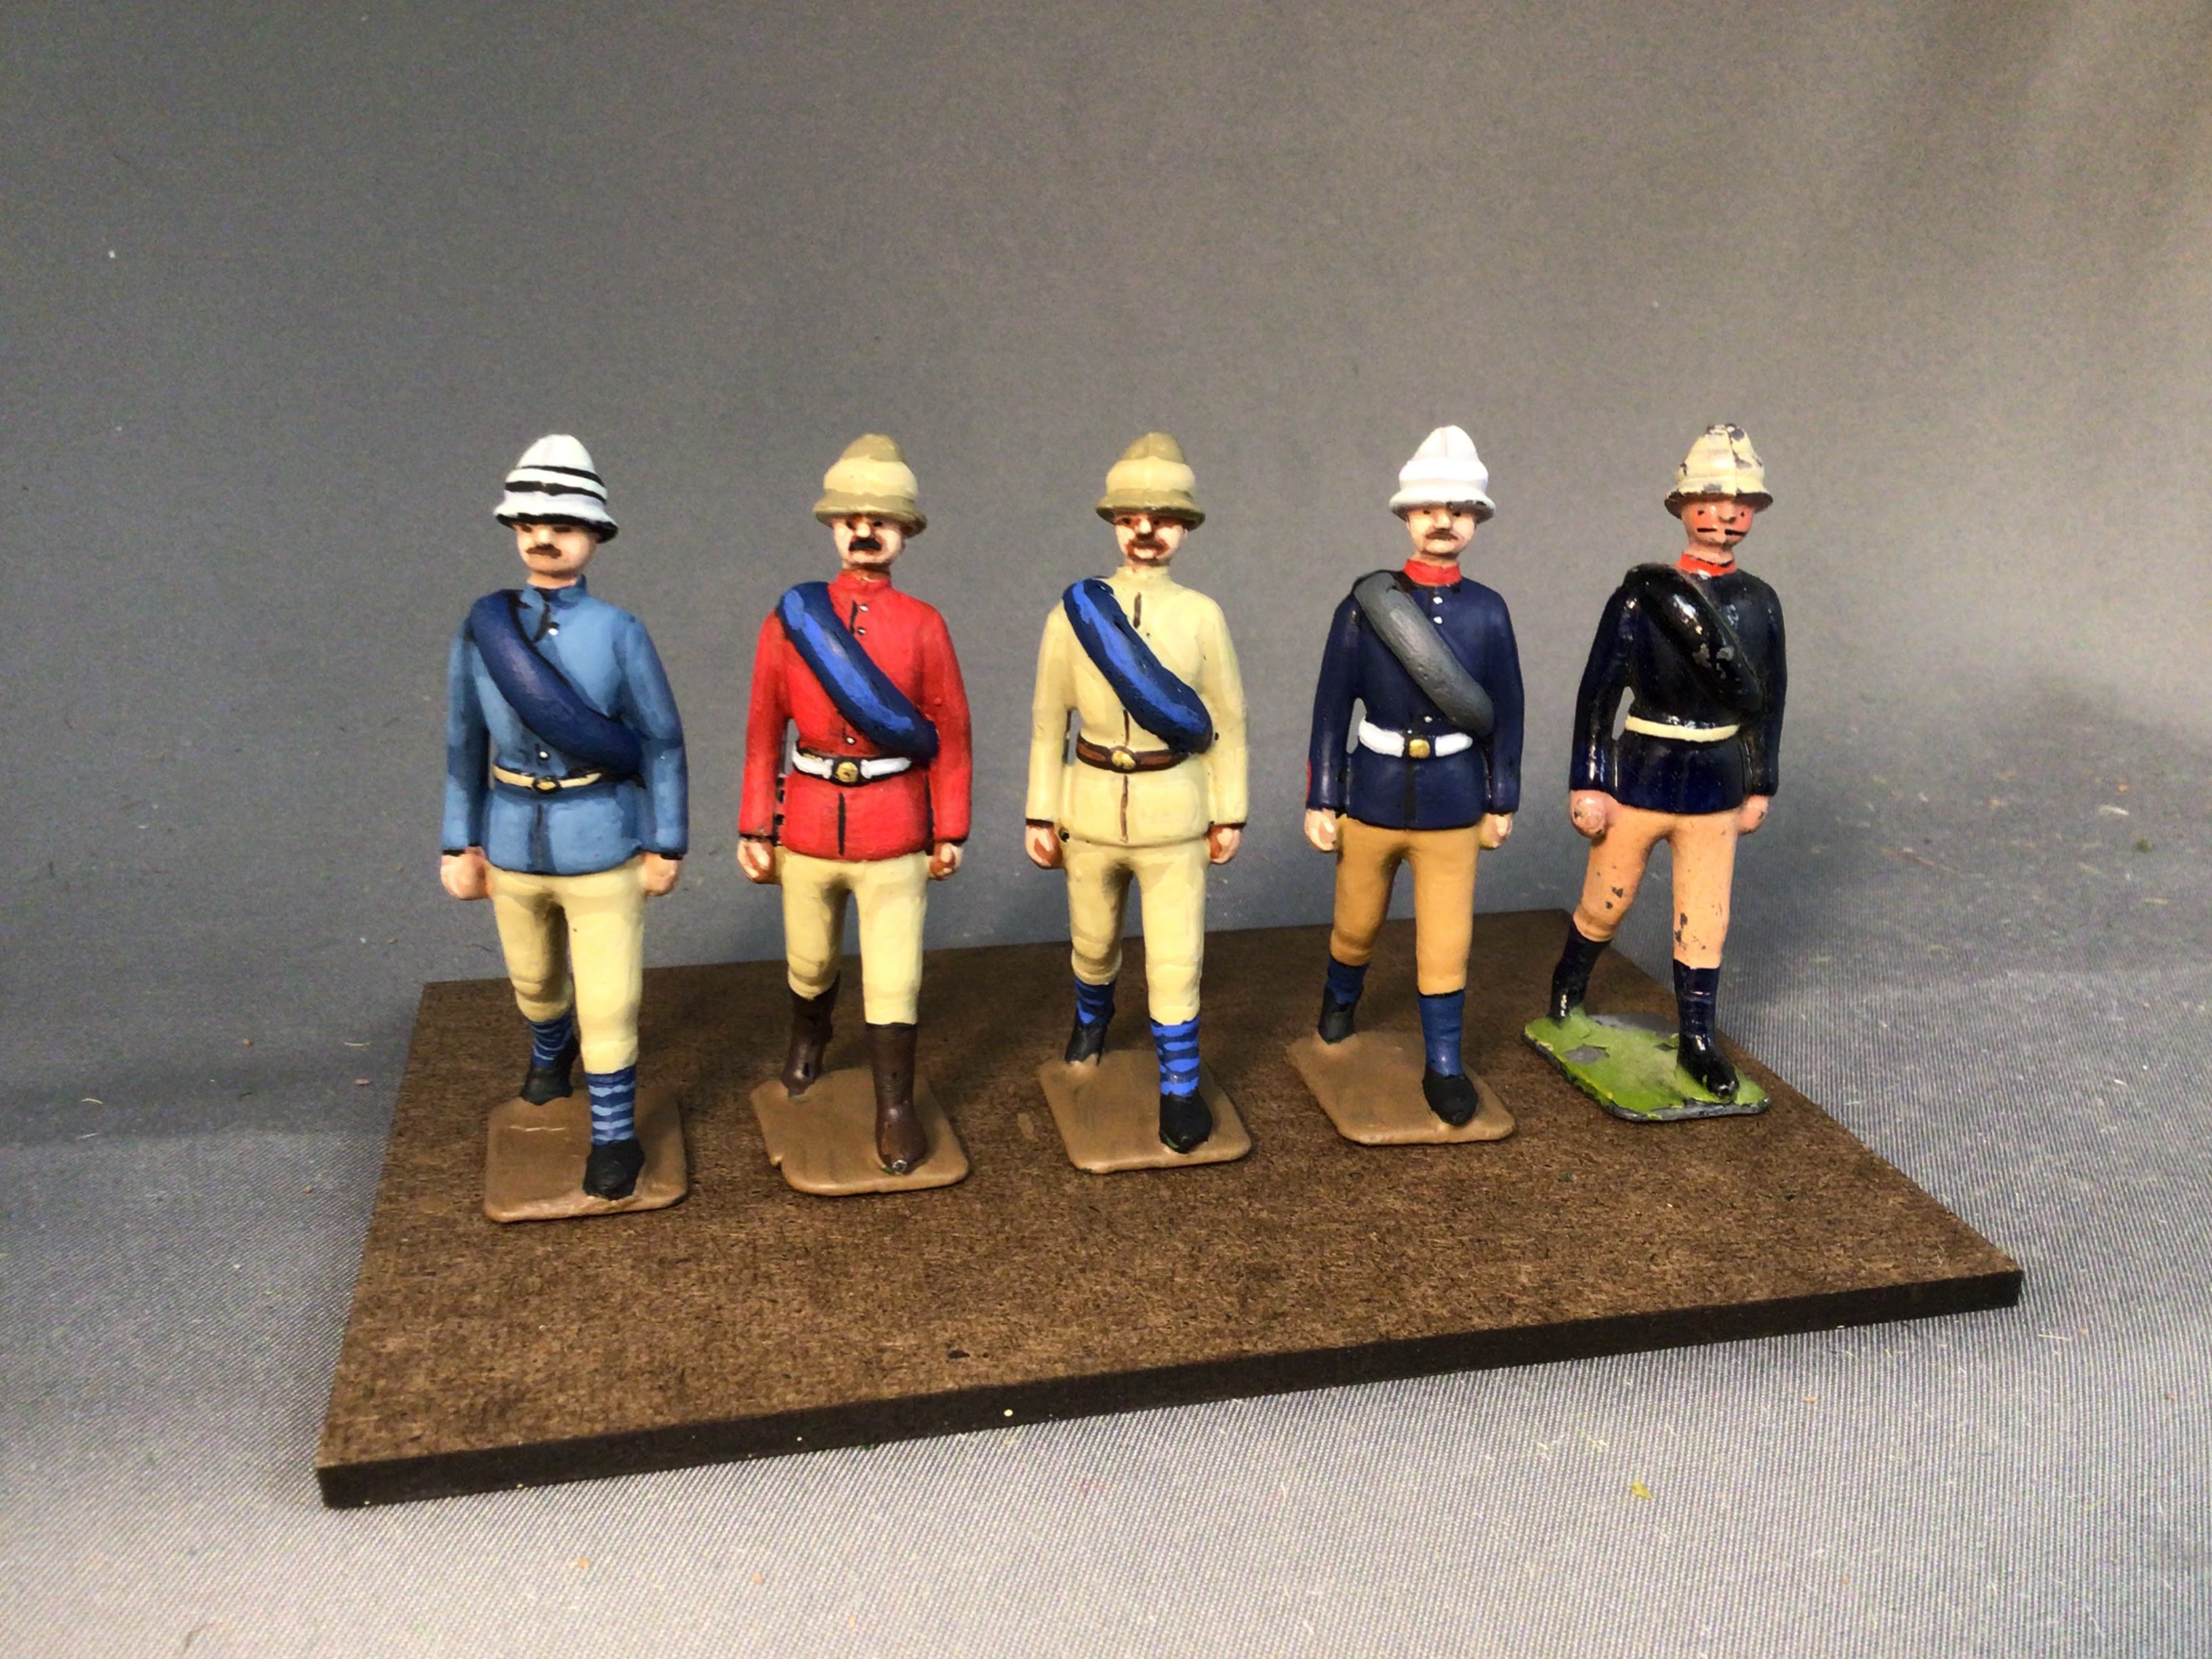
The original Mountain gun crew figure is on the right


The other day I was in between painting projects, waiting for the primer to dry on some figures that I planned to paint, so instead, I started playing around with repainting some of the old Britain's British Mountain Artillery gun and crew. What caused this was the need to paint a "bat man" to accompany a personality figure (me) that I am sending off to Fort Rexford, which is under the command of the delightful Claude B. I have about 20 of the Mountain Gun crew figures so I selected a handful of the more beaten up ones and decided to give them new uniforms.


The figure on the left in each picture is a British Camel Corps uniform, the red coat is a Guards uniform, the khaki is a generic British khaki uniform, and the dark blue is a Royal Artillery uniform. The original Britain's figure is on the far right in each photo.


I am still trying to decide on whether to gloss coat the figures in the old Britain's style or leave them with a matte finish. I really like the matte finish, but using gloss on a Britain's figure makes sense and could be quite compelling. I might paint one more figure and give it a gloss coating to see what it looks like.

Next Week's Painting Schedule

I have another 16 plastic Sudanese soldiers to paint this week and this will build the regiment up to three companies of 16 figures for a total of 48 figures. These will likely be finished within the next two days.

I might experiment with painting the flat car for the Sudan Rail Road project and the sleepers (ties) could use a coat of paint over the plastic pieces.

Future Painting Schedule

I need more Beja warriors and I have enough figures to paint another unit of 50 figures. I need to clip off the swords and replace them with pin swords before I paint them, so this takes an extra bit of time in order to het them going.

I have 20 Ansar Riflemen ready to paint.

Also another dozen mounted Camel Corps figures. That reminds me, I need to buy more of the Armies In Plastic Camel Corps set that includes 2 pack camels and 2 troopers. The pack camels will come in handy for the scenario from the movie Khartoum where Gordon ventures out of the city to forage for food and other edible supplies.

54mm Republican Romans and Carthaginians are also in the painting queue.

Somewhere along the line I will probably take a break from painting 54mm figures and paint some more Minden Austrians and Prussians.

Sunday, August 14, 2022

Oh Dear, What Have I Done Now?


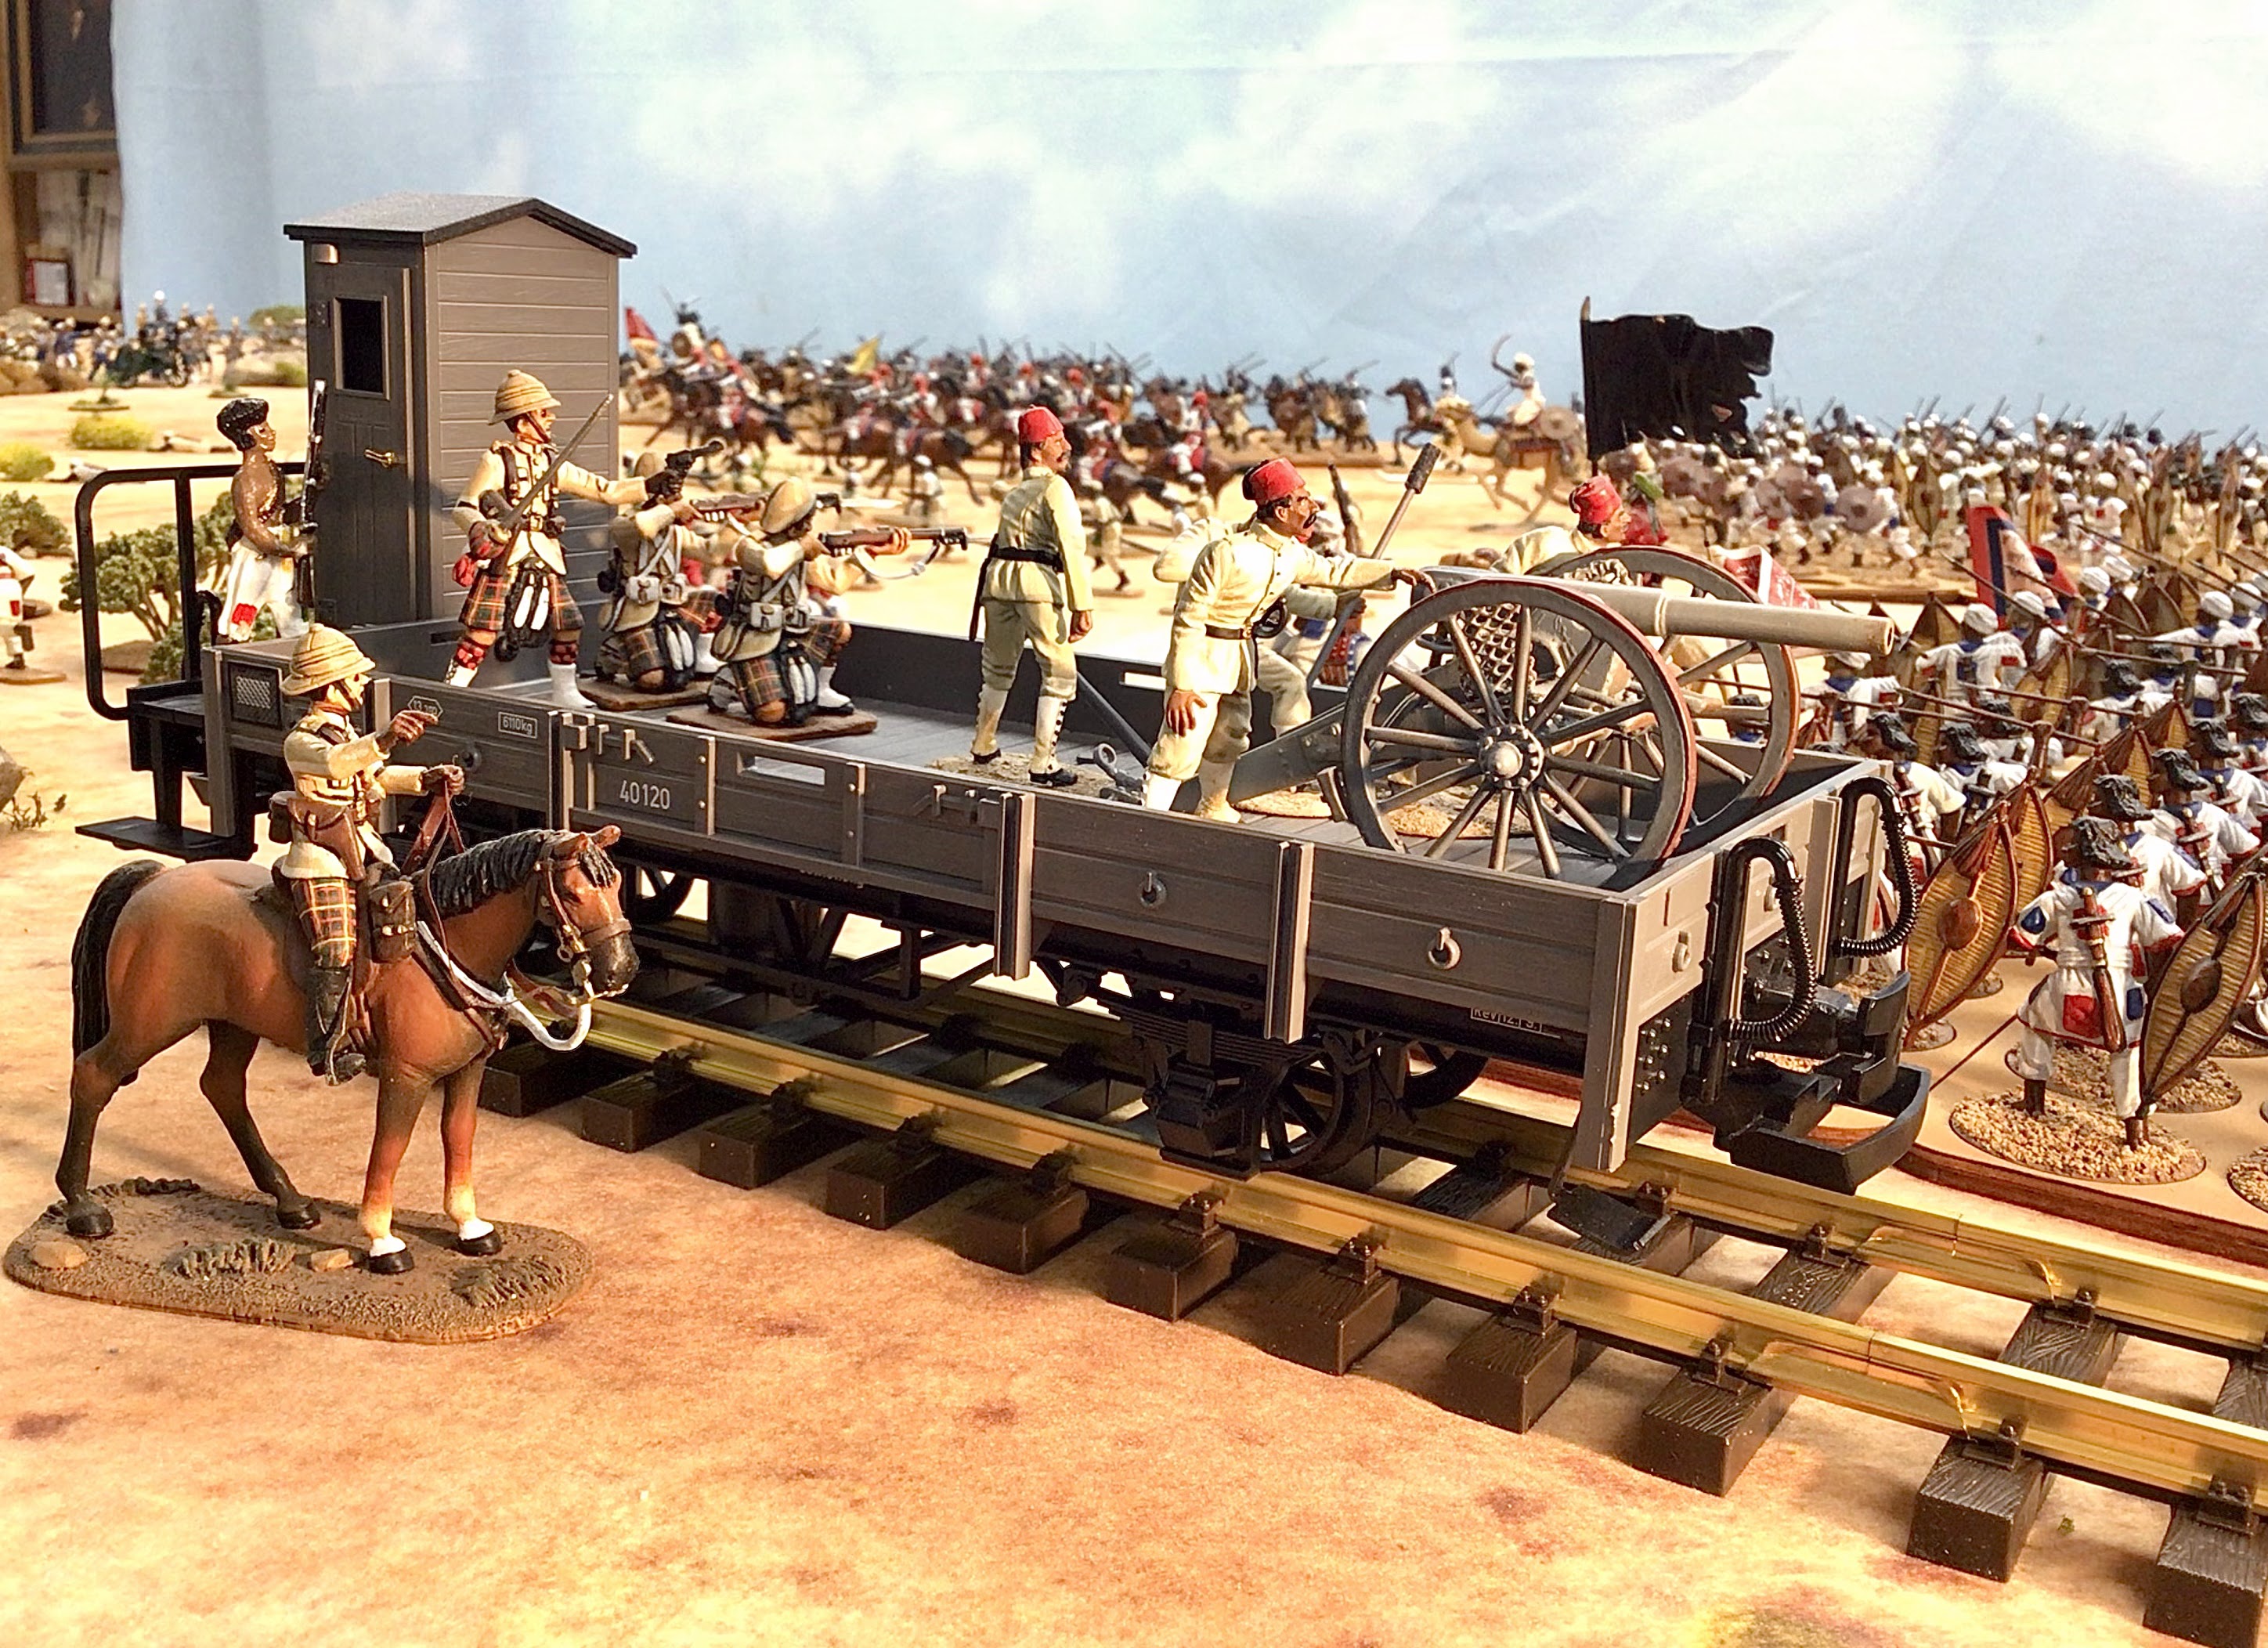
Egyptian Krupp gun mounted on a G Scale railroad flatbed car.
Heritage Camerons provide some support.

Click on all images to enlarge


I was looking at one of Dave Docherty's pictures of his 28mm Sudan game (aren't those Perry figures wonderful?) and noticed that he had a train, tracks and various workers laying new railroad track in the Sudan. So naturally the thought of adding an electric train to my 54mm Sudan Project started whispering in my ear (do it! do it! you know you want to). Here is a link to Dave's fine blog One Man And His Brushes .

Carlo Pagano offers another outstanding Sudan blog:    With Pyjamas Through the Desert . Carlo is the author of the "Sands of the Sudan" rules, which have their origins from Peter Gilder's Wargames Holiday Centre.

Both of these blogs are a must see if you have an interest in the Sudan campaigns of the 1880s and 1890s. The modeling and creativity of both men are truly inspirational.


Dave Docherty's Sudan game at Partizan this year.
Dave is the source of much of my Sudan inspiration.
(Photo by Dave)


So I started an investigation of train scales and sizes that might be compatible with 54mm and 60mm toy soldier figures . It turns out that "G Scale" is a very close match to my Sudan figures. G Scale is the largest size of model/hobby trains and it is often used for outdoors track setups in one's garden.

Yesterday I visited a local railroad train hobby store to get the lowdown on G scale versus O scale (the next size smaller). I brought several wargame figures with me to see how they looked with the two different scales. G scale was the obvious winner, so I bought four sections of railroad track and one LGB flatcar so that I can put them on my game table and see how they look with my 54mm figures.

Take a look for yourself:


And these:


The Egyptian artillery crew and Krupp gun are from the Britains "War Along The Nile" range of 54/60mm figures for the campaign to rescue Charles Gordon at Khartoum. The Cameron Highlanders are from a company called Heritage, if I recall correctly. Another company called Little Legion also makes suitably sized figures that are similar to the old Trophy of Wales figures. It looks to my eye that all of my metal toy soldiers look perfectly at home with the G scale railroad rolling stock. The 54mm Armies In Plastic figures look a little on the small size, in so far as the cars are high above ground, but I think that they will work as they look just fine standing on the train models.

Well, if I'm going to have an electric train set on my game table, then I certainly must have it in working order. Fortunately, track can be set up in a "point to point" arrangement so that I could have a straight line of track going down the length of my game table. It would look a bit silly to have an oval layout on the table and the extra track would take up too much space (as if the train models don't take up a lot of space). 

The rolling stock and engines are approximately 12-inches in length so I think that a maximum of 3 to 4 cars is more than enough. I would need the locomotive engine, a coal tender and a flat bed car to carry track and ties or armed with cannon or Gatling Guns to protect the train.

I would have to decide on a brand of rolling stock to use. LGB track can be used with nearly all G scale trains. I'm told that the problem is that one brand of cars may not be compatible with the other brand in terms of hooking up the cars together. I've kind of narrowed it down to either LGB or Piko trains, both of which are made in Germany.

So am I going to add a train to my Sudan campaign? What do you think?

Painting Update:

I finished 10 more Haddendowa warriors over the weekend and now I'm started on 16 Sudanese infantry in the service of the Egyptian Army during this period. Check the running total of new figures painted for this project in the upper righthand corner.

Friday, October 2, 2020

Wm. Britain’s Nile River Gunboat


The Bordein at dock in Khartoum.

I pulled my large Nile River gunboat out of storage today and set it up at the dock in my Khartoum static display at home. The boat measures about 20-inches long and has a beam of 6-inches. The boat is made by Wm. Britain’s. It is out of production but you can still find them on eBay and at some of the toy soldier dealers across the country.


Friday, September 13, 2019

Lancer Officer Conversion Project


Britain's Egyptian Lancers are ready for wargaming.

Now that I have 36 Britain's Egyptian Lancers ( 3 x 12 figure squadrons) repainted and based for wargames I decided that the brigade needed to have its own cavalry commander. I had an extra broken down Wm. Britian's lancer officer and did a little bit of conversion work on him. 

I decided to paint the officer wearing the Egyptian Winter Blue uniform to distinguish him from the rank and file officers and troopers in the regiment.

Here is the finished figure:


Here are the step by step photos of the conversion process:

Someone long ago either decapitated or attempted to repair the Egyptian lancer officer, sticking a small piece of wood into the head and pushing it through the cavity where the head is supposed to be.
Egyptian officer with redundant sword removed and a sheepskin shabraque added.


The next step was to cut off the sword hilt that was cast onto the body. Since the officer is holding his sword in his hand, the one in the scabbard was redundant.


Rear view showing some repairs to the horse's hind quarters.

Later, I decided to add a valise or blanket roll behind the saddle, largely to cover up the join between the officer's derrierre and the shabraque.
Now the figure is covered in grey primer and is ready to paint.

The officer is now painted and ready for basing.

I like the way that this figure turned out. It's amazing what can be achieved with paint and a minimal amount of conversion work. 

I also converted a lancer into a bugler by removing the bugle arm from a Skinner's Horse figure, removing the lance arm from the lancer, and then placing the bugle arm onto the lancer's torso. Easy peasy work to do.

I have one more conversion figure on the work bench: an Egyptian NCO. I removed the arm from a Britain's Life Guard figure - the arm in the rested sword position - and placed it on the torso of another Egyptian lancer figure. The Life Guard arm has a gauntlet on its hands, so I will have to fashion a gauntlet for the other hand.

Tomorrow I am playing in a 28mm Sudan game at General Pettygree's house and once that game is over, the General will do some landscaping of the table to turn it into the terrain for the Battle of Firket, which will be played using 54mm toy soldiers.

Tuesday, September 3, 2019

Egyptian Lancers in the Sudan

Britain's Egyptian Lancers, basically repainted in matte acrylic paint.


Front view of the lancers.


Over the long holiday weekend,  I started basing individual Britain's toy soldier Egyptian Lancers for our Battle of Ferket toy soldier game later this month. I already had a dozen lancers glossed and based from previous battles. I had repainted them in gloss enamels to give them that toy soldier effect. Another dozen, unbased, were eBay purchases that I planned to base "as is" without any touching up. 

However, the third set of 12 figures (we use 12-figure squadrons) were a complete wreck and needed extensive work. I didn't have my enamel paints on hand, having put them into an offsite storage locker, so my plan was to repaint the figures in matte acrylic paint and then give them a couple of coats of spray gloss  protection. After finishing a couple of the lancers in matte, I started liking the way that they looked and so I decided to do this squadron in matte, rather than in gloss.

You can see the results in the pictures on this blog report.


I am also working on adding a bugler (second from the right) which is still a work in progress.

The Britain's figures are kind of fun to paint, not having too much detail, which makes the job go fairly fast. The thing about the figures that surprised me though, was how nice the horses are. They have an amazing amount of musculature detail such as one would find on 28mm wargame figures. This is part of what led me to the decision to go with the matte finish.

Officer (left) and lancer (right)

I gave the lances a 'bamboo effect' having seen the ones painted by Peter Gilder. I liked the look.

Lancer officer. You can get a better look at the definition in the horse, which makes for good 2-color or 3-color painting techniques/


I plan on adding a lancer standard bearer by cutting the lance pennons and lance tip off of a spare lance that I have in the bits box. I am also working a lancer bugler - basic lancer with lance arm removed and replaced with a bugle arm from a Skinner's Horse bugler.

If I had to do it again, I would do a few things differently. For starters, I would use green epoxy putty to fill in some of the holes that have developed from lead rot in the figures. I would probably rework the hands with putty to give them more definition in the individual fingers and also add a wire lanyard to the lance pole. These are toy soldiers that are meant to be played with, so I am not too concerned about the lead rot in a couple of the figures. I assume that this continues over the years and might eventually render the figure unusable, but that's all right.

I have seen some collectors do some amazing rehabilitation work on Britain's figures and so I want to try out some of these methods and see how well I can do.

These figures will be placed on MDF bases measuring 2-inches wide and 3-inches deep. I drill holes in the bases where the horse hooves attach to the wood so as to make the bond strong. Then I terrain the bases with my usual spackle paste (wallboard paste) and very fine railroad ballast.

I will post pictures of the finished figures on their bases in a future post.