


 |
| HaT Industrie figures: Italian Allied cavalry in Roman service |
Please click on all pictures to enlarge the view
With my Carthaginian cavalry forces nearing completion, I have turned my brushes towards the Roman Republican army in my Punic Wars Project. At the top of the list were two 16-figure units of Italian Allies horsemen in service with Rome.
I purchased a dozen Italian cavalry from the gentleman in the UK who is disposing his Punic Wars armies in 54mm. Another six figures were sourced from eBay. I am always on the look out for 54mm figures on eBay or listed in various wargaming forums. Purchased and painted figures are a quick way to fill out one's army. I do not care about the quality of the painting because good figures need little "touching up" while poorly painted or heavily used figures will look good after some major touch up painting.
 |
| HaT Italian Allied cavalry. The figure on the left is a touch up figure that I painted, leaving the horse "as is". The other five figures are shown as the "Before Picture". |
 |
| The "After Picture" of some of the Italian cavalry, essentially these were totally repainted. |
So I now have one 16-figure Italian cavalry unit that includes the 12 figures (untouched) from the UK and 4 figures from the eBay group. I have a second Italian cavalry unit of 16 figures that I painted in entirety.
 |
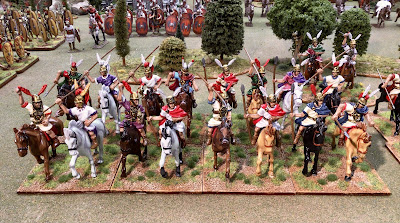
| The two 16-figure Italian cavalry units. |
 |
| This is the unit that I painted. |
 |
| This is the unit of purchased figures. The basing/terraining makes all the difference. |
Command Stand - A Mini Tutorial
I also painted a two-figure command stand for the Italian cavalry. The officer holding his sword aloft in heroic fashion ("forward lads, follow me") has a sword that I made from wire off cuts and a hilt made from epoxy putty. The standard bearer is straight out of the box. I use a piece of 1/8 inch bass wood for the base. I cut the base in an irregular manner using a small coping saw to curve the corners, then beveled the edges with a flat file.
The figures were glued to the wood base using "tacky glue" and allowed to dry over night. I also placed a small blob of epoxy putty under the saddle before adding the glue. The putty helps to seat the figure solidly on the horse and fills in some of the gap between rider and horse.
The next step is to slather the base with my standard goop: wallboard paste with brown craft paint ($1.00 per bottle) mixed in to give it a brown tone. Once the goop is slathered around the horses' feet the base is sprinkled with a heavy coating of Woodlands Scenics railroad ballast. The ballast provides texture to the stand. Next, I dry brushed an orangish-brown color from my box of craft paints and then gave it a second dry brushing of linen white or creamy yellow.
Final step is to glue tufts and flowers onto the base and let them dry for about an hour. After that, I do the final touch and add a minimal amount of static grass to the base to finish it off.
See picture of the finished command stand below.


I will likely use this command stand as my overall Roman cavalry commander. The HaT Roman cavalry figures are noticeably smaller than the Italian cavalry figures so they do not look as imposing in comparison.
Next on the docket, some Roman cavalry. I have 12 figures primed and ready to paint and another 4 figures purchased on eBay. This will give me my standard 16 figure cavalry unit for this project.
My next blog post will feature the Numidian cavalry in Carthaginian service. These were painted several weeks ago, but I only got around to basing them yesterday.

Very impressive , love this project and how it is progressing .
ReplyDeleteA colorful and splendid cavalry, love the bases as well...
ReplyDeleteMore fantastic figures Jim.
ReplyDeleteWillz.