Thursday, July 30, 2020

Saratoga British Painted Pix


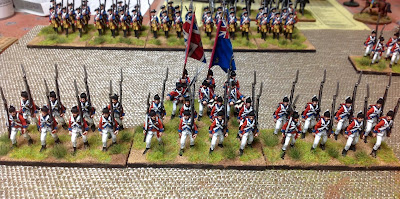
British figures from the new Saratoga range from Fife and Drum Miniatures 


I recently finished the painting and basing of the 21st Regiment in General Burgoyne's army during the Saratoga campaign. The figures are Fife and Drum Miniatures (of course) and the flags are from GMB Designs in the U.K. I am increasingly of the opinion that the British regiments left their colors in Canada. There is a source that indicates that only the 9th Regiment brought their colors with them  to Saratoga.

The 21st was commanded by Lt. Colonel James Hamilton and departed Montreal with 23 officers and 370 rank and file men. I don't know whether these figures include the two flank company personnel or not. The light company was converged with the lights of the other regiments in the army and the same held true for the grenadier companies in the army. My recollection is that both flank company battalions had over 500 men.

21st Regiment 


I use a figure to man ratio of 1:10 ( one figure represents 10 actual men) so a 50 figure flank battalion would be quite a force to reckon with on the war-game table. The 21st Regiment has 38 figures in it in my order of battle. I have four stands of 8 figures mounted on 80mm wide by 40mm deep and a command stand of six figures on a 60mm by 40mm base. I place one NCO and seven rank an file men on the eight-figure stand. The command stand has two standard bearers, two drummers, one officer and one NCO.


I also painted the 62nd Regiment in Burgoyne's army, but I haven't attached the flags yet.

The 9th, 20th, 21st and 62nd were all in the same brigade at Saratoga.

Wednesday, July 29, 2020

My Sudan Reading List


I've recently ordered a number of books about the Sudan campaigns of the 1880s and 1890s and all of the books have come home to roost in my library. So in order from best to average are the following:

1) Khartoum The Ultimate Imperial Adventure - Michael Asher

2) Go Strong Into The Desert - Lt. Col. Mike Snook

3) The River War - Winston Churchill

4) Blood on the Nile (Black Powder supplement)

5) With Hicks Pasha In The Soudan - John Colborne

6) Fire and Sword in the Sudan - Rudolph Carl Slatin ("Slatin Pasha")

Book choice #1 arrived the other day (saving the best for last?) and I did a Half Gainer into the volume right away. People told me that this is a hard book to put down and they are right. The account of the Desert Column's desperate fight to get to Mettameh and the Nile is very compelling and reveals how close it came to destruction.

Mike Snook's book looks really good too. I've skimmed through it and read several of the sections, but I can already tell that this is a good book. Snook has actually visited the battlefields in the Sudan and includes pictures of the ground today, which are very helpful. The book is published by Perry Miniatures and includes some of their drawings. My one nit to pick is that the font is too small and hard to read for my 67 year old eyes and the picture caption use a light grey color typeface

3) Winston Churchill has a good writing style that is easy to read, albeit it is not politically correct by today's standards. His book would not get published in 2020.

4) The Black Powder book has extraordinary eye candy featuring superb Sudan game layouts. The book is worth buying for the inspirational value.

5) John  Colborne was a British officer on Hicks Pasha's staff and he did not get along very well with Hicks. Colborne had the good fortune to be ill on that fateful day - was back at a base and so missed out on his chance at immortal fame or infamy. This gives us a first hand account of the campaign, which makes the book worthwhile.

6) Slatin Pasha was an Austrian who had been the governor of Egyptian Darfor and was captured by the Mahdi prior to the fall of Khartoum. He was held in captivity for a dozen or so years before making his escape in 1895.

This reading list should keep me going for quite awhile. I also have the Michael Barthorp book and several Osprey Campaign books to round out my resource collection. Let me know if you can recommend any other titles. Snook has a second book that I will probably purchase.

Sunday, July 26, 2020

Minden Miniatures Prussian Guards

IR15/II - musketeers of the second battalion of the Prussian Guard


I recently finished painting and basing a battalion of the second battalion of the Prussian Guard (musketeers in tricorn hats). The actual figures had been painted several months ago, but I was awaiting the arrival of the GMB Designs flags to finish the unit and do the basing and terraining. Flags arrived and were immediately affixed to their staffs and are now ready for service.


The figures are the Prussian Guard Musketeers that were added to the Minden SYW figure range in late 2019. I decided to change my basing system from 2 ranks on a 60mm wide by 40mm deep base to three ranks on a 60mm wide by 80mm deep base. The third rank consists of the officer, NCOs and drummers. The end stands have the drummer on the outside flank standing next to an NCO. The other stands have one officer or one NCO.

The figure configuration per stand is:

8/9/8/9/8 = 42 figures

The old system has six figures per stand on five stands = 30 figures.

View of the third rank of officers, NCOs and drummers.

I kind of stumbled into this basing concept when I decided to paint some AWI Hessians (in a firing line) as Austrian musketeers. I added Minden SYW drummers, officers, standard bearers and NCOs to the Hessian figures to make the unit look more "Minden-like". I used the conversion by paint method to turn the Hessians into Austrians.

Because the front rank of my firing line has the muskets in firing poses, I was a bit concerned about having the musket and bayonet extending over the front edge of the stand, thus making it susceptible to breakage from rough handling. So I decided to keep the same 60mm frontage, but double the depth from 40mm to 80mm. in order to provide the base depth that would protect the muskets and bayonets.

I immediately noticed that I had lots of extra real estate on the bigger stands, so this allowed me to do two new things to the battalion: cram at least 8 figures onto the stand instead of 6, and add a third rank of file closers. Each stand has a third rank of either drummers (only on the two end stands), NCOs or officers. Bigger stands and more figures means that the size of the battalion would suddenly increase from 30 figures to as much as 42 figures. I have the flexibility to remove one of the stands (8 or 9 figures) to reduce the size of the unit more in keeping with my existing battalions of 30 figures. If I removed an 8-figure stand, that reduces the strength from 42 figures to 34 figures. Using a 1:20 ratio, this results in a battalion of 680 men, which is closer to the theoretical strength of 720 men in a typical Prussian infantry battalion.

However, removing one stand leaves me with four stands, of which the command stand flags are now slightly off-center when the battalion is deployed into a line formation. My solution was to add a stand representing the 3-pound battalion gun and crew and place it on one of the flanks. This would give me a configuration of:

8/9/8F/9/battalion gun. 8F represents the command stand with the battalion's flags.

I prefer the symmetry of a battalion that has its flags in the center of the battalion frontage.

I like the new look and this will likely lead me to paint a whole new Prussian and Austrian army for the infantry service branch. I don't have to change the cavalry basing, but I will have to increase cavalry strengths from 24 to 36 figures, by adding 12 more figures per regiment.

And so I will end up with two Prussian infantry contingents and two Austrian infantry contingents; however I will likely sell off the old 30-figure battalions as I paint more 3-rank battalions. I have the one Prussian Guard battalion compared to six Austrian battalions already painted.


Here are several pictures that compare the new (three ranks) basing system versus my original (two ranks) basing system

New basing system (top) versus the original basing system (bottom).

The battalion frontages are the same, but the new system has the files much closer. There are 30 figures in the original battalion and 42 figures in the new battalion.

New system (left) has three ranks compared to two ranks for the original system (right).


Friday, July 17, 2020

The Original Banana Republic Store


I remember back in the 1980s when Banana Republic stores featured Safari gear and other travel accessories that harkened back to the 1930s and Indiana Jones movies or a 1950s Stewart Granger safari movie. The catalog also featured one-off finds that the owners discovered during the course of their global travels.

The company was headquartered in the San Francisco area and it issued wonderful catalogs on a regular basis (monthly?). The cover always had a hand drawn, somewhat whimsical, drawing on the cover that was a little work of art in its own right. Some of the stores had funny displays such as a real army Jeep or artificial animal Trophy heads, or even a full sized artificial giraffe. Every visit to Banana Republic was a travel safari in its own right.

I was a regular customer of Banana Republic in the 1980s. I had my Indiana Jones fedora, Khaki pants and safari shorts ( outerwear, not underwear, LOL), various backpacks and travel bags, etc. The clothes were of very good quality and you could wear the trousers, shirts etc. without looking like a poser. They were really handy for hiking trips.

Alas, somewhere along the line, the company was bought by The Limited, a national retail clothing chain, bought Banana Republic and turned it into a high priced clothing store that targeted Yuppies ( Young Urban Professionals) and more specifically young women.

No more colorful catalogs to look at. Once my safari trousers had worn out, there was no way to replace them. It was a sad loss, indeed.

Wednesday, July 15, 2020

When Will You Return To Live War Gaming?


Last weekend on the Virtual War-game Club ("VWC") on-line forum we had a discussion about how and when we would return to live person to person wargaming. One member had a game scheduled for that very weekend. Hello Mr. Canary; how safe is that coal mine? Others were on the fence of yes and no a couple of people were not ready for person to person contact, due to health issues in their families. 

So that sort of runs the gamut of all possibilities and I suspect that the majority of us are sitting on the fence at this moment in time. I was in the fence sitter camp, but a day or so after the VWC meeting, my thoughts started turning in the positive direction; and here's why:

Since the pandemic lock down began in mid March and basically ran through the end of June, I have been making regular trips to the grocery store, gas (petrol) station and the pharmacy. I take great care when I am out in the public domain, wearing a face mask, wearing disposable latex gloves, carrying a pocket sized bottle of hand sanitizer, and being mindful of keeping social distancing.

At the risk of karma going bad or my being jinxed by saying this, I have not contracted the Covid-19 virus. That got me to thinking: "if I can make a trip to the grocery store and be safe (mindful that there are a good number of other shoppers in the store), why not give person to person war gaming a try?" When you think about it, it seems that one would be relatively safe, or at least as safe as being in the grocery store, in a group of four to six people who are wearing masks and following all of the other protocols of virus safety. Wouldn't the grocery store be riskier than playing a game set up in the garage, or outdoors?

In the VWC meeting last week, members came up with a number of ideas that could help make group war games safe:

1) the obvious one - following the established protocols (masks, gloves and distancing)

2) each player only moves his own figures in his command

3) each player has his own set of dice, dice are not shared

4) each player brings his own beverage refreshments and snacks, no sharing of snacks.

5) wiping down surfaces with disinfectant spray, as needed (this would not include giving your first battalion of the Prussian Winterfeldt regiment a heavy spritz of disinfectant after each handling).

6) keeping six feet distance among players.

7) limit the number of participants to four to six people.

8) possibly set up the game table outdoors provided the weather cooperated.


I believe that the implementation of these protocols would make for a low risk war gaming event. Are there any other ideas that you can think of? If so, please make a comment in the comment section at the end of this blog post.

My garage can accomodate a rather large wargame table, being that it has three car stalls, of which one is not in use. My wargame tables are those 2.5ft by 6ft "school cafeteria " fold up tables that you can buy in stores such as Staples or online at ULine and other similar suppliers. I have enough tables to set up a single 6ft by 20ft table, or a smaller length of table, but with two parallel tables and a virtual aisle. Airflow should be good with all three garage doors open.

Another idea is to set up the tables in the drive way adjacent to my garage. The air breeze and circulation would be even better than that inside the garage. I could purchase one of those portable "flys" or open sided tents that you see at local farmers' markets or outdoor craft show. This would provide needed shade on a sunny day. 

I think that this idea is doable. Now all that I have to do is convince my regular group of gamers that an outdoor game would carry less risk than a visit to the grocery store.

What do you think?


Tuesday, July 7, 2020

Modeling The Governor-General's Palace In Khartoum


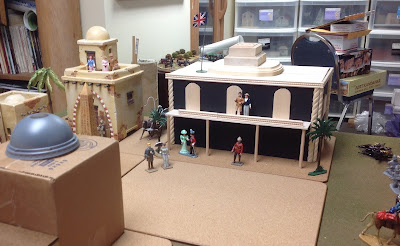
The Governor-General's Palace in Khartoum.
Work In Progress

Over the July 4th weekend I decided that it was time to grasp the nettle and start buiding 1/32 scale Middle Eastern buildings to represent Khartoum in my 54mm Sudan Project.


Part of the wood framing structure built behinds the foam core board walls.


Cross beams for the second floor, notched to add strength to the beams.

Interior bracing to provide a platform for the roof and to prevent the foam core board from warping .
Foam core board walls have been glue together. A sewing pin (3 per corner) is added for extra strength and then the corners are covered with masking tape to conceal the join.


I found some ornamental wood trim at Home Depot. The twisted piece makes for a nice Arabic column. Another piece of trim is glued to the facade to cover the join of the roof to the front facade.

Cross beams are now glued to the front and back of the building. These will serve as a beam on which to rest the veranda floor in the front of the building. A similar beam on the back and sides break up the mass of the walls and provide an element of architectural interest. Windows and doors will be added later.

Front beam to support the veranda deck is glued horizontally.
Twisted trim wood looks perfect for Arabic architecture.


The roof is now glued to the model and another piece of wood trim is glued to the top of the front facade. It looks nice and it covers the join of the roof pieces to the front facade.
Similar work is done on the sides and the back of the building.

A two-inch wide piece of balsa wood forms the veranda floor which is supported by plain columns made out of dowel rod. I made some templates for the front windows/doorways out of paper and they give me a hint at how the finished model will look. One of the paper windows has been replaced by one made out of balsa wood.


Mock up paper windows give me an idea of how the front facade will look.
The palace would look rather boring or incomplete without some kind of focal point on the roof. I found some pine rosettes in varying sizes at Home Depot. These cost around one dollar each. I stacked them up to create a more interesting skyline silhouette. I might add a roof top handrail on posts, but that might be too much work for me. I think that a handrail on the front veranda would be appropriate though.

Now we have an idea of how the palace will look when it is finished. Obviously there is still much work to do such as adding window on the back and sides of the building and more doors on the ground floor in the front.

The building will be painted either to match the color of the other buildings or it could be an off-white color. All of the buildings will be attached to cork placemats in a modular format. I will be able to mix and match various modules together to create different looks. The cork will be painted.

I sprinkled a few civilians around the town center for the photo shoot. These are 54mm toy soldiers from Trophy of Wales Miniatures. I wish that I could find some Middle Eastern civilians to populate Khartoum .  Any suggestions are welcome.

I placed some architectural rosettes (purchased at Home Depot) on the roof of the building
 to provide some visual interest of the roof. These will eventually be glued in place.
An Egyptian obelisk, purchased from an art museum, provides a nice focal point in the plaza in front  of the Governor-General's Palace. Some of the ex-pats from Britain are inspecting the new building.


And finally:  a pre-made minaret arrived in the mail from King & Country Miniatures. I was going to make my own minaret, but when I saw this model, I had to have it. It is perfect for the scene and gives the town a Middle Eastern feel. I will have to build my own mosque and leave a place on it for the minaret. The dome of the mosque will be made from a lid for a coffee drink from Starbucks.


A new minaret fom King & Country arrived to day and now sits atop the mock up of the town's mosque.


The new buildings improve the skyline of Khartoum.

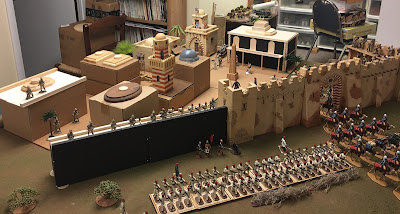
Aerial view of the whole town and its walls. The wall extensions are works in progress.

 I am tempted to push the town walls out further to create more space for the city behind the walls. The Palace should have a formal garden in the front and I could add the town armory  next door to the Palace.


The model will soon be ready for paint and I am kind of anxious about this step. The main thing is that I don't want the foam core board to warp when it has been painted. I did some test work on a piece of half-inch thick piece of the board and it didn't warp. The eighth and quarter inch boards warped so I won't be using these thicknesses.

Monday, July 6, 2020

Gorcy Hussars Minden Pictures

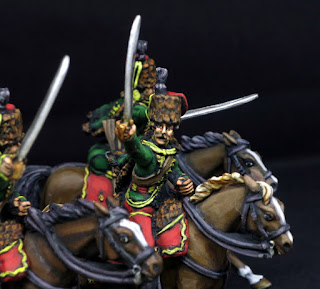
Gorcy Hussars of Württemberg


One of my customers sent me some pictures of some of his painted Minden Miniatures. These are Austrian hussars painted as the Gorcy Hussars of Würtemberg.

This demonstrates the versatility of Minden figures for armies of other countries. This unit is one of the most beautiful examples of Minden figures that I've ever seen.


Add caption


Saturday, July 4, 2020

Happy Fourth of July

Independence Hall in Philadelphia 


I want to wish everyone a happy Fourth of July holiday today. This is the day when Americans celebrate the declaration of our independence from Great Britain and the creation of what would eventually be called the United States of America.

The holiday is actually a bit more meaningful because it seems like it is the one day of the year in which we are all Americans, all one people no matter what creed or color of one's skin or political beliefs are.

Usually I would take the family to the local July 4th parade and then we would have family and friends visit for a cookout in the backyard, followed by a viewing of fireworks in the evening.

However, this year, because of the Covid-19 pandemic, the Purky family is staying home today in self-lockdown to stay the virus. It is a completely different feel this holiday. We can only hope for better days ahead.


Meanwhile, here is a picture that hopefully will generate a few laughs:


dd

Friday, July 3, 2020

Morgan's Rifles At Saratoga- New Greens Pix


The other day Richard Ansell sent me some pictures of his latest work on the Fife and Drum AWI figure range: Daniel Morgan's Rifles at Saratoga.

The greens are on their way to Griffin Moulds where the master and production Moulds will be made and the figures will be cast. There are a total of eight different figures and they will be sold as a pack of eight figures, with one of each pose.


M


Thursday, July 2, 2020

Behind the Walls of Khartoum

My mockup layout for Khartoum in 54mm


I have been working on some building "mock ups" to portray the city of Khartoum in the area behind the walls of the city.


The Modeling Professionals
Seeking some ideas and inspiration, I found some very attractive model Middle Eastern buildings on the internet. These building models were made by professionals, but hopefully I can use some of them to guide my building of models for my version of Khartoum and Suakin.

Wow!

Another view of the building in the first picture.


Note the narrow street or alleyway in the moddle of the models.

Overhead view of several of the models placed together to form a city block or compound.


Mockup Town Layout for Khartoum

Yesterday I decided to build a mockup of a possible layout for my version of Khartoum in 1885. I already have three 54mm buildings from King & Country Miniatures that form the basis of the town. However, it is obvious that I will need many more buildings, so I started a mock layout using cardboard boxes to give me an idea of how much area I have to work with behind the city walls.

I placed some pieces of ornamental wood blocks on top of some of the buildings to add some architectual detail. The round and oblong bases were bought at Michaels Stores. The Two square blocks are rosettes purchased from Home Depot. The minaret is a cardboard tube from a roll of paper towels, topped by a round MDF base and stacked with some 1-1/2 round discs that were purchased from Michaels. You can see various toy soldiers standing next to some of the "buildings" to give some context to the size.

A view behind the walls: the minaret in the center will be an important landmark.

The finished town walls are made by King & Country.
I plan on extending the walls using the 1/2-inch thick foam core board.

The Khartoum skyline.


Plastic coffee lid from Starbucks makes for a nice dome.

What's Next?
Now the question is, how will I actually make the buildings?

My first building will be made from cardboard, using either an existing box or wall pieces that I will cut from heavy duty liner board that I have been saving over the past year. Some of the liner board used for shipping consumer products are quite sturdy and should be easy to cut to size. Then it is a matter of adding things such as windows and balconies and stairs made from bass wood and plywood.

The big question and concern is, how to paint the model so that it doesn't warp from the paint? I will probably start with a small building to work out some of the construction details and to see if it can withstand warping when I paint it.

I would like to use pre-mixed wallboard paste (Spackel compound) to create a stucco or adobe texture and look. Experiments indicated that nothing less than 1/2-inch thick foam core will resist warping. The eight inch and quarter inch thick pieces warped when I applied the spackel.


I've been reluctant to start the modeling project - fear of the unknown I guess. I think that I can do the construction part, but it is the painting and warp prevention parts that give me pause.

I guess that the solution is simply to give it a go, hope for the best, make some mistakes, and learn from my mistakes.