Showing posts with label Buildings. Show all posts

Wednesday, April 9, 2025

The Roman Forum/Basilica Model


An orator speaks to a gathering crowd in front of the basilica

The front entrance to the basilica. I repurposed a cameo of a woman from a piece
of discarded jewelry for use over the front door.

Click on images to enlarge


I finished another building model for my 1/32 scale Roman town this week. It is a basilica that can also be used as a forum.

In Ancient Rome, basilicas were versatile and monumental structures that served the civic, judicial, and religious needs of society. Designed as long rectangular buildings featuring a large central space (called a nave), and flanked on either side by aisles, basilicas were centers of public life.

So now my growing Roman town (at what stage does it become a city?) now has a public building for government administrators. It is conveniently placed on the central plaza in the town, across the street from the Temple of Athena.


The basilica's roof needs to be finished so I placed a carpenter on the roof to make the repairs.
Why not? I really like this picture.

The butcher's shop and the antiquarian dealer's shop are next door to the basilica.
The Temple of Athena can be seen in the background.

Now it's starting to look like a large town!

The quayside view of the basilica

A bird's-eye view of the town

A view of the older temples across the river from the town.

A Roman war galley sails into the port.

The basilica was constructed from foam core board, bass wood for the rafters, and balsa wood for other bits of trim such as the doors. I also found a cameo of a Roman woman's head that I repurposed from a piece of discarded jewelry and I placed this over the front doorway to suggest an ornamental relief sculpture inside the pediment. Plastruct brand roof tiles (in G Scale) were used for the roof.

I will probably take a pause on making more town models until after the Little Wars convention, which is coming up soon on April 24-27, 2025 in Lisle, Illinois. I could probably use a couple more farm house sheds for my games.


cc

Thursday, March 27, 2025

More Roman 1/32 Scale Buildings


The Roman town is growing!


With Little Wars coming up soon (April 24-27, 2025 in Lisle, Illinois) it is time to put the metal to the peddle and really focus on getting my Hannibal terrain finished. I also have one 32-figure unit of Italian allies to paint.

A number of my Roman houses were only partly finished. They needed painting and the attaching of their roof and I had been putting off this task over the past month. The building shown below is probably the most complicated structure that I have built so far. The deck/balcony requires extra work and precision fitting of its components. At the last minute I also decided to add the little structure tacked onto the second floor of the building (shown on the left side of the below picture). It took me two hours just to make this small add-on piece. Yikes!

My favorite and most difficult building, so far.

The unfinished version of the building model.

The finished version of the model. This is the local Taberna. The innkeeper
is standing on the balcony overseeing events going on in the town. I still 
need to glue the balcony rails to the deck. I will do these last after attaching the 
roof to the model.

One of the citizens walking down one of the narrow streets of the city.
The aqueduct arches are shown on the right hand side.

I like this picture of the citizen walking down the narrow street.
I should have done some editing with the light in the photo.

The two buildings on the left and middle were finished yesterday. The third building
in the distance on the right is actually a facade of a building. I added a 
rectangular structure behind the facade to give it 3D depth.

Here are some pictures of the various buildings in their partially constructed and yet-to-be-finished mode.


Lady Hagatha suspects that her hubby is up to no good.
What could she be looking at?

Marcus is going to have some explaining to do!
A small Roman bath.

I hope to find the time to start on the local temple this weekend. I bought a lot of wedding cake Roman columns to use on this model.


ccc 

Sunday, March 23, 2025

Tutorial: Building a Roman Triumphal Arch


The 1/32 scale (54mm) Arch constructed by Fritzious Magnus

Every Roman city of repute must have its own triumphal arch located in the center of the city. It is an iconic Roman look and so I decided to build an arch for my growing 1/32 scale (for 54mm soldiers) city.

I based my arch somewhat on the Arch of Titus in Rome. See below:


The Arch of Titus

Materials Needed

1/2-inch foam core board (purchased from Blick's artist supplies store)

1/4-inch foam core board

Balsa wood of various sizes

Wood trim that I found at Home Depot

Coins (pennies and dimes) to use as images of leaders found on the sides of such structures

Sewing pins

1/2-inch wide masking tape

Circle Template (found in art supply stores or Michaels Stores)

Hot Glue Gun

Wood Glue

Box cutter knife

Exacto knife and Exacto mitre box and mitre saw set


Construction Details

The walls and roof are made from foam core board which at 1/2-inch thick is sufficiently strong to withstand any rough handling or storage/transport from my house to the game convention site.

Front walls: 9-inches wide by 8-inches high

Arch: 2-1/2 inches measured in from each edge of the foam core board and 5-1/2 inches to the high point in the arc of the arch.

Side walls: 4-inches wide by 8-inches high

Roof: a piece of 1/4-inch foam core board cut to dimensions that will give it a 1/2-inch over hang once the four walls are assemble. Another piece of 1/2-inch thick foam core board will later be attached to the top of the roof to provide structural support for the cornice trim on the top edges of the arch.

Trim for the cornice and columns: I found some really useful pieces of miniature wood trim at Home Depot. It is hard to describe what they are and how they look, but they provide a classical look to the arch. You can find these in the area where ceiling moulding and floor trim are found in the store.

Constructing the Arch

The first step is cutting out the wall pieces from the 1/2-inch foam core board. I recommend using a metal T-Square tool to ensure that you get straight cuts in the material. Once I pencil out the cutting lines, I remeasure everything to make sure that the dimensions are true and correct. Then I place the metal T-Square along one of the drawn lines and cut the board with your box cutter. Do not use any of the Exacto knives for this process. The box cutter provides a neatly cutting whereas the Exacto knife can result in a rough looking cut with chunks of foam cut out the board.

Next, I take some of my sewing pins and stick the four walls together to see how the structure will look. I then raise one of the walls a little bit so that the sewing pins are still sticking into the foam. I apply a liberal amount of hot glue and then push the pieces together. I do this for each edge of the walls that are being glued together. Next, I pry the sewing pins part way out of the foam core board and snip off the flat head of the pin with a wire cutter. Then I push the pin back into the board to provide support for the glue join.

Following this, I cut a piece of roof from 1/8-inch foam core board, making sure that this roof piece overlaps the edge of the walls by 1/2-inch.

Attaching the cornices and columns

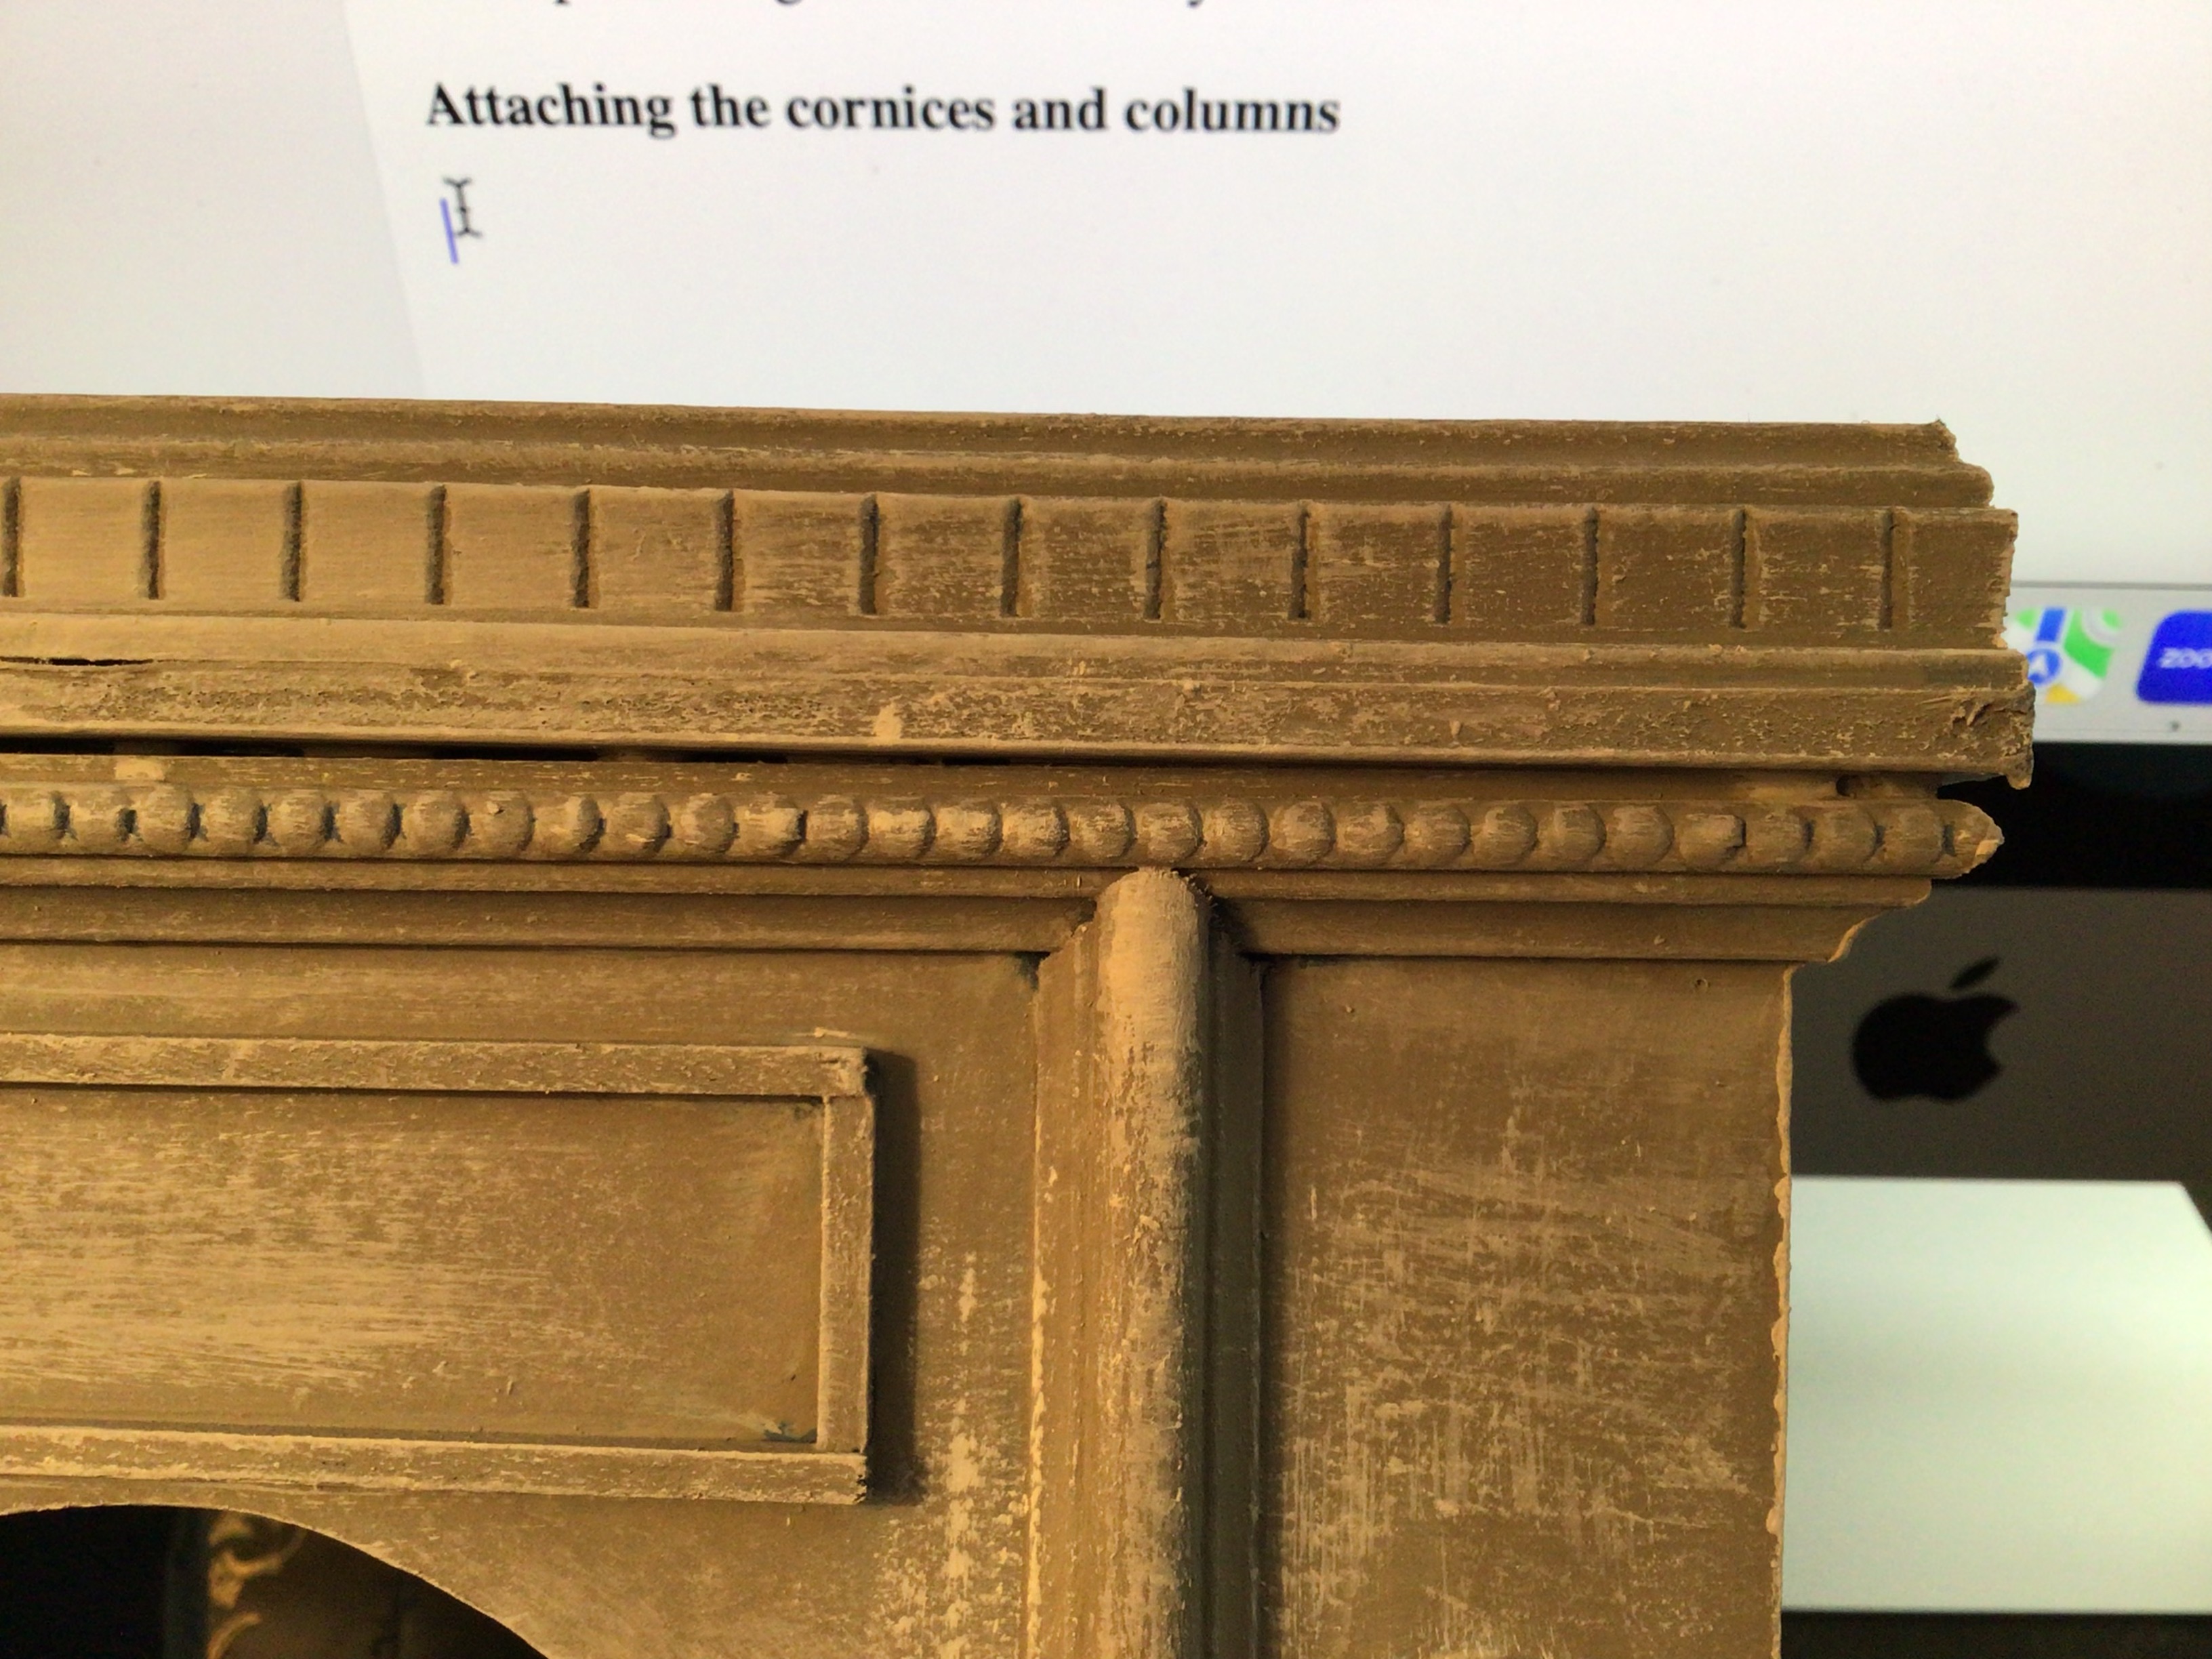
Here are some close up pictures of the trim pieces. They are all 1/2-inch wide.

Close up view of the trim piece used for the vertical columns on the front and 
rear sections of the arch. Note the Lincoln penny that I glued to the board.

Here you can see the three different trim designs that I found at Home Depot. The beaded
trim is glued horizontally and abuts the 1/4-inch foam core board overhang.  Then the trim 
piece that resembles a vertical column is glued to the arch and abuts the beaded trim. Finally,
a piece of dental moulding is glued to the top of the foam core board to provide the crown of
the arch.

All of the wood trim pieces are attached to the walls of the arch using wood glue. Hot glue is messy and I have found that sometimes the glue doesn't stick and the piece eventually falls off. Wood glue will attach the pieces permanently and it sets in about five minutes.

The tedious part of the trim assembly occurs when the pieces of trim are cut. I used the mitre box and mitre saw for this and cut the pieces at a 45-degree angle so that they fit together seamlessly. Exacto makes a nice miniature mitre box and saw and I use it on many of my building construction projects.

Be sure to measure the trim pieces at the same length as of roof section. Anything less will result in a gap where the pieces should join together. I learned this the hard way and had to throw out several pieces of trim that I had cut. Also, double and triple check to make sure that you are cutting the mitre angles on the rear side of the trim rather than on the front side of the trim. I made this mistake several times. Doh!!!

The bead moulding under the roof overhang is easy to do as you have two surfaces to glue together ( the wall side and the over hang piece. I use wood glue for this.

The crown piece, or dentile moulding, is glued to the top of the roof. I begin by laying out the four pieces of wood together on the roof. Then I use some sewing pins as guides for the location of the pieces. I stick the pins into the inside edge of the wood moulding so that when I glue the wood to the foam core board, I have a guide for its placement. Once the guide pins are in place, I glue the crown moulding pieces to the top of the roof. After the pieces are glued together I stick more pins into the inside edge of the moulding to help it stay in place.

The final stage of the roof cornice sections is to cut out a piece of 1/2-inch foam core board that will fit inside the four edges of crown moulding (5-1/2 inches wide by 9-1/2 inches long). I use hot glue to attach the piece to the top of the roof. This insert piece abuts the the interior of the crown moulding and provides extra strength to the crown. Without this, there is too much free standing wood on top of the roof that could break off with rough handling. Since the insert fits snuggly against the crown moulding, it is like adding a support wall that will prevent any breakage.

Adding details on the walls

The next step is to add some details to the walls of the arch that fill in some of the blank wall areas and give the arch a finer look. I use Lincoln pennies and Roosevelt dimes and glue them onto the wall with hot glue. I place Lincoln on the front and back sides and Roosevelt on the sides. I actually place two dimes on the side: Roosevelt's head and the reverse side ( I forget what it is called; phalange?).

Once the coins are painted over and dry brushed with white paint, the heads will be picked out and easy to see. However the paint softens the head image so that it looks like some Roman dude rather than an American president.

I cut pieces of balsa wood to make a frame over the top of the arch opening. The frame measures 4-inches wide by 1-inch high.

I use wood glue to attach the pieces to the surface of the foam core board on the arch. Usually the arch would have some words within this frame, either identifying the emperor that built the arch or it might have "SPQR" engraved inside the frame.

The side walls use a similar frame of balsa wood, but these are larger at 3-inches wide by 6-inches high.

Balsa wood frame with two dimes glued inside the frame, Note also the piece
of wood at the base of the model. This base kind of ties everything together.

The final construction step is to glue a piece of bass wood or balsa wood around the base of the arch, as shown in the picture above.

Basically, any join that involves pieces of wood should use wood glue and any join that puts two pieces of foam core board uses hot glue.

The finishing touches: painting the model

Now that all of the bits and bobs are glued together, it is time to paint your model. I use "chalk paint" that you can purchase from Michaels or purchase on line from Plaid Paints. Don't ask me why I use chalk paint, just trust me that it looks better/more realistic than acrylic paint. I used three coats of paint on the arch, largely to hide the primer paint that I used on the arch. I reasoned that primer should cover the wood bits and the coins before I could paint them. A light grey primer is the best color because grey sort of looks like stone. On other buildings I don't use primer, just painting over the surface of the foam core board.

The final part of the painting, of course, is dry brushing the model with a lighter color. Use dry brushing sparingly because it makes the details "pop out" from the darker undercoat. During each stage of painting, I use my finger to wipe the paint from the coins, otherwise the two or three coats of paint will obscure the images on the coins. It is only when the highlight color is dry brushed to the surface that I don't wipe off the paint.

That pretty much finishes the arch model. I want the "SPQR" letters inside the frames above the arches. I don't trust my freehand painting skills enough to hand paint the letters, so I will either find images on line to down load onto paper or maybe use Word software to print out the letters in the correct size. The paper will be glued to the surface using spray on rubber cement (spray the paper with glue, not the surface).

Here are some pictures of the finished arch (sans the SPQR lettering) shown in situ in my Roman town.

The finished arch. Note the sections of aqueduct in the background. I made those
prior to making the arch and they gave me practice in making arch openings
similar to that of the triumphal arch.

A view of the town center, or forum, showing the location of the arch. I think that 
the arch really improves the visual look of my Roman town. The cobblestone mat
is made by Cigar Box Battle Mats.

You can see that there are a number of buildings that are in various stages of "work in progress". The black models still require some final assembly and painting. The two larger buildings on the right hand side of the picture need to have their roof tiles painted so that they look like the tiles on the building on the lower right hand side of the picture. Herb Gundt made that building for 28mm figures and I have used some of the buildings that he made for my long ago Late Roman Project as templates and ideas for my large 1/32 scale Roman building models.

The cobblestone surface in the town is a Cigar Box Battle Mat that I purchased recently. The civilian figures are a mostly from King & Country in Hong Kong and they are 1/30 scale (about 60mm), but I find that they fit rather nicely with my 54mm figures. The Egyptian Obelisk was purchased from the New York Art Museum on line store.

Conclusion

I know that there aren't too many of my readers that will have a need for 1/32 scale building models, but I thought that the step by step construction tutorial would transfer easily to smaller 28mm models. On the other hand, there are quite a few laser cut Roman buildings that are available from some of the more notable and usual providers of such things. I really like the Sarissa models that are sold though Footsore Miniatures in the UK. Click on the link below. I only wish that Sarissa made some of these models in 1/32 scale, but I know that there is a limited market for models in my size.

Footsore Miniatures

My Roman town continues to grow. I need more apartment buildings and then I would like to tackle a temple with columns or a Roman bath building.

salve!

Friday, February 14, 2025

Tutorial: Making Scratch Built Buildings


Four "city" Roman buildings that I have been constructing this week.
The figures are 1/30 scale King & Country civilians.

Click on pictures to enlarge your view

The past week has seen me in a flurry of miniature model construction as I have started making some of the buildings (and then some) for my Hannibal Punic Wars war games at Little Wars and Historicon this year. Surrounded by vast sheets of foam core board, balsa and bass wood, thick card stock and oceans of glue, I have finished three farm buildings and have a good start on four city or town buildings.

When I embark on making buildings for a new historical period, I like to start with something that is simple and easy to make (such as small farm buildings) before I tackle the more complicated buildings (such as city buildings). This gives me a feel for how to design the basic shapes of the building and how to assemble them together. The most basic building is a square box with some doors and windows cut out from the sides of the box.

My first building was a small Roman era farm house and a work shed. The shed consisted of four pieces of foam core board and a tile roof that I fashioned out of a piece of corrugated cardboard from a box that I received from an eBay seller. I like to save some of my boxes for future use in model building constructions. After I cut out the sides of the walls I line up the pieces to make sure that they fit together and then I pin them together with sewing pins. Once I am satisfied with the fit of the pieces, I glue them together using my hot glue gun. 

Sometimes I will use super glue to tack on a decorative piece of wood to the foam core wall. The picture below shows a horizontal cross piece at the top of the front of the shed. This is a piece of a coffee stirrer that a local coffee house chain donated to me. It covers the gap between the roof tiles and the wall. I found it easier to use super glue rather than the hot glue gun in this instance because it spreads evenly across the wood while the hot glue is "lumpier" in its application.


Work shed to use with my Roman farm. 
King & Country figures.

The next model that I made was a small farm house such as those that might be found in the Italian countryside. This was easy to build, but it had a few more complications than the basic shed. This time I needed to make a ridged roof and to cut out the windows and doors from the foam core. I glued pieces of fine wire mesh over the interior parts of the window. The doors and shutters were made from balsa wood that I scored with a wooden fondue skewer to simulate wood planks. The wood bits were then covered with wood stain. 

The sides of the building were partially slathered with a mix of wall board paste and paint and allowed to dry overnight. The next day I painted the buildings with a light grey chalk paint and then did some dry brushing with a lighter shade of grey. I used Plastruct terra cotta roof tile (in plastic sheets of material) to make the roof. A piece of round dowel rod was used to cover the gap on the ridge of the roof where the two sides of plastic tile sheets met.


A birds eye view of the smaller Roman farm house and work shed.
King & Country figures.

The Medium Farm House Construction

The medium sized farm house starts with a basic shell made from 3/16th inch or 1/4 inch black or white foam core board. The picture below shows some of the basic house "shells" that I made from foam core board. I keep a set of sketches for each shell so that I know how to make it again for another building without having to go through the process of deciding on which dimensions to use all over again.

Four of my basic building shells for my Roman buildings. These serve as 
templates for future buildings.

Walls and roof construction:

I cut out the walls and then figure out where I want to place all of the doors and windows. Doors are made out of balsa wood and glued to the inside part of the wall. I use a fondue skewer to "score" vertical lines to create wood planks and then give it a stain of dark walnut stain.

Thick balsa wood or thinner bass wood pieces are used to make the ridge pole of the house. Supporting beams extend from the walls of the house to the ridge pole to strengthen the ridge pole. The cross beams do not actually support the roof, but rather, they are placed to offer strength to the side walls, preventing them from pushing inward. These structural pieces also get a coating of walnut stain.


A view of the roof ridge pole, beams and braces that will support the roof tiles. You can also
see the bits of mesh screen that cover the windows from the inside of the house shell.
This is the medium farm house work in progress photo.

Applying the Mud to Create Stucco Walls

I mix up a pot of wall board paste and brown paint that I use for basing my soldier figures. The same goop or mud also serves as stucco on the walls of Roman buildings. I like to use the Red Devil Pre-Mixed Spackling Paste for this part and I buy large tubes of craft acrylic brown paint from Michaels' Stores. Below is a picture of the medium farm house after the application of the mud.


The next phase is to paint the walls of the building with "chalk paint". I use a medium grey as the base coat and then I dry brush a light grey chalk paint to pick out the texture of the wall board paste. 

Attaching the Roof 

After all of the exterior painting is finished I then turn my attention to attaching the roof tiles to the house. I will cut out a piece of cardboard the size of each half of the roof and glue them into place. This provides a sturdy base for the plastic roof tiles. The roof tiles come in plastic sheets that measure about 8-inches by 12-inches and it is a simple matter of measuring the tile sheet and cutting it with a box cutter knife. The tiles have been sprayed with a coat of primer prior to being glued to the roof and so I finish the painting of the tiles after they have been attached to the roof. The tiles are glued into place using my not glue gun and then I stick sewing pins through the plastic tile sheet and into the foam core board. I finally cut a length of round dowel rod and fit it into place where the plastic tiles join at the ridge pole. This simulates the tiles that would be placed horizontally across the peak of the roof to prevent rain water from seeping in under the vertical tiles.

The painting and dry brushing of the terra cotta colors are done after everything is attached in its place.

Here is a picture of the finished medium sized Roman farm house:


Medium sized Roman farm house (right) populated with King & Country 1/30 scale figures.

Next Up: Constructing City Buildings

Here is a preview of the first four city buildings that I have been working on this week. All of them are in the "work in progress" stage and I hope to get them painted and finished sometime next week. Stay tuned to this blog for pictures of the finished city buildings.


The models in the pictures represent one side of one street of my Roman city. I could have as many as 16 shop and town house buildings in the project. There will also be a Roman temple and maybe a forum and a bath house when I complete the project. There will definitely be an aqueduct running across the side of the game table.

One thought is to make only a few buildings for war gaming purposes. However, I am also considering making this an on-going project and adding a few more building here and there over the next several years. The city would cover a 6ft by 4ft table; or maybe even more over time.

Here are some inspirational pictures to help me through the Roman City Project.


Thursday, May 9, 2024

Building A Civil War Barn in 54mm


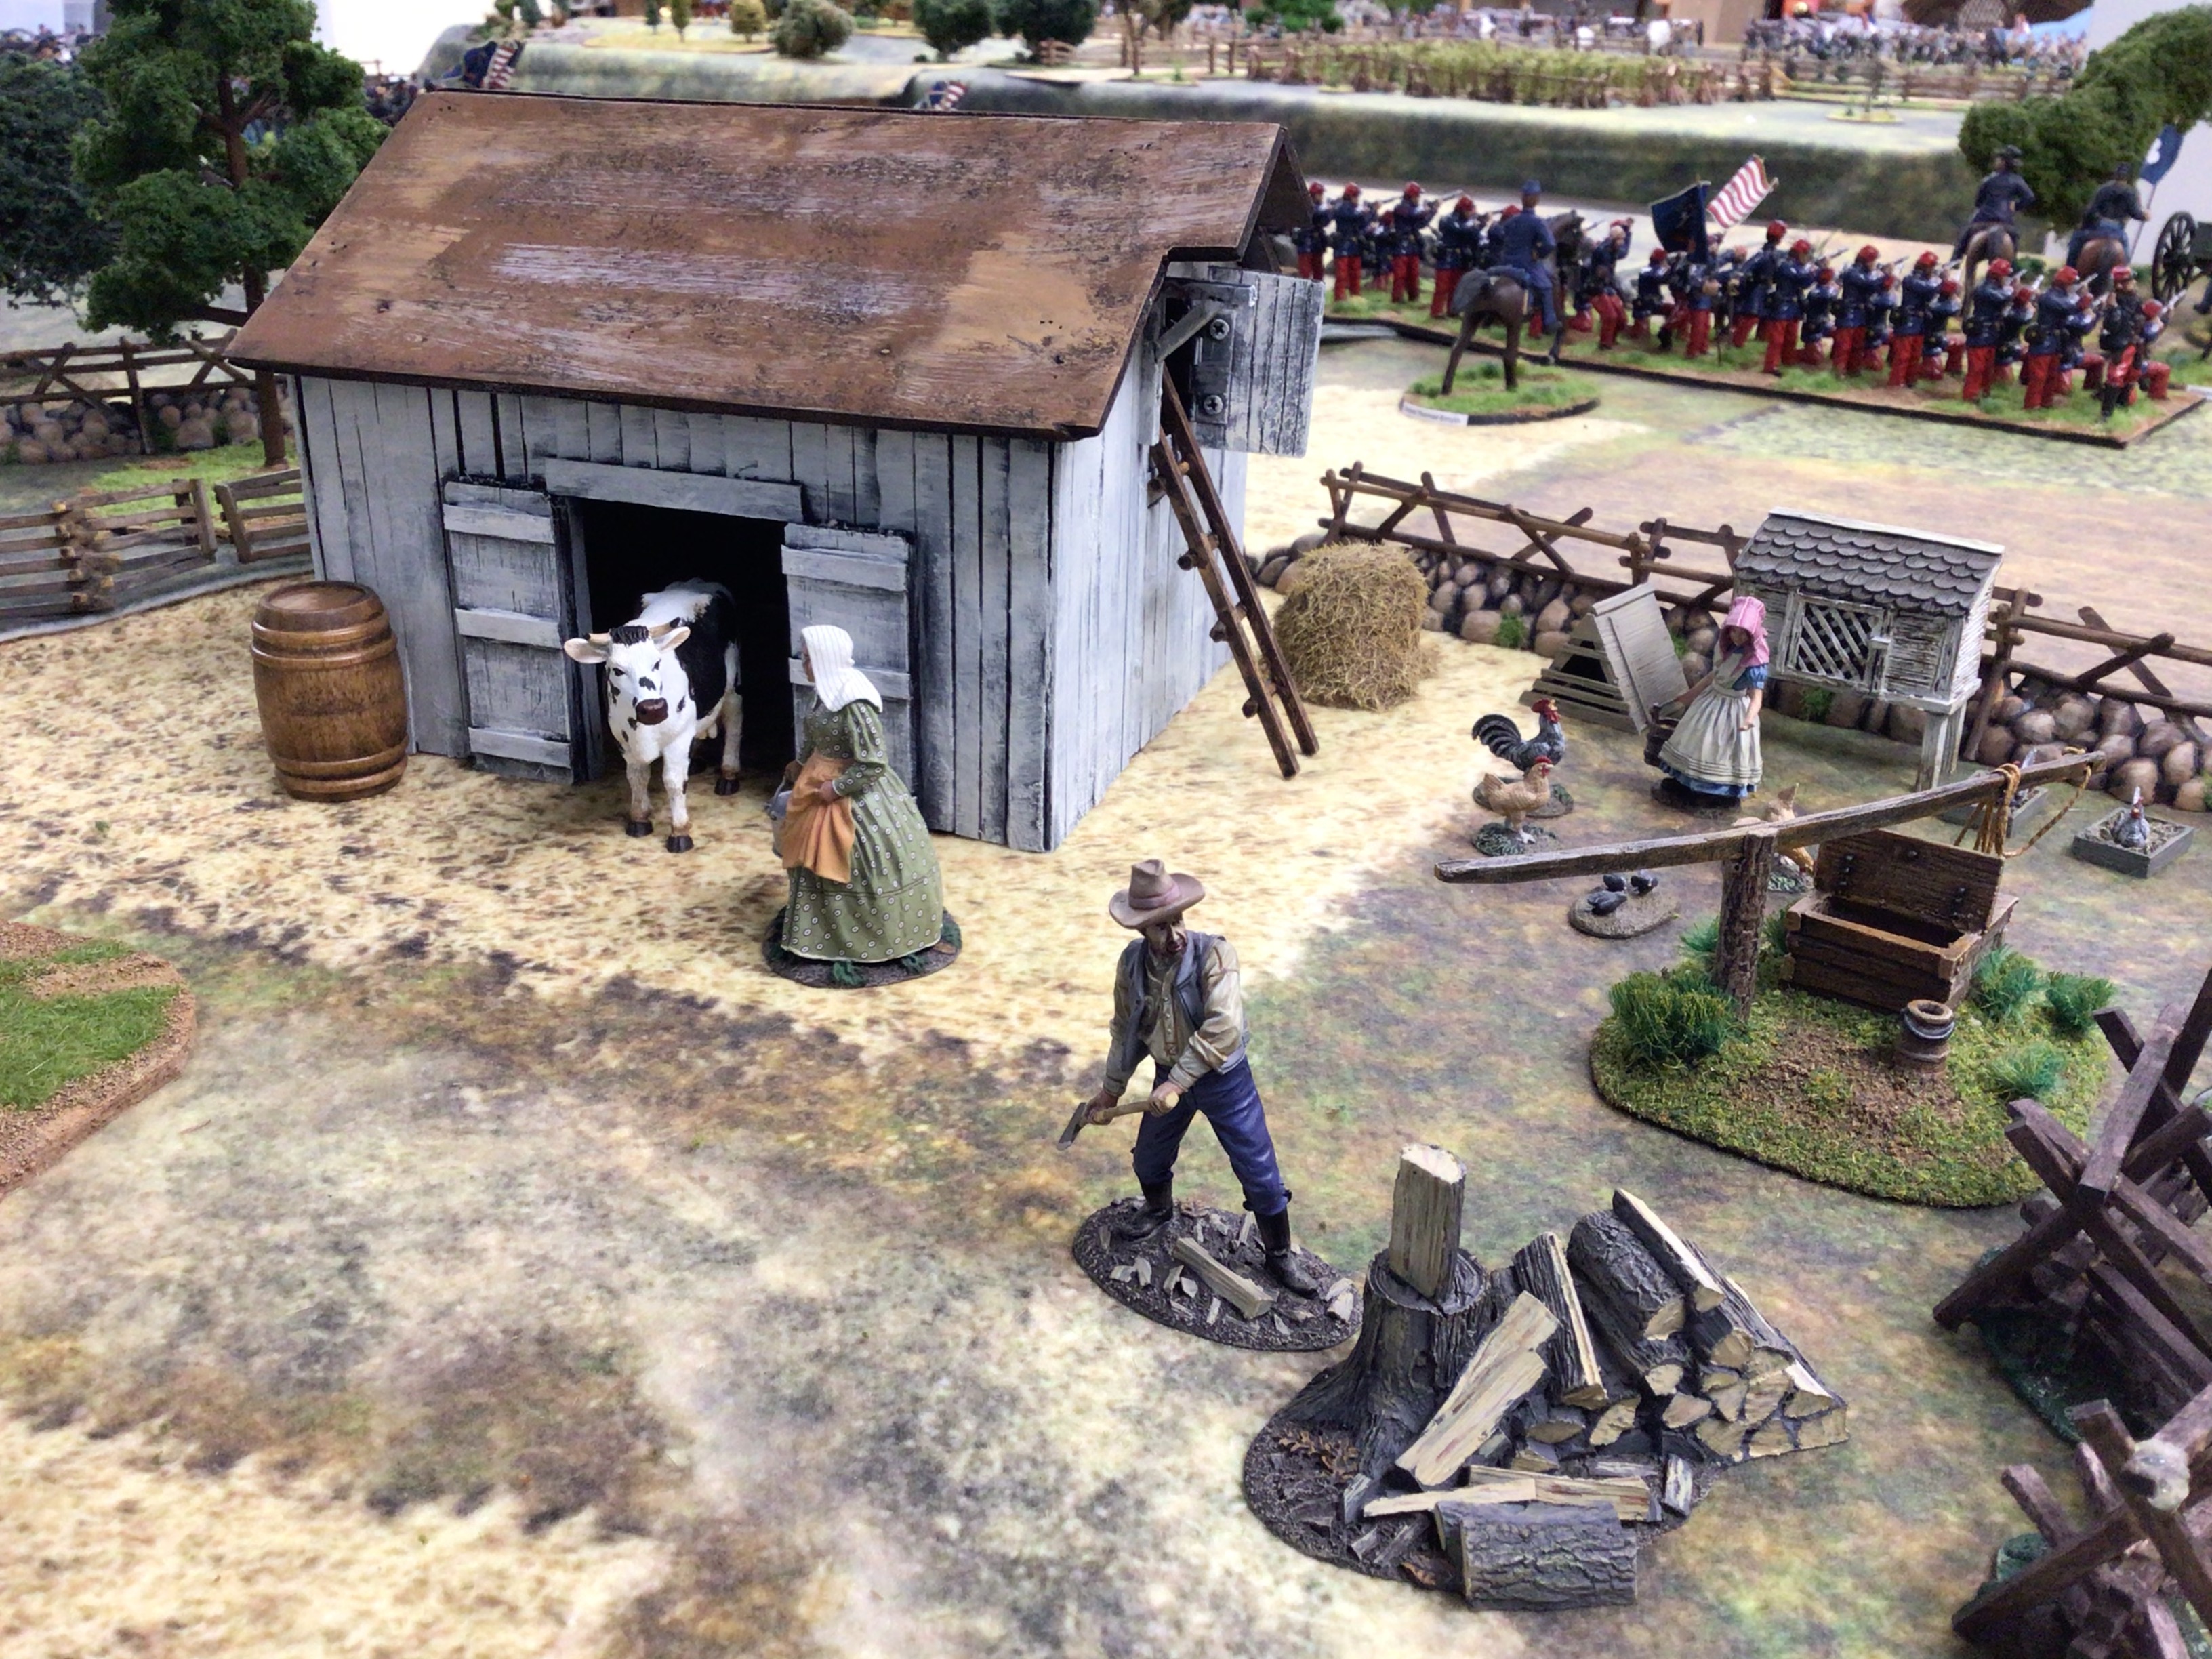
Scratch built small barn. Figures from Wm. Britain. Cigar Box Battle mat.


After doing some conversion work on BMC plastic models of the Leister House, I decided to try my hand at making a barn from scratch. Having made a number of houses and boats for my Khartoum game last year, I have the minimum skills necessary to make a barn from foam core and balsa wood. I am not so great at employing the mathematics of miniature architecture and my tools are limited to Exacto tools, a pin vise, and a miniature mitre box with saw.

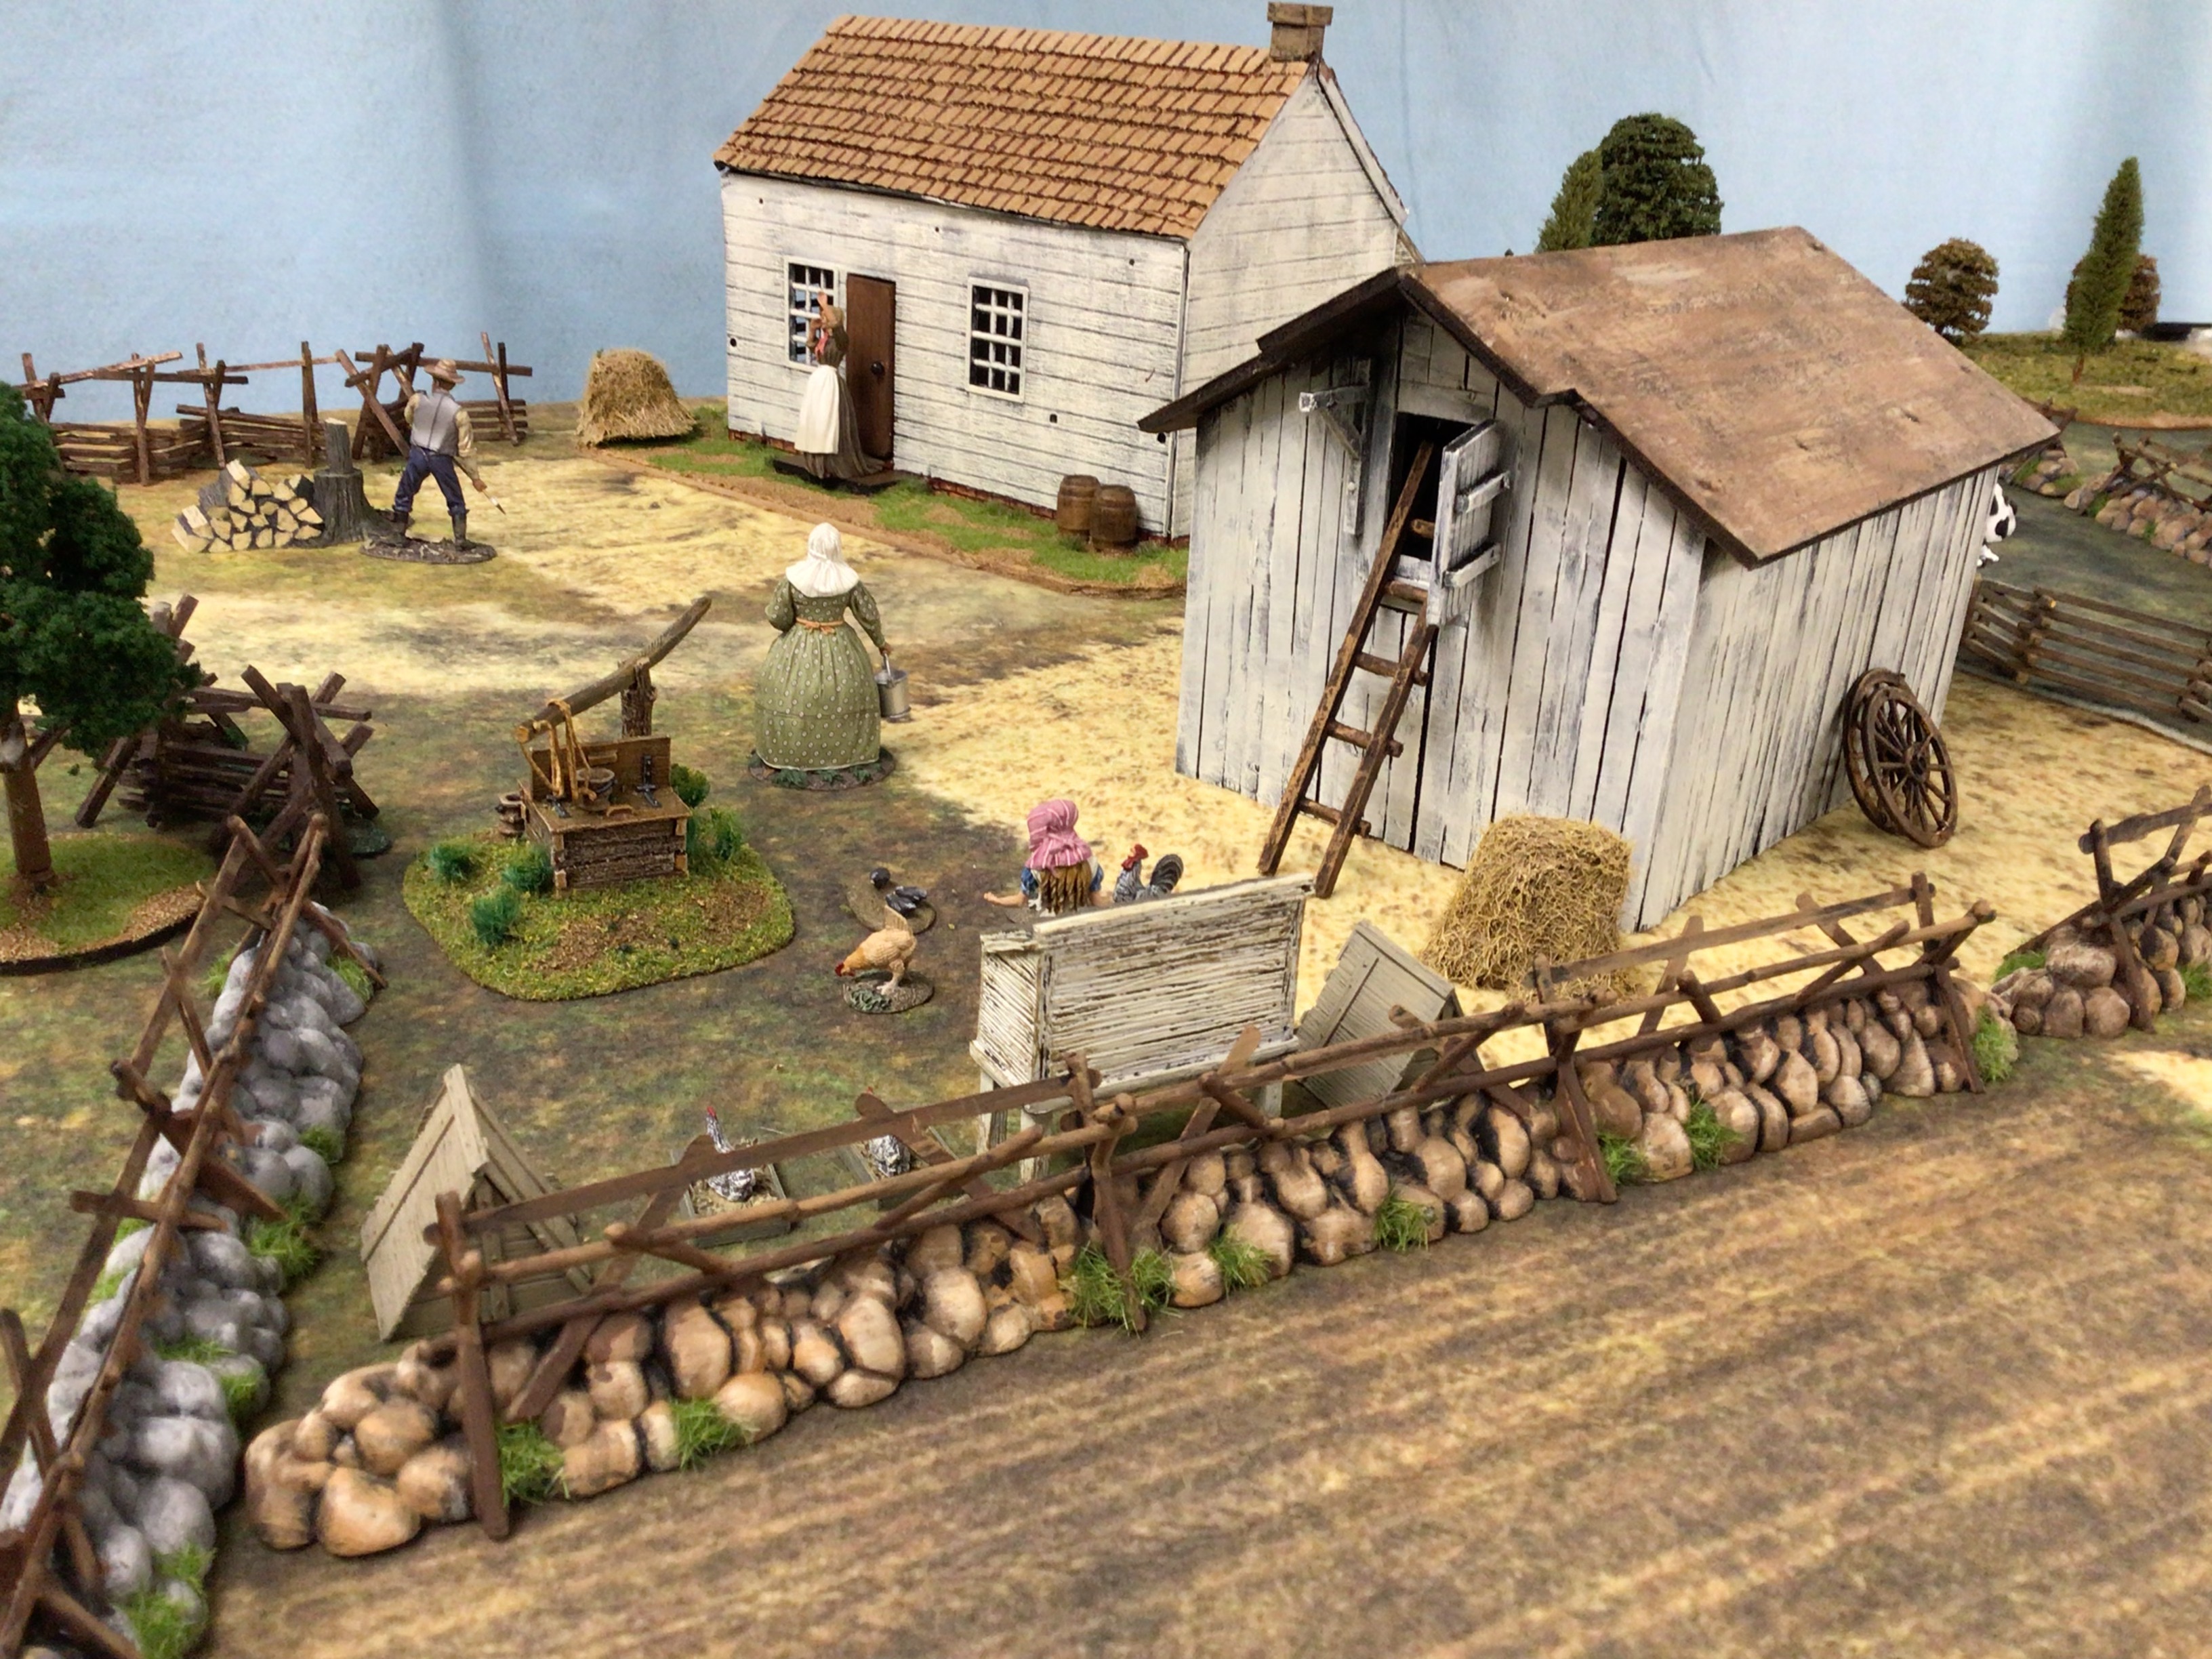
Side view of the barn with a hinged hay loft door and ladder.


The rear area of the barn. A couple of wagon wheels have been added
to provide some "junk" detritus around the building/

I made a template of the side elevation of the Meade Leister House model and used this for the sides of the barn. I chopped down the height of the barn so that it would be lower than the roof of the house. Once the end pieces were cut from foam core, it was a simple matter to decide how long to make the barn ("6-inches") and the parts were glued together with wood glue and sewing pins.

The next step was to find lumber to make the walls of the barn. Initially I was resigned to the idea of cutting out planks from cardboard cereal boxes, but then I looked into my box of junk wood offcuts from previous model building and I found some small craft sticks that look like coffee stirrers from Starbucks. I only had one pack of 50 sticks and did a little bit of measuring to determine that I would need more than 50 plank pieces for the whole building. However, digging deeper into the box of offcuts, I discovered another pack of sticks that were narrower than the other 50 sticks. I found that alternating the two sizes would provide me with enough wood to clad all the walls of the barn.

I cut the planks first, and then slathered the sides, one side at a time, with wood glue and then placed the sticks onto the side of the barn. I would attach a wide stick and then put two narrow sticks next, followed by another wide stick. I should note that one should cut out any windows and doors that will be on the model prior to attaching the lumber to the walls.

Next, I added some "doo-dads" to the building. These included a hinged door on the hayloft opening; a bracket for rope and pulley to haul items up to the hayloft, a ladder for the hayloft, and finally a pair of larger doors for the barn entrance. I used a small hinge on the hayloft door so that the door could actually swing open and close. In retrospect, I probably wouldn't do this on other models. The amount of time to make the door and hinge isn't worth the final result. Thus I didn't make hinged doors for the main barn doors.

Then the roof was added and glued to the building. I used pieces of foam core to make the roof. I temporarily painted the roof brown, but it is my intention to come back later and make roof shingles from tree wrap. The next step was to prime the model black. I use black primer on building models so to enhance the use of dry brushing to paint the model.

The final step will be to glue the barn to a larger base and add some terrain and grass to finish things off.


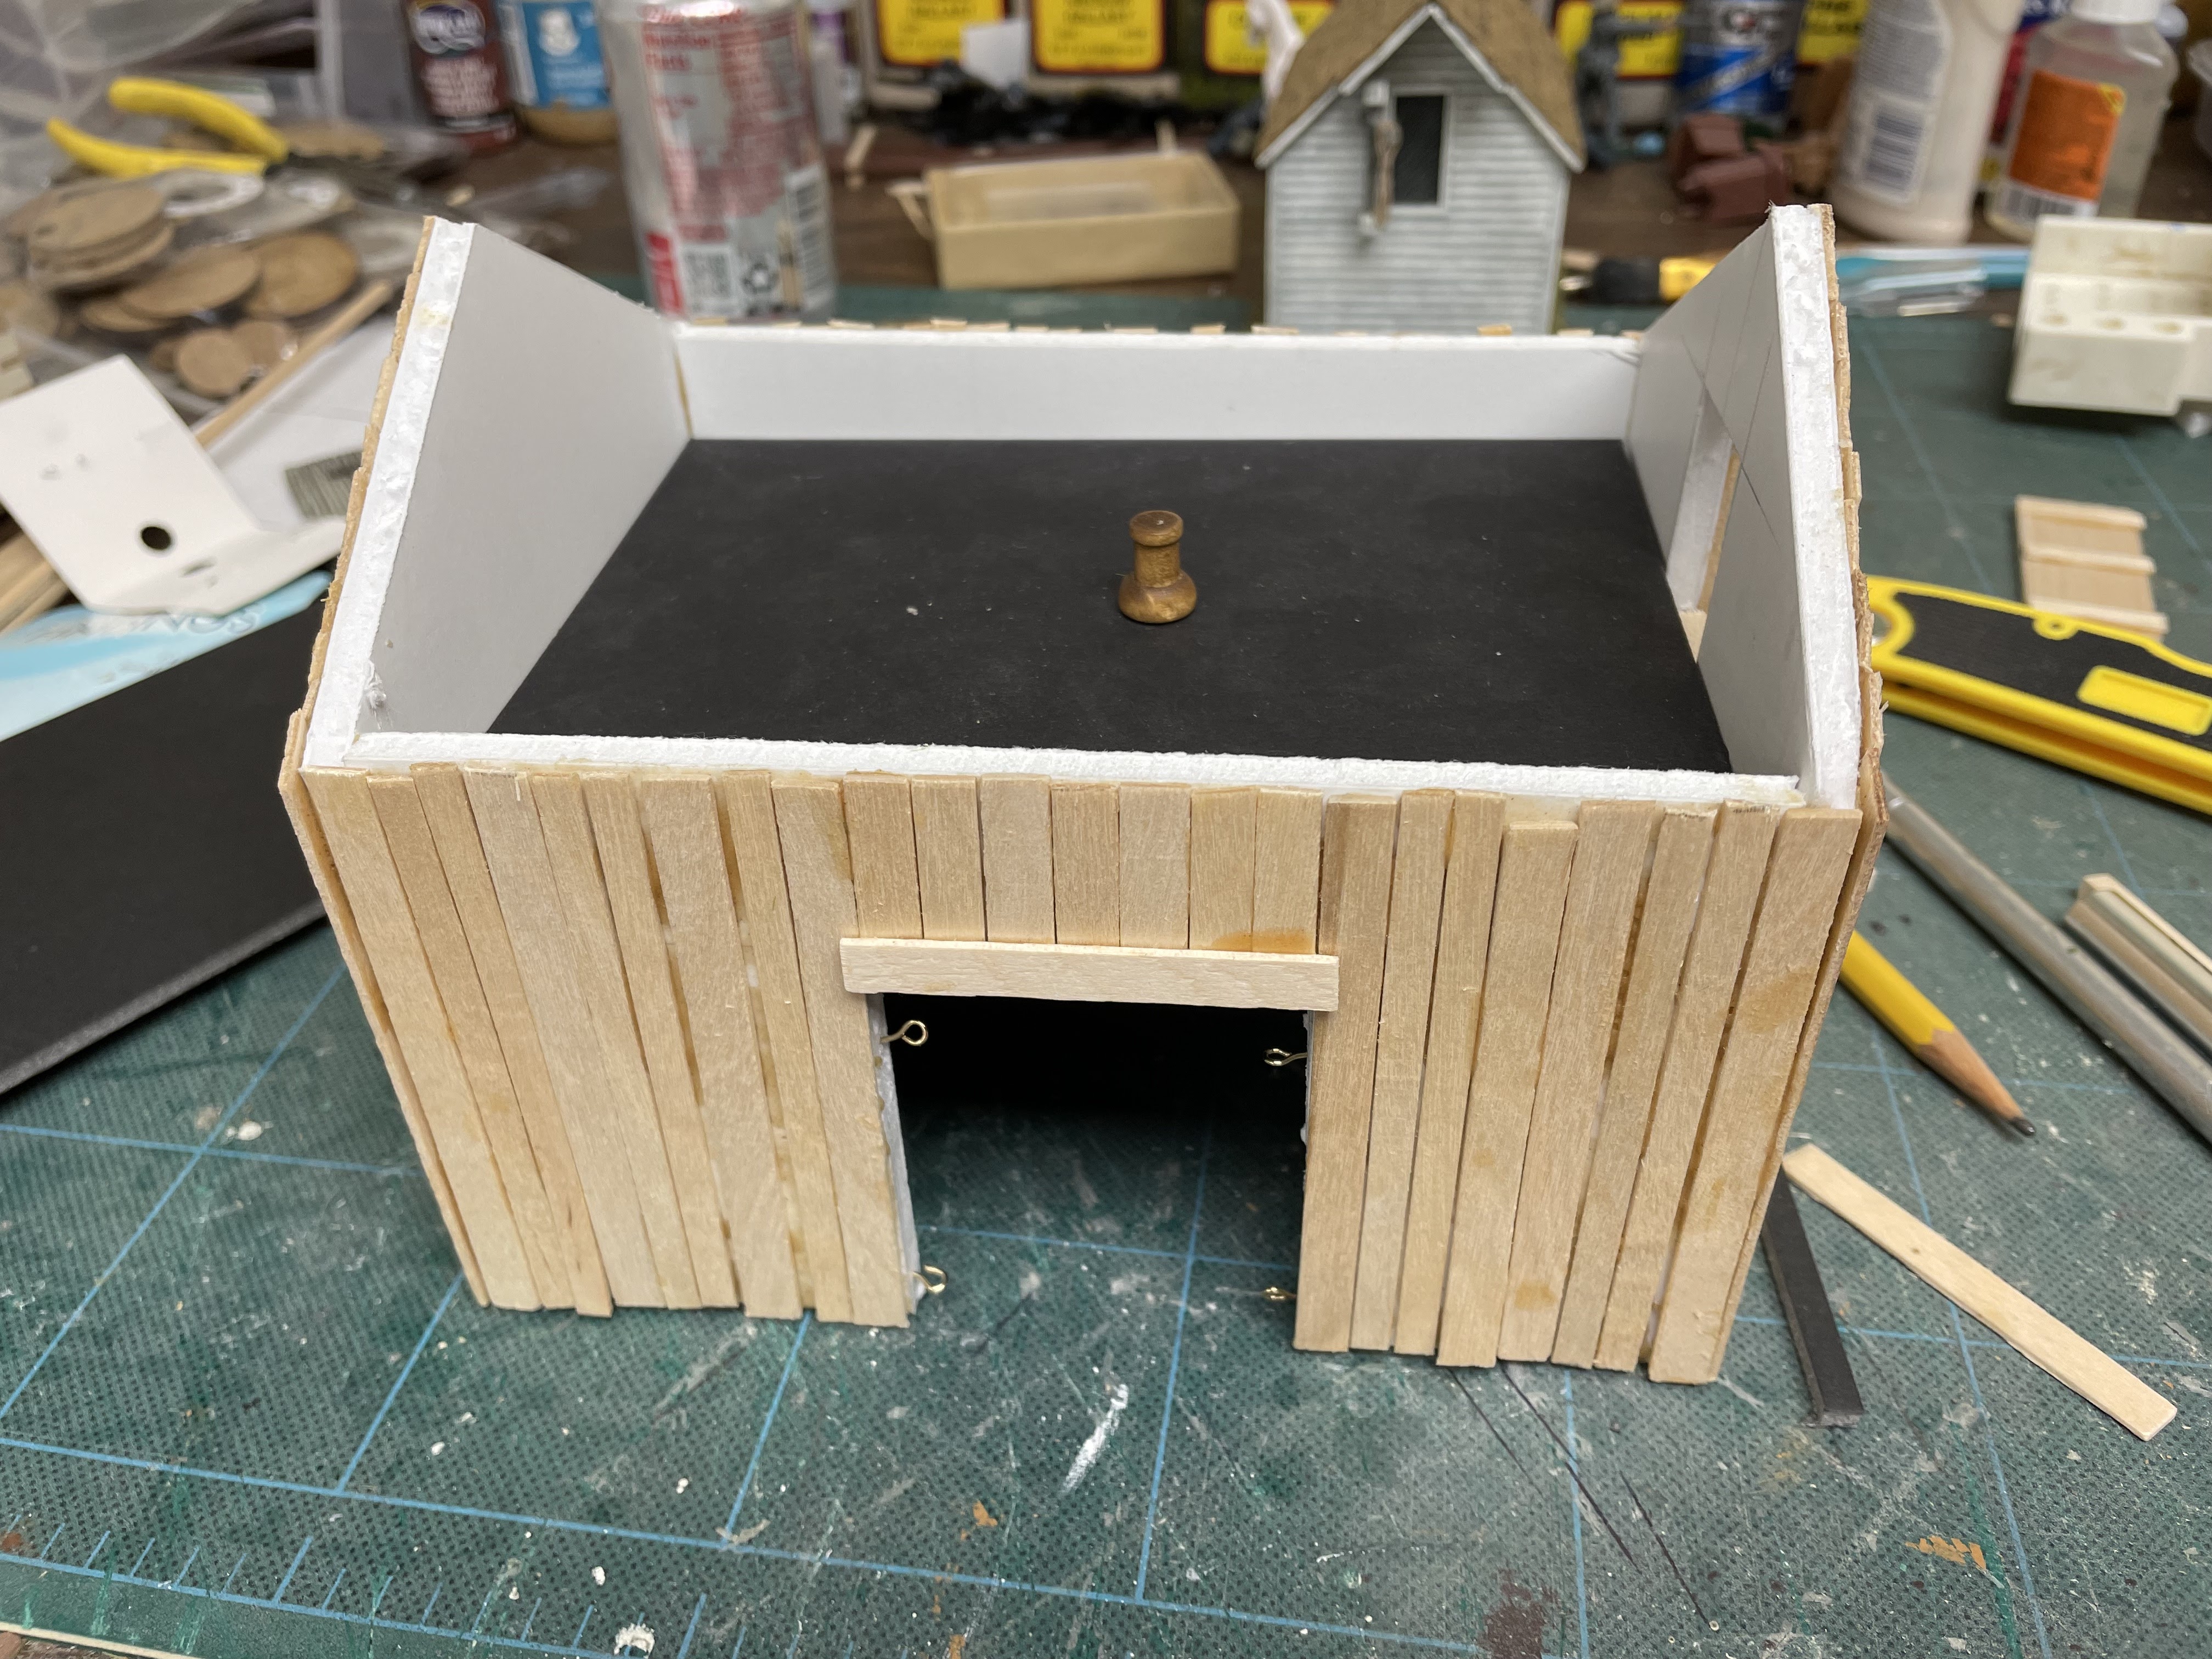
The four walls are constructed from foam core material and the corners are
reinforced with sewing pins and wood glue. I used craft sticks purchased at
Michael's Stores to make the plank sides of the walls. I mixed in some thin
and wide sticks to give some variety to the appearance.

A piece of black foam core is added to the interior to give more strength 
to the barn walls. I briefly thought about having a lift off roof, but then
my sanity returned and I discarded that idea.

Attaching the swing door to the hay loft.

The hay loft door is installed and actually has a hinge allowing the door
to swing open. On the left side is a bracket to hold a rope and pulley.

Adding the roof made of 1/8-inch foam core. I used wood glue to attach the 
roof and used sewing pins to hold down the roof sections.

Once all of the pieces were assembled, and allowing the wood glue to dry overnight, I sprayed the barn with black primer and then painted it with three shades of grey and finished the painting by dry brushing some "Antique White" craft paint.

I also made a ladder from bass wood leading from the ground to the hayloft door. The finished model will be glued to a base and some small accoutrements such as the ladder, some barrels and a couple of wagon wheels around the outside.

I may build another house but I'm more or less done making the necessary buildings for my Pickett's Charge game.

Finally, here is another photo portrait of some noted personalities such as Hancock, Warren and Custer.

Back row, left to right: some artillery crew guy, Winfield Hancock, George Custer, Governor Warren, and some 
other guy on the right end of the row. The names of the seated characters have been lost to history, maybe one 
of my ancestors.


Monday, April 29, 2024

Tricking Out A Common Building


BMC "Meade's HQ" after I have painted and based the model.

I have plenty of buildings for my collections of 28mm figures, but finding "off the shelf" buildings for 54mm figures is not an easy task. After a fair amount of searching, I have an idea of where to find some of these buildings, but the selection does not come close to what is offered for 15mm and 28mm figures. So this necessitates converting whatever buildings I can find and turning them into unique individual models.

The BMC model of Meade's HQ Leister House is a pedestrian white plastic model with a medium blue roof. It is a snap together model whose parts are usually warped and hard to fit together. I decided to fix some of the model's defects and paint it. The results can be seen in the photo at the top of this blog post.

I added the exterior portion of the stone chimney using, well, stone pebbles 
that I picked up while walking my dogs. A resin chest was also added to the base.

I had a second model of the same building and decided to give it a different look. I removed the attached porch to change the profile of the building, making it thinner.


The dry brushing completed, I now added a new roof using tree wrap that
I bought at the hardware store. The idea comes from Herb Gundt. Individual
wood shakes will be delineated with a brown Sharpie pen.

The model after two rounds of dry brushing dark to light grey.


The basic model after a coat of black primer. The add on porch has been removed.

The partially finished model. I have to add things like a balsa wood door, maybe some card window shutters,
an outside cellar entrance, and attaching to a base made from a cork backed table place mat. A 
little water well would look nice too.

Here are a couple other commercially made buildings that I have not done any conversion work:


Foam clabbered house from Classic Toy Soldiers store.
Photographer's wagon is made by Lemax.


Colonial Salt Box style house from McShaun 's Closet.

The Rummel Farm Barn at Gettysburg from McShaun's Closet and sold
through Classic Toy Soldiers store.

Britain's - made resin barn. This model is Verrrrry heavy and is hard to find.


So I think that I am fairly well set for 54mm (1/32 scale) building models for my Pickett's Charge Project and other ACW games that I might play. These buildings would also be suitable for the 18th Century such as the American Revolution and the French and Indian War.