


 |
| Gondor Raid into Harad - Lord of the Rings game hosted by Herb Gundt. That giant pachyderm was commanded by none other than ME! |
I decided to attend the HMGS-Midwest "Little Wars" convention yesterday. The show runs from Thursday April 24th through Sunday April 28th. Usually I just go to look at some of the games, take a few photographs, and then finish off with a trip to the dealer area. This year I decided to actually play in some games for a change. I hardly ever get to play in games at conventions - usually I am either running my dealer booth or hosting a game or two.
I registered on line for a weekend pass ($45 vs. $40 for a daily - one day- pass) and signed up for two games: Herb Gundt's Lord of the Rings game using Dragon Rampart rules at 10AM and then the Battle of Dunkeld from the 1745 Jacobite Rebellion, hosted by Ed Harding and using Sharp Practice 2 rules.
 |
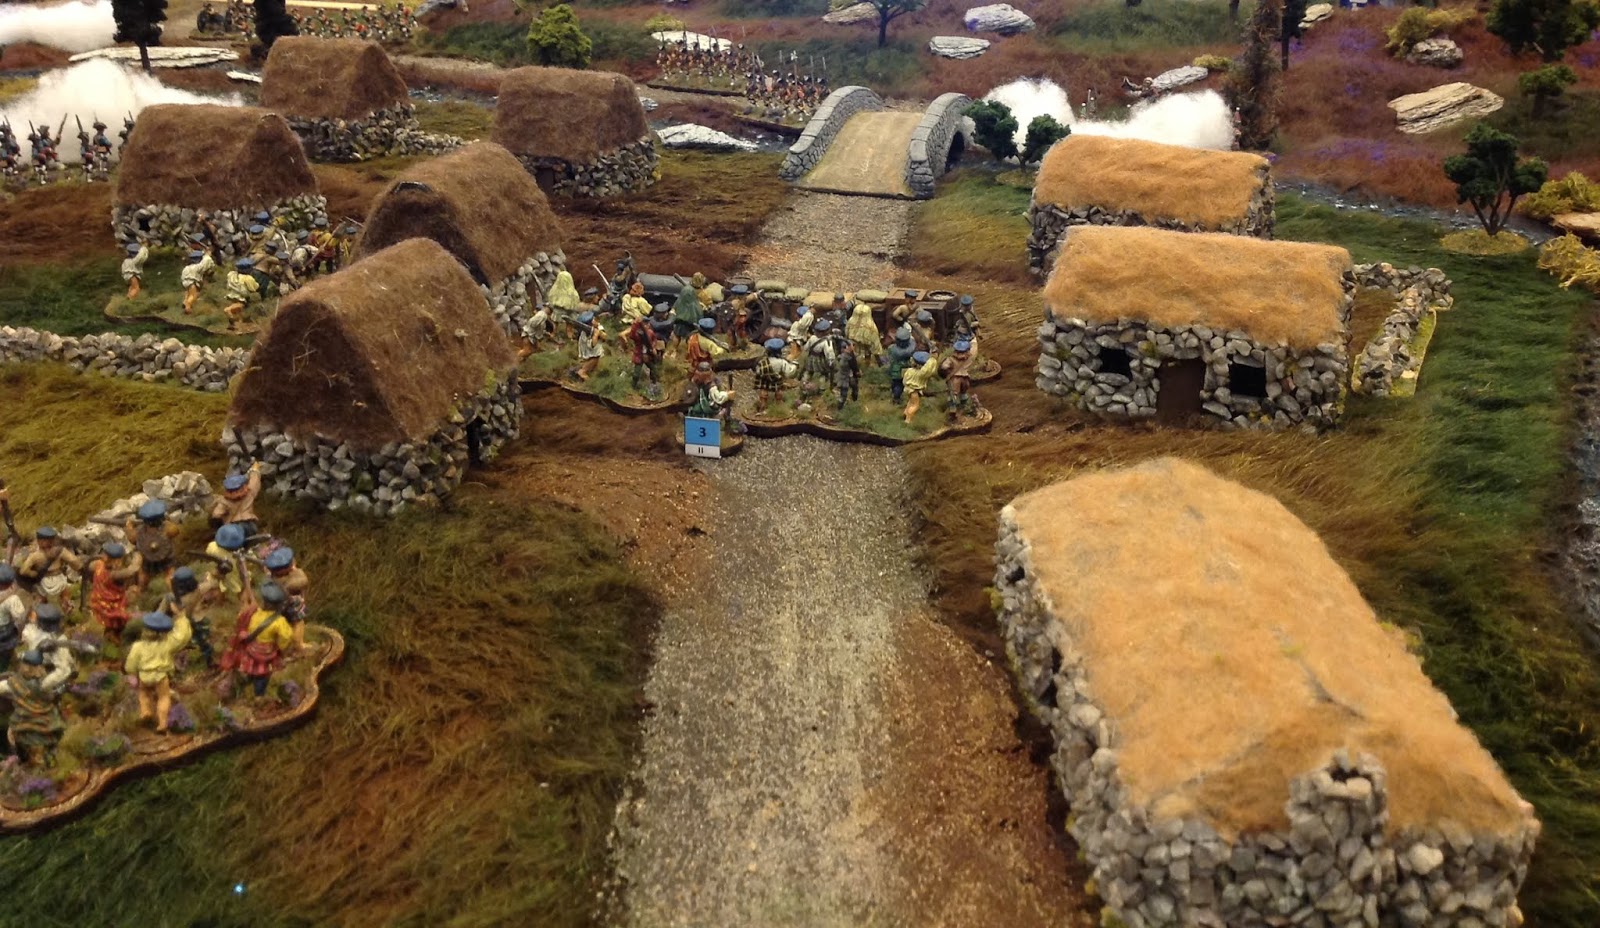
| Battle of Dunkeld - Jacobite Rebellion - with Sharp Practice rules |
The on-line bit was easy-peasy and I was able to snag the last opening in the Sharp Practice game. I have always wanted to give these rules a try, so what better place than at a wargame convention? I know that people generally don't see me as a Fantasy player, but if its a Herb Gundt game, it is going to have beautiful terrain and painted wargame figures, so I'm going to play in it no matter what the period. My selections turned out to be very good as I had lots of fun.
 |
| The Harad, on the right, had two large elephant-like Mamukils. |
In the Dragon Rampant game, I commanded a giant elephant-mastodon and two units of armored cavalry. I also had a camel caravan that was a visual diversion to try and fool the other side that there was something of importance with the caravan. Alas, no.
I pitched into the attack with my elephant and immediately found a swarm of foot archers and mounted archers going after the elephant. My cavalry refused to move for the first couple of turns. The scenario had the Gondorians on the attack so they always got the first initiative every turn, which means that my elephant soon had more arrows sticking out of it than a hedge hog has quills.
My only quibble with the scenario is that there should have been a variable initiative, maybe with competing dice rules deciding who goes first, because I was often unable to use my own archers. The elephant has a wild charge rule, meaning that it automatically must charge any unit within 12-inches of its position. The attacking unit does not get to fire its missiles. Oh well, I had fun anyway.
Eventually, both sides slaughtered each other and the Gondorians won by virtue of having more viable units remaining on the table.
This game was really a lot of fun (there is a snarky blogger or two out there who seem to have a big problem with the concept of a game being "fun". I am in not in that camp. You can form your own opinion of the "not liking fun" curmudgeons). I ask you, what is the point of playing a wargame if, on some level, you are not having fun? This makes no sense to me.
My thanks go out to Herb for hosting the game and to my fellow players who were all friendly and not taking things too seriously - i.e. we all had FUN.
My thanks go out to Herb for hosting the game and to my fellow players who were all friendly and not taking things too seriously - i.e. we all had FUN.
My Sharp Practice game didn't start until 3PM, so I had a couple of hours to eat lunch and roam through the dealer area. I bought some more Novus rubber road section to add to my collection. I really like the look of these roads. Another dealer was selling MDF bases at $20 per container. You picked up a Chinese carryout food container and you could fill it with any kind or size of base. What a great sales concept! I filled up on 28mm round bases for skirmish games and some larger round bases to use for command stands in my regular armies.
 |
| Some of my literary finds. |
I found a lot of interesting AWI books at one book dealer's booth. I bought a copy of John Hair's book about Guilford Courthouse (I had heard that this is a fairly decent account of the battle) and two books about Cowpens, including a staff ride and battlefield tour by Ed Bearss. I bought a copy of the John Mollo books on American Revolution uniforms. I already had a copy, but it is out of print so I might as well purchase it because the price was right. Finally, I bought a new book about the battle of Brandywine by Michael Harris. I almost did not buy it because I knew that I had the two-volume set about the Philadelphia campaign by Macguire, only I couldn't remember Macguire's name and wanted to be sure that I wasn't buying a double copy. The book dealer understood my dilemna and identifed the two different authors, so I bought the book.
The Battle of Dunkeld - Sharp Practice 2 Rules
I have heard a lot about the Sharp Practice set of rules by Two Fat Lardies and I was really eager to give them a try because I want to find a good set of skirmish rules for the 18th Century. The updated version of the rules, Sharp Practice 2, played more like a conventional game of battalions and didn't really strike me as a set of skirmish rules. Also, there is a steep learning curve to the rules and it took me a while to figure how things worked. Fortunately, Ed Harding, the game judge, was very good at explaining things and helping players make certain decisions during the game.
The table top terrain was very well done and eye catching. The use of Teddy Bear Fur was well executed and Ed did a really nice job of getting the color just right for Highland heather. The highland Black Houses were simple, but very nice looking. Pebbles were glued onto a card frame and the thatched roofs were made using brown felt cloth. I will have to try making my own buildings using this easy to do method.
The task of the Jacobites was to execute a rear guard defense and hold up the advance of the Government troops until the main Jacobite army could effect its retreat. We placed one brigade of Highland clans in the center to occupy the village and block off the bridge over the water. My brigade of Highlanders and Lowlander cavalry were posted on the right, guarding another road leading into the village. On our left, we posted our best troops: the Royal Ecossais and a regiment of musket armed Lowlanders. Both units had better fire power than the clans, so they were better suited to fight the Redcoats in a stand up fire fight.
The Battle of Dunkeld - Sharp Practice 2 Rules
I have heard a lot about the Sharp Practice set of rules by Two Fat Lardies and I was really eager to give them a try because I want to find a good set of skirmish rules for the 18th Century. The updated version of the rules, Sharp Practice 2, played more like a conventional game of battalions and didn't really strike me as a set of skirmish rules. Also, there is a steep learning curve to the rules and it took me a while to figure how things worked. Fortunately, Ed Harding, the game judge, was very good at explaining things and helping players make certain decisions during the game.
 |
| Team Lard America presents the Battle of Dunkeld |
 |
| An aerial view of the battlefield |
| The village of Dunkeld - very nice use of the Teddy Bear Fur concept for the ground cloth. The Highland Black Houses where made by gluing pebbles onto a cardboard frame. Felt cloth was used to make the thatched roofs. The barrel markers denote entry points for troops onto the table. |
 |
| On the other side of the table, far away from my action, the main portion of the Government army arrives. |
 |
| A battalion of Lowland musketeers advance into musket range to engage the Government troops. The are supported by the Royal Ecossais regiment, diagonally behind them. |
Early in the game, the British/Government troops were having trouble activating their units and entering the table. It reminded me of the Cashtown Road at Gettysburg, so I decide to hurry down the road and try to bottle up the Goverment Highland regiment and dragoons.
 |
| My command consisted of some elite cavalry and three Highland clan groups. The foot commander could activate two units and his subordinate could activate one unit. The cavalry had its own commander. |
 |
| My Highlanders advance along the river and my elite cavalry move to engage the Government dragoons. Hey, wait a minute! There are a lot of horsies and muskets bearing down on us. Maybe advancing wasn't such a good idea. |
 |
| Change of plans! Abrupt turnaround and let's get out of range of those muskets, all 24 of them. |
At this point in the game, with my cavalry mooning the Government cavalry, the Fates started to turn against me. Over the course of about 3 or 4 turns, the Redcoats in my sector were activating first and before I could activate and give response, the dreaded "Tiffin" card was drawn, thus ending the turn.
One of my clans took 24 musket balls in the face, but miraculously they only lost one man, but took on a bunch of Shock Points. My cavalry were charged in the rear - not good as you might imagine, but the Fates gave me a brief respite as I threw lots of 5s and 6s and won the melee over the Redcoat dragoons, who threw a lot of 1s and 2s. Ed, the game judge, laughed and said he had never seen anything like it for as long as he had played these rules.
Now comes the funny part: so I routed the first line of dragoons and was allowed to turn about and fight the second wave of Redcoat cavalry face to face. Do you want to guess what happened? Yes, I lost the melee. Big time. I had done a better job of meleeing when my backs were turned to the enemy. Go figure.
I left one clan at the barricade in the road and sent the other two clans scurrying for cover on the other side of the stream, in light cover. This would negate the effect of the Redcoat firepower a bit. My plan all along had been to cross the stream and get on the flank of the Government infantry that were attacking the village. Eventually this deployment paid off for my command.
Meanwhile, in the village, the Highland clans manned a barricade in the road and filed in around the village, giving them some cover from musket fire. It took us most of the game to figure out that the Highlander clans needed to get close enough to the Redcoats to launch a Highland Charge.
 |
| At the start of the game, one command of Highland clans occuppies the town of Dunkeld. Part of my clan command can be seen in the lower righthand corner of the picture. |
 |
| Highland Clans barricade the streets of Dunkeld and watch the British fire at them from long range. |
A battalion of British Grenadiers bravely (foolishly perhaps?) crossed the stream to engage the Highlanders in the village. Two of my clans finally got enough initiative to cross the stream and onto a U-shaped peninsula, thus bringing me close enough to fire into the flank of the Redcoats (who were now in a prediciment - Highlanders to the front of them and more Highlanders on their flank). I couldn't cross the stream to charge (it takes two D6 movement, minus the high die, making it difficult to cross the stream and then execute a charge).
 |
| A lonely battalion of British grenadiers cross the stream and advance into the Dunkeld. |
 |
| ...but maybe that wasn't such a good idea. My Highlanders cross one stream to get away from the large Government Highland battalion and find themselves parked on the flank of the British grenadiers. We're are going to have dinner tonight! |
 |
| The Highlanders finally get within charge range of a Government unit. The puff of smoke indicates that the redcoats have already fired and thus have empty muskets right at the moment when the Highland Charge goes in. It does not go well for the Redcoats. |
The Jacobites had won the battle! God Save the Young Pretender.
Conclusion
I had a lot of fun (there's that word again) playing in two games at Little Wars and roaming the game hall to look at a lot of good looking games. I will post another report on the other games at Little Wars.
I was glad that I had the chance to try out the Sharp Practice 2 rules with a knowledgeable person there to walk me through what seemed to me to be a complicated set of rules. It was a good game and the rules produced a fun (again, ha ha ha) time, but I'm not sure that they have the simplicity that I want to have in a skirmish set of rules. I imagine that my search for a good set of skirmish rules will lead me to creating my own set.

So, you have met my old wargaming buddie Ed Harding.
ReplyDeleteEd was my club secretary back in the 70's before he went off to the States.
I visited Ed a few years ago in Chicago.
There is a picture of us back in the day.
http://jim-duncan.blogspot.com/2013/08/page-3-in-daily-record.html
Glad you had a nice show and enjoyed your games. A lot of gamers these days seem to forget the 'game' in wargame! Both tables looked great, but the SP2 one was pretty special. Looking forward to part 2.
ReplyDeleteVery nice! I like the Jacobite-game. Great to read that they won.
ReplyDelete