


 |
| Khartoum gate tower for 54mm figures. |
 |
| A view of the walls, corner pieces and gate tower models. |
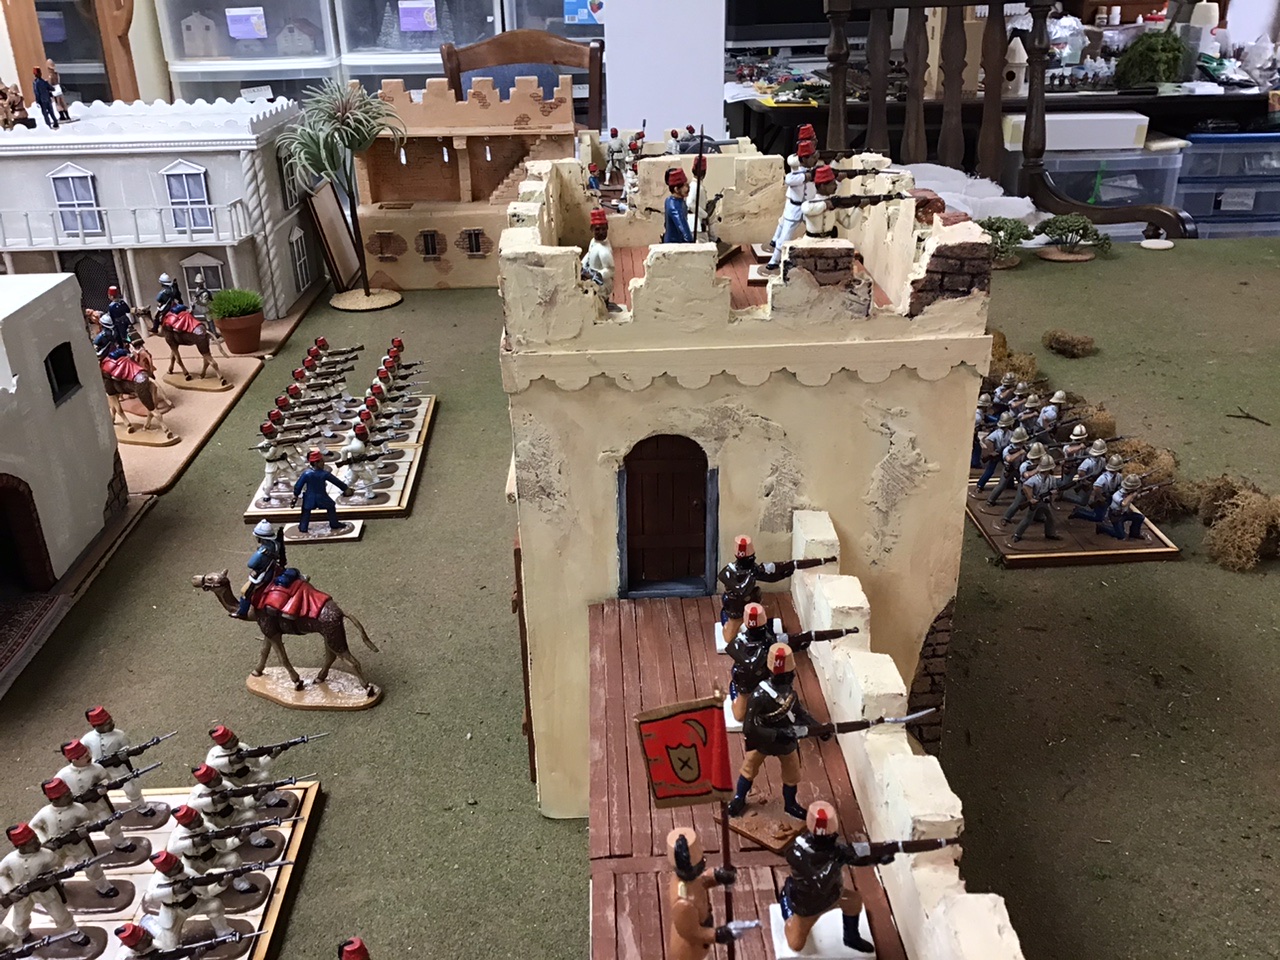
Over the past month I have been building the city walls of Khartoum, gradually replacing the commercially made King & Country Desert Village walls with those of my own construction. Why? Because it is gratifying to have your own purpose built terrain on your game table.
I have been knocking out 12-inch wall sections at a rate of about one every three days and as a result I now have enough wall to cover the width of a six foot wide table. Whereas the first wall sections were made one at a time, I learned enough about their construction that I started making them two at a time. Now I cut out the pieces (from 1/2 inch thick foam core board) for two or three models at a time and glue the shells together at the same time. Then I add details such doors and windows to individualize each wall section.
Gate Tower Tutorial
Gate Tower Tutorial
Today I completed the center piece of the wall defense- the gateway tower. It really adds a sense of completeness to the appearance of my Khartoum model city. The gateway is basically an 8-inch square box with a 10-inch height. I use half-inch thick black foam core board for my walls and three-eights thick foam core for floors. I use a metal T-Square measuring stick that I bought at Home Depot in their wall board section of the store. This tool is about three feet long. You will need this to cut up small pieces from the larger boards that you purchase at the store. I also have a smaller 12 inch long T Square that I use to cut smaller pieces of board material.
I measure out the dimensions for cutting using the T-Square to ensure straight cuts on the boards. The actual cutting is done using an Exacto knife with Number 2 blade (for the walls) and a box cutter blade for the thinner floor boards. Do not try to make one cut of the material, but rather, make several light cuts of the material, going deeper and deeper with each cut. This improves your odds of getting a straight cut of the foam core material. The cuts are made against the edge of the metal T Square.
Crenellations were cut into the crown of the roof, placed at one-inch intervals. A removable floor was built into the top of the model at a depth of 1.5 inches from the top of the wall. This makes it easy to access the ground floor of the passageway between the front and rear gates. I suppose that I could later add an interior floor and cut a couple of small windows in the front wall of the tower, but I probably won’t. I attached some doll house trim, turning it upside down, around the perimeter of the tower on the upper portion of the structure. This breaks up the surface of the tower by providing a bit of architectural detail to the tower.
From the sublime to the ridiculous, I decided to put hinge on the doors of the front gates. I found some doll house door hinges at Michael’s Stores and thought that it would be nice to trick out the doors so that they could open and close. After about 2-3 hours of fiddling with the extremely tiny hinge nails, the doors were hinged. In retrospect, it was a waste of time to put hinges on the door and I doubt that I would do it again on future models. The rear gates were constructed in the open position and simply glues onto the tower wall. I cut the gates from a length of balsa I and then scored some door planks with a BIC pen. A pair of doors were added at the deck level of the parapets to allow access into the
Now I create some exposed brick or stone by tearing off some of the paper surface of the foam core that exposes the black foam center. I take my trusty BIC pen and score stone or brick patterns into the foam., making sure that the space between the ends of the individual bricks has a long stretcher brick layer above them. A flat stretcher brick prevents water from running through the cracks of adjoining bricks.
Once the doors, windows and other decorative bits are glued to the walls it is time to prep the model for painting. I apply household masking tape to the joins of the four wall pieces. The tape is covered, in turn, by wallboard paste mixed with tan colored paint. I use the Red Devil brand of premixed spackle compound paste. Mix the color of paint that you want to use for your walls into the spackle paste and create a goop that you can use again and again.
I apply the spackle to the joins and also slather some clumps of the paste in random places on the walls. This creates some raised relief that breaks up the flat appearance of the wall. Let the spackle dry overnight. You can now paint the exposed brick sections of the wall with a light brown color for middle eastern buildings.
 |
| The tower model after the spackle past has been applied. Note the dollhouse trim attached just below the crenalations of the tower. |
 |
| Smooth down the spackle with fine sandpaper. |
I use a matte chalk finish paint for my walls, either something on the creamy yellow spectrum or the white grey linen color. Mask off any woodwork etc. that you don't want painted by the wall color. Paint your walls, but try not to paint over the raised wall relief that you created with the spackle. It will take 2-3 coats of paint to cover the black foam core board, but fortunately the chalk paint dries quickly. Doors are now painted brown.
 |
| Matte finish chalk paint from Michael's Stores. I used the cream color paint on the left as my base coat and the linen white color for highlights. |
 |
| Use masking tape to cover the doors so that you don’t get cream colored paint on them. |
 |
| A view of the front of the gate tower. |
 |
| A view of the interior that shows the individual appearance of each wall section. |
 |
| A door was added to both sides of the gate tower to allow soldiers to enter the tower form the parapet decks. |
Finally, dry brush the surface of the walls with a color that is lighter than the wall color. I find that white paint, used sparingly, works well with either the cream or linen colors. Now your model is ready for gaming!

Thanks for this. I'm always keen to see how people do their terrain.
ReplyDeleteA lovely gatehouse; great modelling
ReplyDeleteThe Wargames Holiday Centre (U.S.). . . And then some.
ReplyDeleteBest Regards,
Stokes
Outstanding build!
ReplyDelete