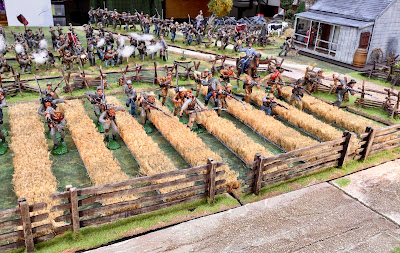
Charging through the Wheat Field at Gettysburg


 |
| Wheatfield made from a coir doormat |
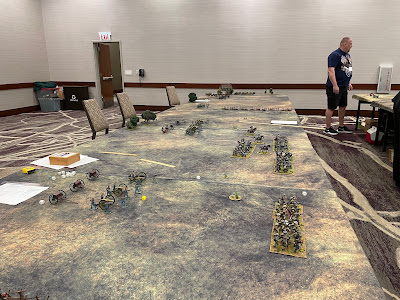
My Pickett's Charge game stretches out over three 6ft by 20ft tables. One of the things that I noticed in my previous playing of the game is that the third table (the Confederate back table) looks a bit sparse after the Confederates march off of it and on to the middle table and the Emmitsburg Road.
 |
| The Confederate back table during the game at Little Wars this year. Look at all of that empty table space once the Confederates move off of the table. |
 |
| The middle table features the Emmitsburg Road and it has more visual things going on than there is one the Confederate back table. |
I decided that I need to add some terrain pieces to the back table so that it doesn't seem so bare. I considered using teddy bear fur to make some amber waves of grain on the back table, but I have never made a bear fur mat, it would be cumbersome to carry to the convention, and it seemed like too much effort and not enough payback to do. So I decided to create some areas of wheat fields for the back table.
 |
| Doormat strips are glued to cork bases and terrained with goop. |
The typical material for such a field is to use a sisal or coir doormat like you might use for your front door to your house. I picked one up at the local Big Box store for about $10.00. Gamers often cut the mats up into rectangular pieces and set them out on the table. The problem with this is that the field just looks like a giant piece of doormat, which is what it is.
So my next thought was to cut the doormat into one-inch wide strips and place them on the table about one inch apart from each other. This would break up the single piece look of just cutting up a large section of doormat and placing it on the table. This adds a three dimensional look to the wheat field, however, I didn't like leaving bits of the green table mat exposed beneath the wheat strips. So I cut out some bases for the strips of wheat grass (2-inches wide for the 1-inch strip of door mat) and then added my usual mixture of "goop" wallboard past mixed with brown paint and let it dry overnight. The next day I did some dry brushing of the bases with a tan color called "Camel". The final touch was to cut the threads off of some of my doormat offcuts and sprinkle them over the wheat field bases like you would if you were flocking a base of war game figures. I used Elmer's spray adhesive along the sides of the bases and sprinkled the bits of coir threads on the surface. After doing this task on all of the strips, I then placed them together, side by side, and sprayed adhesive over the surface of all of the strips. This reduces the appearance of the strips as pieces of door mat and adds a little more texture to the top of the wheat field strip.
 |
| The strips of doormat have not been based at this point, they are merely set up on top of the game mat. The sections of green do not do much for the overall appearance. |
 |
| The finished strips of wheat field made from a door mat. |
I might have done the wheat field pieces in a different way had I been using them for 28mm figures.
Here is a picture that I pulled off of the internet showing a different way of making grass or wheat fields for smaller 28mm figures. The irregular shapes look good and they can be moved around as the war game units move through it.
In my situation though, I am not anticipating any of my Confederate regiments marching through wheat fields so they don't have to be done in the manner shown in the above picture. My wheat fields are "for looks" only and their purpose is to fill up blank space on the back table. I will also add a farmhouse in the corners of the back table as vignettes of interest and this should help steer the eye around the table.
 |
| The most recent version of the BMC model that I have modified with window shutters. |
Click on all pictures to enlarge the view
I am adding a few more farm houses for my 54mm Pickett's Charge game at Historicon and I just finished the third model that I have made from the same kit. I used the BMC "Meade's Headquarters" building and tricked each model out differently so as to end up with three different looking houses made from the same BMC model.
Here are pictures of the three models:
 |
| Version #1: The original BMC model of Meade's HQ at the Leicester farmhouse. No modifications other than adding stones to the chimney. |
 |
| Version #2: eliminates the front porch of the basic model. A cellar entrance was added on the side of the house and the roof shakes are made from tree wrap material. |
 |
| Version #3: I have added wood shutters to all of the windows to the basic BMC model. I also added a wood front door and wood floor planks to the front porch. |
Here are some work in progress pictures of the newest model so that you can see how the modifications were made to the original plastic model:
 |
| Here is a view of the front door that I made from balsa wood, again, scored to give the appearance of wood planks. The hinges and the door handle are also made from balsa. |
 |
| The rear wall of the house showing wood shutters made from thin bass wood. Note the slight warping in the plastic roof and the balsa pieces attached to the corners of the house. |
 |
| The model as it looks prior to priming with black primer. This illustrates most of the modifications that I made to the building. |
This project was started to have a model of the Bryan House that is located on Cemetery Ridge. It will be on the far right flank of my table. BMC plastic models typically come with some bad warping of the wall and roof pieces so my initial plan was simply to place pieces of balsa wood in the four corners of the house to hide the warped joins where the walls come together. After that, it hit me that I could make some relatively simple modifications by adding window shutters that would differentiate the house from the earlier versions of the model that I made. Balsa Wood and Bass Wood are easy materials to work with and the modifications did not require much in the way of carpentry talent on my part.
It is rather amazing that I could make three different models from the same basic BMC model of Meade's Headquarters at Gettysburg.
I now have one more model to make: the Bliss farmhouse that was located further away from the Union positions on Cemetery Ridge. Both sides had been using the house as cover for their respective skirmishers. Union general Alexander Hays (II Corps, 3rd Division) finally had enough of the Confederate sharpshooters picking off his men so he sent a company of soldiers down to the Bliss farmhouse with orders to burn the house down so that the Confederates could no longer use it for cover. So I will have to make a model of a burned out destroyed house.
Finally, here is a picture of the Gettysburg terrain that I have set up on my game table in my home basement. The picture shows about half of the amount of table length and depth that I will have for my Pickett's Charge game at Historicon this year. I set up various sections of my planned layout so that I can visualize the spacing of the terrain relative to the size of the regiments.
 |
| My two game tables in the basement. The near table is 6ft by 12ft and the back table measures 5ft by 12ft. I could add three more feet of table to increase the length to 15ft. |
I was scrolling through some old pictures that I took in 2022 when I had a large SYW setup on my game table. It featured two small villages with houses made by Ian Weekley. I commissioned these buildings with Ian back in 1986-87 years and I think that they still hold up well today compared to laser cut and resin buildings. I also think that they have a sort of ramshackle appearance that is both charming and more realistic for a small German town in the 1700s.
By the way, does anyone even have an interest in the Seven Years War era anymore? I’m not seeing it in my convention games, which were totally skunked for lack of players signing up. Figure sales for SYW figures are significantly lower, but are offset somewhat by a rise in AWI figure sales. This might be a function of people still trying to paint all of the figures that they bought during the COVID lockdowns around the world. Figure manufacturers of all stripes had a once in a lifetime bump up in sales during that period.
Finally, blog viewership is also lower. I’ve had some recent posts that failed to garner even 100 views which is shockingly off from peak viewership. ACW and 19th Century Colonials are significantly higher than SYW articles. I am a bit baffled, but I shall keep doing my own thing and sharing my activities on my blog.
I still have a post about my recent Napoleonic game in the works and I will drop it on the blog this week (hopefully). I’m thinking that a 28mm Napoleonic Peninsula War game might be my convention game for the 2025 season. I can do this type of game on one table rather than the three tables that I’ve needed for my 54mm games. Hmm, 54mm Napoleonics. Now there’s an interesting idea, although I also have 54mm Hannibal lurking in the background.
 |
| Confederate supply wagons on the Emmitsburg Road |
I have some plastic munitions wagons for my 54mm Civil War armies that were just begging to be painted and based. And so I did.
Some months ago I was thinking that I would leave wagons and limbers unpainted to give the game a nostalgic toy soldier feel, however, as the Pickett's Charge Project progressed all of the other terrain elements were so well done that leaving the wagons unpainted made them look out of place.
The first picture below illustrates the look of the unpainted wagon versus the painted and based wagon.
 |
| The "before" wagon on the right and the "after" painted wagon on the left. |
The wagons came from a set of 1/32 scenic pieces made by BMC and sold under the "Americana" label.
They are a little bit on the small size relative to 54mm figures, but they will look just fine on my table top set up. Painting the wagons was easy; just black primer all of the parts and paint the wagon carriage an olive green color. The canvas was primed in grey because I did not want the undercoat of the canvass to be too dark. I used some P3 brand paints (Jack Bone, Menoth White, and Menoth Highlight) which give a khaki color to the shade and gradually lightens to a light cream color. This results in the canvas looking like, well, canvas. I didn't spend much time on the horses (black primer, burnt umber shade and brown highlight colors).
The bases were cut out from cork dinner place mats and slathered with my usual terrain mix of wall board paste mixed in with dark brown paint. I then sprinkle some fine railroad ballast material from Woodland Scenics and then let the base dry overnight. The horses and wagons are glued to the base with two-part epoxy before the terrain goop is slathered onto the base. When the base is dry I dry brush a tan color called "Camel" onto the base and then finish off the base by gluing down a small bit of green static grass. Don't use too much static grass, just enough to add a bit of color to the base. In the picture below you can see how the wagon bases resemble the roads.
 |
| Confederate supply wagons trundle down the Emmitsburg Road, passing by the Codori farm. |
 |
| Close up view of the wagons. |
The wagons do not serve any purpose in my Pickett's Charge game other than to add a little bit of eye candy to the table top. I do like the way they turned out, but I kind of wish that I had used the larger wagons from Classic Toy Soldiers (CTS). However, I am too much time invested in the wagon project to start over, they look fine and Historicon is coming up in four weeks.