Saturday, October 31, 2009

21e Regt. de Ligne


Two battalions of the 21 Regiment de Ligne. Elite Miniatures painted by Der Alte Fritz

I finished the last four voltigeurs, this evening, that I needed to complete my second full regiment of French line infantry for my 1805-1807 project at a 1:10 ratio. As shown above, these are Elite Miniatures figures with all of the soldiers in the "at the ready" pose. The two battalions of the previously-painted 12e Regiment de Ligne are all in the "advancing" pose. Thus, when I start removing single casualties during a game, I will remember which regiment the figures belong to by way of their pose. These two regiments complete Petit's Brigade in Gaudin's 3rd Division of Davout's III Corps.

Note that I have not gotten around to basing the figures yet. I will terrain the individual bases with spackle compound and gravel and flock to finish them off.


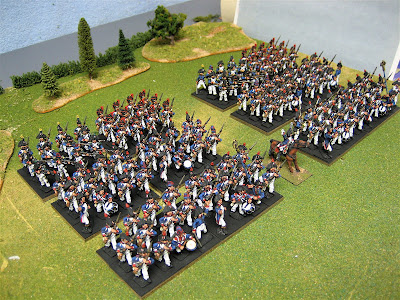
Another view of the 21e Regiment de Ligne. Click all pictures to enlarge the view.

I also have one battalion of the old Elite figures painted (which will become the 25e Regt. de Ligne) and one battalion of Dave Alsop-sculpted Legere figures. The second battalion of the "old Elite" figures for the 25e Regiment de Ligne are already primed in black primer and are ready to paint. These will be a joy to paint, after slogging through the second battalion of the 21st. I did not like painting the "at the ready" pose for some reason - the figures just did not inspire me. However, the old Elite figures are little gems and I look forward to working on them.

For the month of October, I ended up with 89 Olley Painting Points - all of them infantry figures this month. That included 72 French line, 2 eagle bearers, 1 "old Elite" carabinier in the Napoleonic genre. In the SYW, I painted 8 Stadden Prussian grenadiers for the Reisengarde regiment and 6 Stadden AWI artillery crew that were painted as Prussian artillerist.

We have our annual SYW light troops game on December 4th or 5th and so I suppose that I should work on adding more dismounted hussars and freikorps dragoons, but I would much rather work on the 1806 project.
m

Tuesday, October 27, 2009

Russian Project of 1806


Close up shot of the Smolensk Regiment on temporary stands. Click all pix to enlarge the view.

I did an inventory and sorting of all of the 1805 Russians that I bought from Old Glory over 15 years ago. These are the original Dave Alsop sculpts that were compatible with his limited edition French in bicorns and shakos that are no longer available. The Russians were not going to be released to the public after Dave's untimely passing since the range could not be completed. I prevailed on Russ at Old Glory to cast about 900 of the Russians for me and he agreed to do so. I believe that a couple other people in Omaha, Nebraska also piggybacked on my bulk order.

I was going to build up Russian forces to refight the Battle of Austerlitz on its 200th anniversary in 2005. The battalions would have been at 1:30 or 20 figures per battalion. I had about 40 plus battalions of Elite Miniatures Russians painted over the ensuing years and I probably could have completed the project, had not life, getting married and having a family not interceded. So I didn't do the big battle, Wargame Holiday Centre style, but that was my intent.


The whole Smolensk battalion (60 figures) in line with GMB Designs flag. Old Glory figures.

Once I caught the bug to do Napoleonics again at a 1:10 ratio with French and Prussians, it occurred to me that I still had a lot of Russian castings left over, even after having sold the entire painted collection of 28mm figures a couple of years ago. I thought that I would never paint another Napoleonic soldier in my life, but I guess that I was wrong.

It seemed like adding a couple brigades of Russians, circa 1805-07, would dovetail nicely with my French in bicorns and my 1806 Prussians. Afterall, the remnants of the Prussian army in East Prussia fought with the Russians in 1806 and 1807. Or, I could do some of the battles in the 1805 campaign and maybe add a few Austrians too. See how a little project can grow by leaps and bounds?


Elite Miniatures Russian Horse Artillery circa 1805-07.

So I did the Russian inventory and found that I had enough figures to paint 14 battalions of 60 figures, or 840 figures in total, from my existing supply of lead. I had previously painted the Pavlov Grenadiers and the Smolensk Musketeers in shakos, so two battalions were done, and Apsheron Musketeers in bicorns were half way done. So I had a good start on a Russian brigade. The inventory indicates that I will eventually have:

2 x 60 Musketeers in shakos
6 x 60 Musketeers in bicorns
2 x 60 Grenadiers in mitres
2 x 60 Grenadiers in shako with busch

All of the above will be Alsop Old Glory figures. I also use Elite command figures (officers, drummers and standard bearers) since Alsop only made one NCO figure (the fellow who is pointing his arm to lead the way).

To that I will add two battalions of jagers using Elite Miniatures. Because Old Glory did not make the artillery or cavalry, I decided to use the Elite range of figures for everything else. The pictures of the horse artillery are from the Elite range.


Elite Russian horse artillery battery has a frontage of 15 inches.


A closer view of the Elite gun crews and cannon.

The cavalry contingent will eventually include a regiment of uhlans (40-48 figures), some hussars (30-36 figures), dragoons (40 figures) and cuirassiers (48 figures) plus an assortment of Cossacks that I will recruit from my Seven Years War Russian army.

As you can see, I have a lot of painting work ahead of me and I probably will not start painting the Russians until sometime in 2010. Then, assuming a pace of 60 figures a month, we are looking at a couple of years of painting work to finish the project. That is not to say that there will not be periods where my painting production is not faster than 60 figures per month, but that is a sufficient amount to assume for planning purposes. Anything faster than that would lead to severe painter's burnout.

In the short term, I may add a battalion of Russians here or there so that I can build out the first brigade of infantry sooner rather than later. Since I only need 4 battalions per brigade, I am already half way there. And those uhlans, hmmm, Fritz likes uhlans and has been wanting to paint them for a long time. I can hardly wait. But first, I have to finish some more of the French and the Prussians.

Monday, October 26, 2009

Old Elite French - 1806 Project


Original Elite Miniatures French in bicornes, circa 1805-1807. This is the first battalion of the 25e Regiment de Ligne. (click the pictures to enlarge the view). Painted by Der Alte Fritz.

I have been slogging away at the painting of my French infantry for the 1806 Project at a 1:10 ratio of figures to actual men. As of today I have 5 battalions at 72 figures each completed. A sixth battalion has five of the six companies finished, needing only the voltigeur company to complete the unit. And yes, I know that the French had 9 companies per battalion during this period, only changing over to six companies in 1808.

I am painting Gudin's 3rd Division in Marshal Davout's III Corps circa 1806. The division will eventually have two infantry brigades of four battalions. The first brigade will have the 12e and 21e regiments de ligne and will consist of figures from the current range of Elite Miniatures French in bicorne chapeaux. These figures were redesigned by Peter Morbey some years ago, I don't know when. The 12e de Ligne are all "advancing" poses while the 21e de Ligne are all in the "at the ready" pose. I liked painting the advancing pose, but for some reason, I really dislike painting the "at the ready pose" for some reason. I guess that the figures don't inspire me, and when you are painting 72 figure battalions, you need to be inspired to paint that lot!


The 1/25e de Ligne in line formation. Old Elite Miniatures.

The second brigade of infantry will consist of the 25e de Ligne using the original old Elite Miniatures figures, which are shown in these pictures. The second battalion will consist of either more old Elite French, if I can find another 144 of the figures, or more likely, the new Eureka Miniatures French infantry from their French Revolution range. I really like the original Elite figures and wish that Peter Morbey hadn't redesigned the range to make them taller and a bit more cartoonish. Even more troubling is that the old figures are not easy to find. I think that I have about tapped out my source for these figures.

So if anyone has any of the old Elite French infantry in bicornes, and you are interested in selling them, then give old Fritz a call and he would be most happy to take them off of your hands at a really nifty markup to what you paid for them. I will take them painted in any condition or unpainted (preferred).

My next post will discuss the Russian part of the project. Here is a taster picture of one of the units that I have painted so far (on temporary bases until I figure out how to base them).


Old Glory Russians designed by the late Dave Alsop. These figures were never released to the public for sale, but I bought approximately 900 of them. This might be my main project for 2010. Who knows? Find out tomorrow.

Monday, October 19, 2009

Battle of Schaumburg - Part III


The Erbprinz of Hesse Seewald and his staff watch the battle from their vantage point on the Muhlenberg, while Prussian dragoons and guard cavalry await in the background. Windmill scratch built by Herb Gundt of H.G. Walls. (click the pix to enlarge the view).

Today I am posting several pictures of the large cavalry battle that took place on the Prussian left during the battle of Schaumburg. The Prussians were ably commanded by Jim Fitzgerald while Rich Black handled the Allied cavalry (Austrians, Saxons and French) with equal skill and panache. ( I always like to use words such as "panache", don't you?).


The French Guards Brigade (left) and the French Heavy Cavalry Brigade and their commanders await the orders to unleash their thundering herds upon the Prussians.

I was too busy commanding the attack of the Prussian Guard brigade of infantry and cavalry, so I did not pay much attention to the happenings to my immediate left. It appeared that Old Fitz had things well in hand, so when things are going according to plan, a good commander just leaves well enough alone. And that is exactly what I did.


The brigade of Saxon cavalry lead the Allied advance. The grey-coated von Bruhl cheveau-legers lead the way, followed by the red-coated elite Rutowsky dragoons, and backed up by a converged 60 man unit of Austrian cuirassiers.


Here are the results after the first class between the Prussian DR2 Jung Krakow Dragoons (lower left) and the Saxon von Bruhl Dragoons (upper right). A single squadron of Prussain Gensdarmes joined in and hit the von Bruhl's in the flank. After the first round of melee, the Saxons took their morale check and passed. We now squared up the two sides for the second round of melee, which is why you no longer see the Gensdarmes hacking away at the flanks of the von Bruhls. Another regiment of Saxon cavalry can be seen in the background, ready to support the melee in the next round of fighting.


The Prussians throw in two squadrons of CR1 Buddenbrock Cuirassiers (left) to offset the arrival of the Austrian cuirassiers. At the top of the picture, the Prussian CR8 von Seydlitz cuirassiers and the Saxon Rutowsky dragoons are hacking and slashing at one another.


The Prussian Jung Krakow dragoons break and flee! They are closely followed by the allied cavalry which rolled a "pursuit" outcome after winning the melee. The von Seydlitz cuirassiers and the Saxon Rutowskys continue their melee in the upper left corner of the picture. Cavalry melees last up to three rounds in our BAR rules. If neither side wins, then both cavalry forces retire a full charge move to the rear where they may reorder their squadrons.

It appeared that the Prussian cavalry was gaining a slight advantage, having more armoured cuirassiers in this sector of the field. The cuirasse gives the rider a huge advantage in the saving throws, as they only die on a D6 die roll of 1 or 2, anything else is a save. The Prussians had lost the DR2 Jung Krakow dragoons and a squadron of Gensdarmes for the day, but the Saxon had lost the von Bruhl dragoons and the large 60-rider French Carabinier regiment. Enough of the allied horse were gone to allow the Prussian infantry to advance across the open field with some degree of comfort.


Prussian infantry advances towards the village of Leiha while their right flank is secured by Prussian cuirassiers of the CR8 von Seydlitz cuirassier regiment.

Monday, October 12, 2009

Battle of Schaumburg - Part II


The Erbprinz Friedrich and his staff assemble on the Muhlenberg. Behind them one can see the attack force of infantry and cavalry that would soon be unleashed upon the French centre on the Schmeideberg heights. (CLICK PIX TO ENLARGE)

The battle in the center stretched from the little village of Leiha on the left, running over the elevated height of the Schmeideberg to the right of Leiha, and continuing on to the Pheasantry, which was a sort of dividing line between the fighting for Tagewerben and that of the high ground. The Erbprinz planned to strike the heights with the brigades (from right to left) of Itzenplitz (4btns), Saldern's Guards Brigade (3btns), and von Bevern's brigade (4btns). Each line infantry brigade had a battery of two six pounders, for mobility's sake and the Guards had a supporting heavy battery consisting of a 10-inch howitzer and a light 12-pounder. Cavalry support was provided by 8 squadrons of elite guard cavalry (CR10 Gensdarmes, and CR13 Garde du Corps, both cuirassiers).


The Hesse Seewald Garde (IR6 - Suren figures) of von Saldern's Guards Brigade march into the village of Posendorf at the foot of the Schmeideberg. Itzenplitz's brigade can be seen to the right of the village along with the artillery batteries of the two brigades. The heights are not yet occuppied by the French.


I spoke too soon, for now one can see the French artillery trudging up the opposite side of the Schmiedeberg. They would win the race to the top.


On the next turn, the French artillery began to limber while three French infantry battalions close up behind them. The battalion in the second rank, Regt. Guyenne, would be awarded a battle honour for its stalwart fighting today.

The Cavalry Battle At Leiha
While Itzenplitz and Saldern were trudging up the slopes of the Schmeideberg (Pratzen Heights), the Prussian guard cavalry sought to exploit a gap that appeared to exist at the foot of the heights, near the village of Leiha.


Prussian Gensdarmes (CR10) gallop towards the undefended gap between the villages of Posendorf (in the background) and Leiha (in the foreground). The end of the Schmiedeberg can be seen to the immediate left.

As commander of the Prussian guard cavalry, I looked across the field and saw nothing but open fields ahead of me, and no French infantry or cavalry around Turn 3 of the game. So I decided not to wait for the infantry to take Leiha, on the far side of the table, but slap leather and charge on ahead and try to disrupt the French as best I could. With the five squadron Gensdarmes (CR10) and the three squadrons of Garde du Corps (CR13) I figured that I could handle anything that the French could throw at me. So proceed I did, cutting a rather dashing figure if I do say so myself.


The French cavalry regiment Royal arrived to plug the gap between Leiha and the heights, but with only 3 squadrons, they would be no match for the Prussian guard cavalry of 8 squadrons. To the right, IR34 Hesse Seewald Kadet Korps (Minden Miniatures) advance towards the heights in column of grand divisions. They were in a hurry to scale the heights and did not take the time to stop and shake out into a line. So they would attack in a rare column formation for the sake of speed.


The Prussian Gensdarmes pitch into the French Royals, who are now reinforced by a squadron of Maison du Roi horse grenadiers (red coats) and a squadron of French Carabiniers ( I think), giving the French 5 squadrons versus an initial 5 squadrons of Prussians. However, the Garde du Corps proved to be the difference as they Royals routed and the other two squadrons fell back to their infantry supports. On the right, IR334 Kadet Korps has now deployed into two supporting lines of two grand divisions, due to the space restrictions on the hill. They engage a French infantry battalion in a firefight.


After the first grand cavalry melee, both sides' squadrons retired 24 inches to the rear to reform. This allowed von Bevern to advance his brigade forward to capture Leiha and hopefully burst through the gap create by the guard cavalry. The Prussian guard cavalry then returned and charged into a battalion of les Gardes Suisses infantry that was advancing into the gap. Above, one can see the Prussian infantry battalion Schwerin (IR24) shooting down one part of the Swiss, while the Prussian cavalry hack down the other half of the Gardes Suisses. At the top of the picture is the village of Leiha. Buildings by Herb Gundt.

Time ran out before the Prussians could truly finish off the Swiss and some of the other French regiments that were milling about near Leiha. I have no doubt that the Swiss would have lost the melee and routed before the Prussian guard cavalry, while Bevern could have moved his brigade into the gap to engage the last French unit in the center: les Gardes Francaises. (shades of the Russian guards at Austerlitz).

The Infantry Battle on the Heights
While the cavalry action was going on at the foot of the heights, an intense infantry struggle commenced on the top of the hill.


Lt General Guerchy (Duke Siefried) commanded the French second column and swung them around to hit Itzenplitz's brigade in the flank, while St. Germain's third column fired on the Prussians from the front.

For a brief moment, it looked like Itzenplitz's brigade, supported by IR34 Kadet Korps from Saldern's brigade, were going to capture the heights and advance down the rear slope to finish off the French center. Itzenplitz had a battalion of grenadiers on the crest, supported by the guard 12 pound battery, while the Kadets blazed away at the French Regt. Guyenne. Guyenne refused to leave and so the Kadets elected to charge and finish them off. However, the Kadets were below half strength and thus had to take a morale check before charging. They failed. And Guyenne stood there with one last stand (15 figures) of troops, down 75% of its initial strength.


Guerchy advances down the transverse of the Schmeideberg to create a bend in Itzenplitz's line. Meanwhile, a battalion of Grenadiers de France charged into the Prussian grenadier battalion (5/20) and the Saldern's 12 pounder battery. The artillerists sensibly evaded, leaving their guns behind, thinking that it was only a matter of time before they could return and reman their guns. Afterall, the Prussian guard infantry was coming up behind them.


The situation near the end of the game. The Kadets (on the left end of the height are about to rout, but the Hesse Seewald Garde is coming up behind them in two sections to make the final push. Itzenplitz's last two units are about to get crunched, while the IR15/III Garde Grenadiers have formed a break-water line to the right of Posendorf. The French appear to be advancing to Posendorf, but off camera to the right, are coming 5 squadrons of Prussian hussars and two untouched battalions of infantry to fight the French.

As five o'clock approached, it appeared that the French were barely hanging onto the heights, but would the one Prussian guard battalion be enough to make the final punch through the line? The second Prussian guard battalion had to break off the attack and form at a right angle to face the advancing French, who were descending the heights, supported by another regiment of French heavy cavalry. There was enough there for both sides to say that they had fought each other to a stand still. I think that I would have to agree with that assessment of the battle for the heights.

Tomorrow's Report - the great cavalry melee on the northern flank.
I hope that you enjoyed the second installment of my battle report. Do feel free to leave a comment or ask any questions that you may have by clicking on the comment box, below.

Sunday, October 11, 2009

Battle of Schaumburg - Part I


A picture of the orders that were given to each player/commander before the start of the game. Prussian orders were sealed with an "F" monogram for Friedrich, whilst the French orders were sealed with a fleur-du-lys.

On Saturday October 10, 1759 a great battle was fought between the Germanian army of Erbprinz Friedrich and the Gallo-Saxon army of Lt. General Chevert near the village of Schaumburg, located somewhere within the realm of the Saxon Duchies. Some two hundred and fifty years later, sixteen wargamers recreated this little known battle in Woodstock, Illinois.

The scenario was loosely based on the battle of Austerlitz, with the Prussians playing the role of Napoleon's French army and the French, Saxons and a few Austrians playing the role of the Russians and the Austrians. The names of all of the towns and terrain features were changed in order to disguise the scenario, but as you look through the game photos, I am sure that you will be able to spot the similarities.

Due to the large number of photos that I took, I plan to divide the after action report into two or three parts this week. So without further ado, let us see what happened in the fierce fighting to control the village of Tagewerben (Telnitz).


The Prussian Colonel von Kliest makes a few final adjustments to his deployment of his freikorps in the town of Tagewerben (Telnitz). The blue water is the Rohrbach-wasser (Goldbach stream).

The Prussians placed a brigade of freikorps troops in the forward position of Tagewerben to act as a trip wire for the expected French attack on the right flank of the Prussian army. We set up a footprint for each village using brown felt squares, then placing several buildings atop of the felt. Any unit touching the felt was considered to be "in the town" and thus gained the benefit of hard cover. Musketry from the town was given a minus one modifier to reflect the dispersion of the troops about the town.

The French players were ordered to attack Tagewerben with their advance guard brigade of Fischer's Legion. After taking the town, they were to cross the Rorbach-wasser and head for the town of Rheinhausen at the very edge of the Prussian back table. As this road and town were astride the Prussian supply lines, any French unit that left the table would result in "TWO" Prussian units being required to leave the table to pursue and defend the lines of communication. This placed a great deal of importance on the Prussian right flank.


French light troops advance warily upon Tagewerben, ahead of the vanguard of Fischer's Legion of light infantry and cavalry. Rheinhausen can be seen in the far right background.


Fischer's Chasseurs a Pied (left in green) screen the first column commanded by Lt. General d'Armentaires as they converge on Tagewerben.


Fierce fighting soon develops in front of and around Tagewerben as the French attempt to envelope the town from several sides. Compare this to the earlier picture of just the light troops advancing before the town.

I allowed von Kliest to conceal of company of freikorps infantry in one of the woods that were in front of the town. I replaced the Sachsen Ponds with light woods to help disguise the scenario a little bit. The ensuing ambuscade seemed to disorient the Brigadier Fischer for a turn or two, as he wasn't expecting to meet any resistance before he reached the town. This seemed to slow down the French attack for a turn or two until they regained their confidence. Of course, four more battalions of French regulars and some 8 pound cannons will do wonders for one's morale.

Von Kliest posted the rest of his freikorps in Tagewerben, supported by a battery of light 6-pounders and a battalion of elite Prussian jagers. These rifle armed troops can hit targets at 40-inches in our rules and since they had earned the "elite" rating through their exploits in at least two previous battles, their +2 for being elite offset the -2 for the 40" distance and thus could pick off the French at long distance with little fear of losing any of their own men. Von Kliest also had a battalion of grenadiers that he posted on the other side of the Rohrbach-wasser. Any troops crossing the stream would become disordered for a turn, so von Kliest counted on being able attack/melee any French that dared to cross the stream while they were still disordered. A big advantage in a melee. Since Brigadier Fischer wrote the BAR rules (Bill Protz) he did not seem too interested in testing the mettle of the Prussian grenadiers.


Tagewerben finally falls to the French, who now occuppied the town.

While the fighting was going on outside the town, there was a lively little light cavalry melee going on next to the village, between the Saxon Lanciers de Saxe on the French side, and some von Kliest Frei-hussaren and regular Prussian hussars.


The Saxon uhlans appear to have the upper hand during the first round of melee, but the Prussians had more reserves, including two squadrons of the blue-coated HR2 von Zieten hussars and the black-clad HR5 von Ruesch Black Hussars.


General von Zieten lends the support of a squadron of his Prussian hussar brigade. As you can see, the Saxon lancers are now outnumbered and their defeat is enevitable. A second squadron of blue hussars are also available if needed, while the Black Hussars watch the handiwork of their comrades.


Speaking of von Zieten, his reserve infantry brigade, begins to arrive in the nick of time via the village of Rheinhausen. Von Zieten is, of course, actually representing Davout division at Austerlitz.


Schloss Schaumburg (Solonitz Castle) is well defended by a brigade of Prussian infantry. The French never made it this far during the game.


Another view of Schloss Schaumburg, which was built by the talented Herb Gundt of H.G. Walls fame. I commissioned this building some 15 years ago or so with the intent to use it in a 200th anniversary game for Austerlitz with Napoleonic troops. Alas, that game was never played, but I still had my Sokolnitz Castle model and I wanted to use it in the game.

So the French captured Tagewerben (Telnitz) after a fierce struggle, but they elected to stop there they made no attempt to cross the Rohrbach-wasser and attack either Rheinhausen or Schloss Schaumburg. In retrospect, the extra Prussian brigade was an impediment to the game and I would not use it a refight, as it made the Prussians too strong in this sector. I had hoped to see the French cross the stream and attempt to capture the castle.

If I were to run this game again, either as a SYW game or the real deal Napoleonic version, then I would only permit one battalion to occuppy Telnitz and have the rest of the brigade that fought there in our game appear within three turns as the "Davout" stand in. This would give the attackers a significant advantage, while there would be fewer defenders in the village. Adding a single bridge across the Goldbach might also help the attackers.

A Teaser For Part II's Report

On Monday or Tuesday I will post pictures and a report covering the fighting atop the Schmiedeberg hill (Pratzen Heights). Below is a picture of some of the action.


Prussian guard cavalry (CR10 Gensdarmes and CR13 Garde du Corps) surge through a gap in the French lines, defended only by the Regt Royal French cavalry. Prussian infantry to the right ascend the heights to fight the French.

Stay tuned and check in for more pictures tomorrow. As always, click on any of the pictures to enlarge the view.

Monday, October 5, 2009

Battle Field Pictures


The Erbprinz Friedrich and his staff view the arrival of the Gallian army from atop the Muhlenburg. The royal guard infantry can be seen behind the Muhlenburg.

I finally figured out the glitch in Blogger and so without much further ado, here are some of the pictures of the battlefield for the annual Old School Big Battalion Wargame next saturday October 10, 2009. Please click on the pictures to enlarge the view.


Another view of the staff meeting on the Muhlenburg and the host of support staff hidden behind the hill. Von Seydlitz's brigade of cuirassiers and dragoons are in the right background. Minden Miniatures (IR34 Garde Kadet Regiment) can be seen on the far left, Stadden Guard IR15 in the center, and Suren Hesse Seewald Garde behind the windmill (made by Herb Gundt).


Another view of von Seydlitz's cavalry brigade.


Herzog von Bevern's brigade (left) and von Saldern's Guards Brigade (right).


Major General von Itzenplitz's brigade deploys in the center. (all figures are Potsdam Miniatures 30mm figures).


Schloss Schaumburg anchors the right flank of the Germanian army's position. Lt. General von Hulsen's brigade can be seen behind the ridge line.


Colonel von Kliest and his Freikorps defend the foreward position in the town of Tagewerben. Note the positioning of the town module at a 45-degree angle to the approaching attackers. Von Kliest Dragoons deploy on the near side of the Rohrbachwasser, while a squadron of its sister hussars protect the flank of the elite Jager Regiment.


The hamlet of Posendorf in the center of the battlefield. Note the use of brown felt to outline the footprint of the built up area. Any figure posted on the brown felt is considered to be inside the village and benefits from hard cover. Ian Weekley building on the left, all other buildings were made by Herb Gundt.


Germanian artillery crew man the Mummanschanz Redoubt that anchors the Germanian left flank on the center table. Prinz Moritz of Anhalt Dessau's brigade provides support (out of sight) behind the redoubt.


The Gallian Advance Guard arrives on the field opposite the Mummanschanz Redoubt.


The Saxon cavalry brigade of le Comte de Lusace arrives on the Gallian right flank and covers the march of the Gardes Brigade (Gardes Suisses, two Grenadiers de France and eventually, the Gardes Francaises will arrive from Minnesota to fill out the brigade.

So there you have it, a view of the Germanian army deployment and the arrival of the Gallian vanguard. Monsieur Chevert and le Comte de Freyberg were late in their arrival and so I could not shoot any more pictures of the Gallian army deployment. I have no doubt that the Gallian master spy, Colonel Enigma, would have intercepted my dispatches and drawings of the army anyway.