Monday, November 30, 2009

Bosniaks & Black Hussars


Crusader Miniatures Bosniaks in post SYW summer uniform. Click pix to enlarge.

I completed the squadron of Bosniak lancers this evening and thought that I would post some pictures, even though I have not done the basing yet. That will be done tomorrow. The most difficult and tedious part was painting the white edging on the "van dyke" pattern of the shabraque, closely followed by the chore of painting the black "barbershop pole stripe" on the lances. I will eventually add some lance pennons as well, although I haven't decided whether to make them freehand or use some of the GMB Designs pennons.


Foundry dismounted hussars in mirlitons, painted as a 12-figure squadron of dismounted hussars for HR5 von Ruesch (the Black Hussars). Click pix to enlarge the view.

Over the long holiday weekend, I whipped out the dozen dismounted Black Hussars in about a day. What the heck, they are mostly black and have a minimal amount of equipment plus there is no design on the sabertache. Now that's my kind of uniform!!!!

Next on the painting docket: 18 dismounted von Kliest horse grenadiers to use in our upcoming Light Troop game on saturday December 5, 2009. Given that this is the anniversary of Leuthen, that must be a good omen for Prussian fortunes in our upcoming game.


Der Alte Fritz's Thanksgiving Day Turkey

And speaking of Thanksgiving, you can see what our bird looked like as we took it out of the oven. I was impressed with the golden brown color of the skin so I just had to take a picture. I was going to post it on Thanksgiving Day, but with a dozen guests over for dinner, I got a bit distracted and didn't get around to posting the picture until today.

Saturday, November 28, 2009

Annual Light Troops SYW Game

My colleagues Bill and Randy have been beavering away at building up their mass of French light infantry, cavalry and horse holders for said cavalry. This is all in preparation for our annual light troops game that we hold each December. This year's game is next weekend, Saturday December 5th (Leuthen Day too as I recall?).

I had to make a brief foray back into the painting of SYW figures and add a squadron of dismounted Black Hussars (Foundry figures) to bring those forces up to 36 mounted and 36 dismounted figures. I intend to make some horseholder stands using the Eureka Saxon hussar horseholders, but I won't have them done in time for this year's game. The hussars were finished on Thanksgiving Day and so I turned my attention towards adding a squadron of Crusader Miniatures Bosniak Lancers.

The Crusader Bosniaks are wearing the post 1763 uniform so technically they are not in SYW kit. That's no problem as I intend to use the figures as Milady de Winter's mounted bodyguard lancers. So a fictional unit can wear almost anything. The Crusader figures are in summer uniform of short jacket and baggy trousers, sans the bulkier kaftan of the winter uniform. They wore all red uniforms in the summer and the black kaftan in the winter. If you have been following the exploits of my Lady de Winter character, you will know that she prefers to outfit her private troops in black uniforms. Accordingly, I gave the Bosniaks a black coat and retained the red trousers. The shabraque remains black with red "van dyking" - a sort of saw-tooth edging on the shabraque. The black and red combination looks very nice and I will post some pictures later in the week when the unit is completed.

The lances are red and have a "barbershop pole" strip of black running up and down the lance. This was a pain to paint, much harder than the van dyking on the shabraque. Thank goodness I only plan to have two squadrons or 24 figures in this unit. The lances would drive me crazy if I had to paint many more.

One little nit to pick on the Crusader figures -- the sculptor used eBob horses, which are very nice and elegant; however, his riders don't seat snuggly on the horse and so I had to wedge in a lump of green epoxy putty underneath each saddle in order to fill in the gap left by the skinny horse. Gluing lances into open hands is not a lot of fun either. I prefer a solid hand that allows you to drill a hole into it, resulting in a firmer grip on the lance or flag pole.

Wednesday, November 25, 2009

Frederick & Voltaire


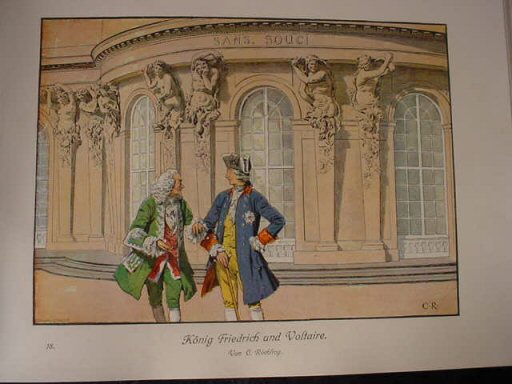
For those of you who have ordered the wonderful Eureka Miniatures sets of Frederick the Great and Voltaire and are wondering how to paint the miniatures, here is a copy of the Rochling print to use as a painting guide.

Tuesday, November 17, 2009

How To Base Figures

Someone asked me how I do my bases. I would direct you to the master, who taught me what I know, and that is Frank Hammond of Minden Miniatures fame. Click on the link to view Frank's excellent tutorial on terraining bases and applying static grass:

http://mindenminis.blogspot.com/2008/04/how-i-do-my-bases.html


Whenever you see one of my bases that has a darker ground and has static grass, then you will know that I am using The Hammond Method.

The other bases that use flock employ the Old Fritz Method. I have to rush off to dinner right now, but I will be back to explain that and add more detail.

OK, I'm back from a fine curry dinner that Mrs. Fritz made. I love that gal!

Old Fritz Bases

I used to (and sometimes still do) use quarter-inch foam core for movement trays. These are easy to make as you just slice them up with a Box Cutter Knife, watch out for those fingers, and then slap some magnetic sheet on top of them.

The main drawback to foamcore bases is that they don't have a nice finished look to them. Oftentimes, the knife blade gets dull and as a result, big chunks of foam are gouged out of the edge as you cut your base to size. It doesn't look very good. When I started using this method for movement trays, it was always intended that these would be temporary bases. My plan was to eventually remake all movement trays from MDF wood. So this is what I am gradually migrating to. (never end a sentence with a preposition).

My new system is to purchase premade or custom made (bespoke basing to those of you in the UK) MDF bases from a local entrepreneur who sells the bases under the name of "Georgo Bases". I presume that his first or last name is George. Georgo will also cut bases to any size, so this what I am doing now. For my SYW armies, which are mounted on one-inch square metal bases, I find that I need about a quarter inch overlap on the length and width of the movement tray. So a 15 figure stand of five files by three ranks (5" + 1/4" = 5-1/4" wide by 3" + 1/4" = 3-1/4" deep) has the dimensions shown in the parenthesis. This gives my chubby little fingers some extra room to pick up the movement tray if needed.

You can buy premade Georgo bases from the Games Plus hobby store in Mount Prospect, Illinois or from The Last Square in Madison, Wisconsin. Both stores have on-line web pages that you can google. Whenever I need a custom size base, I simply call the owner of Games Plus and give him my order requirements and he then passes the information on to Georgo. I usually get the custom sized bases back within a couple of weeks, sometimes sooner.

For the figure bases, I use precut galvanized steel bases made by Wargame Accessories. Many stores in the US carry this line of bases and I usually get mine at Games Plus. I use 1" square for the Seven Years War and 3/4" square for Napoleonics and Colonials. I think that the 3/4" square bases look better, as the soldiers are packed in closer together. However, many of our Surens and Redoubt and some other figures have large bases that will not fit on the 3/4" base. This is why Bill Protz and I went with the larger bases for our BAR SYW armies.

OK, so I clean and prime the figures, then glue them to the metal base and then prime them all in one shot. This covers the metal with a coat of dark primer (I typically use black primer) so that the shiny metal doesn't pop through the basing material and detract from the appearance. I used to glue the painted figures to the shiny metal base, then paint the base brown, then cover the base with spackle mixture.

Then I had one of those "DOH!" moments and realized that I could eliminate the time consuming step of repainting every single metal base black, if I just sprayed it with primer at the same time that I was priming the figure.

At this point, my method is similar to Frank Hammond's other than the fact that I use flock instead of static grass. This is faster, since it can all be done in one easy step. However, it doesn't look as nice as Frank's Method.

I mix brown paint into a quart pail of Red Devil Pre-mixed Spackle Compound, which you can buy at any hardware store or home improvement chain store. I like the texture and consistency of the Red Devil brand. I don't like the generic or store brands of spackle as much, even though they cost less. Mix in the paint directly from the paint jar and stir until the goop looks like chocolate pudding.

Then, using a small artists' palette knife, I trowel in the spackle compound around the base and between the legs. I quickly sprinkle some Games Workshop or Gale Force 9 fine gravel onto the wet spackle. Then, just as quickly, I sprinkle on some Woodlands Scenics "Burnt Grass" flock and presto! I am done. Set the figure aside for about an hour or two, afterwhich it will be completely dry. If you want, you can then dry brush some tan or light colored paint onto the parts of the base where you did not put any flock or gravel. This provides some highlights. Now you are done. I find that it takes me about 30 to 60 seconds per figure to base up a battalion or a squadron

You might have noticed some flat pieces of wood that are embedded into the 2" diameter round command bases. These are strips of mahogony, cherry or walnut that I buy at a local hobby shop. Eventually, I will print out the name of the general on my laser printer and glue the label onto the wooden plaque. It gives it a nice professional looking finish.

When I have a lot of time and am not in a hurry, I now prefer the Frank Hammond Method of basing. But when I am in a hurry, I resort to the Old Fritz Method. Either one will do the job.

Happy basing everyone!

Saturday, November 14, 2009

French Limber Team


French artillery limber circa 1805-06 from Front Rank Miniatures. Click pix to enlarge.

I finished my first of eight French artillery limber teams that I purchased from Front Rank Miniatures about a month ago. I started Friday night and finished the team (7 Olley Painting Points) on Saturday afternoon and started the basing process, which takes several steps. Here you can see the semi-finished product before I apply a coating of brown ink on the base, dry brush some tan paint, and then apply the static grass.

I used some sheets of polystyrene that were laying about the workshop and cut them to a dimension of 7 inches long by 2-1/4 inches wide so that I would have enough extra space to attach an artillery piece to the limber. I do not glue my cannons and crew to a single stand, but rather keep the cannon standing free without a base and I put the crewmen on 3/4 inch square metal bases, finished off with spackle compound, paint and flock. So when it is time to move the gun model, I can simply attach it to the limber and take off!


Here is the Front Rank limber with an Elite Miniatures French howitzer hooked up for a ride. In the background, you can see either a Dixon or Essex (I can't recall which of the two made it) French caisson team.

It seemed a rather daunting task to assemble all of the parts for painting and then carefully glue them onto the plastic base, but the whole process turned out easier than I had imagined it to be. I went back and forth in my mind as to whether I might want to use only two horses and one rider, or go with the four horse and two rider team. However, after painting the whole team and finding it relatively easy to affix to the base system, I have decided to go with the full four horse team. Each one of my French guns will have a similar limber. The battery will be comprised of six gun models (2 howitzers and 4 8-pounders), their respective limbers, and one ammunition caisson team.


Four of the six guns that will make up one of my French line artillery batteries.

So there you have it - the start of the limber building process. I was afraid to tackle this project, but as is so often the case, once you start on a project, it is not as difficult as you might have imagined it to be. I am currently cleaning and getting two more limber teams ready for the primer and hopefully should have them finished by the end of this coming week. The French artillery battery should look downright awesome once all of its elements are in place: guns, crew, battery officer and ADC, limber teams and caissons.

En avant!

Thursday, November 12, 2009

General Gudin & Staff


General de Division Gudin (center) and his staff including Generals de Brigade Petit (left) and Gautier (right) along with their aides de camp. Elite Miniatures figures. Click the pix to enlarge the view.

I have been spending the last several days working on the command figures and staff officers for my 1806 French and Prussian armies. I had set up all of my forces on my wargame table so that I could see how they look all at one time. This also highlights what is missing and what needs to be painted next. After doing this exercise, it was clear to me that I needed to paint an aide de camp for each officer.

My basing system uses a round base for the division and brigade commanders and a rectangular base for the staff. This way, when I look at the figures on the table, I can instantly pick out the Big Kahuna from the staff at a glance. The long pieces of wood that you see on each stand is where I will glue on the name tag for the particular general. The ID tags will be printed out in a nice looking font and glued to the wooden placque with white glue.


French light cavalry commander for Davout's III Corps in 1806, Generale de Brigade Vialannes and his ADC. Elite Miniatures figures (French Guard Chasseurs a Cheval command figures).

Eventually, I will have Gudin's 3rd division of eight battalions of 72 figures, one division battery of foot artillery, and to cap it off, the corps' light cavalry brigade. This was commanded by Vialannes, who was not viewed positively by Davout and later transferred out of the corps. I may change history a little bit and promote Colonel Exelmans of the 1er Chasseurs a Cheval to the command of the light cavalry brigade. The brigade will consist of the 1er, 2eme and 12eme regiments of chasseurs plus one battery of horse artillery.

I will post pictures of the Prussian general staff tomorrow. I am also working on additional artillery crews for both the French and the Prussians and hope to be able to post some pictures of the larger batteries within a few days.

Sunday, November 8, 2009

1806 Update

I took a little break from painting figures this weekend and spent some time finishing off the bases of all of my command figures for both French and Prussian armies. That worked out to 15 different bases needing spackle, brown ink wash, a dry brushing of tan paint, and finishing off with some static grass.

Each brigade will have one brigadier general on a round base plus one Aide-de-Camp on a rectangular 1-inch by 2-inch wooden base. The shape of the base will instantly identify the stand as either that of a commander or that of his ADC. Each figure will eventually have his name printed out on a piece of paper and glued to the base. Thus the gamer will know who his command figure represents, and who knows, maybe over time, some brigadiers will perform incredible feats on the battlefield, while others may turn out to be cowards, slackers or poltroons (or all three!).

Setting the command figures and the brigades out on my home table top also gives me a better idea of what I need to do to get the army into game shape. The French are doing fairly well as I now have General de Division Gudin and his ADC painted, as well as those of his two brigadiers Generals de Brigade Petit and Gautier plus their ADCs. The French light cavalry commander, General de Brigade Jacquinot and his ADC in hussar mufti are completed and based, but my heavy cavalry command figure of d'Hautpoul needs his own ADC. I can see that I also need to paint an artillery commander and an assistant.

On the Prussian side, I have three infantry brigadiers, one division commander and one cavalry commander. However, all of the Prussian generals need ADCs. So I spent some time this afternoon selecting the appropriate figures to use for Prussian ADCs and then doing the prep work so that I can prime them later this week. I have yet to select names for the Prussians, other than Blucher, who will command the Prussian cavalry in 1806.

The command stand basing looked so good (and thank you again to Frank Hammond for teaching me his method of applying static grass to bases) that it had me thinking about creating some "vignettes" to place around the battlefield. These will include such things as men and horse casualties, a prisoner of war stand, a vivandiere or two, etc. So I will eventually be working on these items as well.

Finally, I opened up the packet of Front Rank French artillery limber teams and attempted to assemble one of the sets (I bought 8 of them). I made a number of mistakes in the assembly, the first being gluing the limber trail (center pole) upside down. It wasn't apparent to me untill I tried to glue on the front harness bracket that attaches to the limber trail pole. So I filed it down a little bit to make the fit better. I should work out all right. It looks like the most difficult step in the assembly process will be the limber traces that connect the harness to the limber. Front Rank provides some pieces of copper wire (steel plated). You are instructed to cut the pieces to the "proper length". It would be helpful if FR would give you a precise measurement for the "proper length". You then insert one end of the wire into a little notch on the horse and bend a loop in the opposite end of the wire. The loop is then supposed to fit around a horizontal bracket on the limber, afterwhich, you close the loop with pliers. This will be the hard part. I will let you know how it turns out later in the week after I get the pieces painted.


Thursday, November 5, 2009

Connoisseur Napoleonics


An assortment of Connoisseur French grenadiers and one Bicorne Carabinier in bearskin. Most of these were painted by Dennis Smail about 15 years ago. I painted the officer in the blue trousers in the front row.

Click on all pictures to enlarge the view.

Today on TMP several people were inquiring about Connoisseur Miniatures and wondered what they looked like and how they might compare to newer 28mm ranges of Napoleonic figures. Given the general lack of pictures on the internet, I rushed home and dug out a few "remainders " that I still had laying around the Closet O' Lead in my basement. I thought that everyone might want to take a closer look at these venerable old figures.


Another view of the same grouping of figures.


Guard Dutch Lancers in French service, partially painted and never finished. I may have to finish this group of figures to do them justice.

I sold nearly all of my 25/28mm Napoleonics several years ago, but I still had a few extra castings sitting around in the "bits box" of miscellaneous lead figures. These Connoisseur Dutch Lancers were going to be in my defunct Waterloo Project. My painting style has changed a little bit, so I may go back and touch them up and finish them off, now that I'm a little bit motivated to do so.


Connoisseur Bavarians


Connoisseur Bavarians

The unpainted figures shown above are from the Connoisseur range of Bavarians during the Napoleonic wars. These are suitable for 1809 to 1814. They also have light cavalry and artillery (I'm not sure about the artillery crew, but I think they were made). I rather like the Bavarians and think that they would fit in nicely with my Elite Miniatures 1805-07 French. Perhaps one day I will paint a brigade of these lads. They look nice to me.