


 |
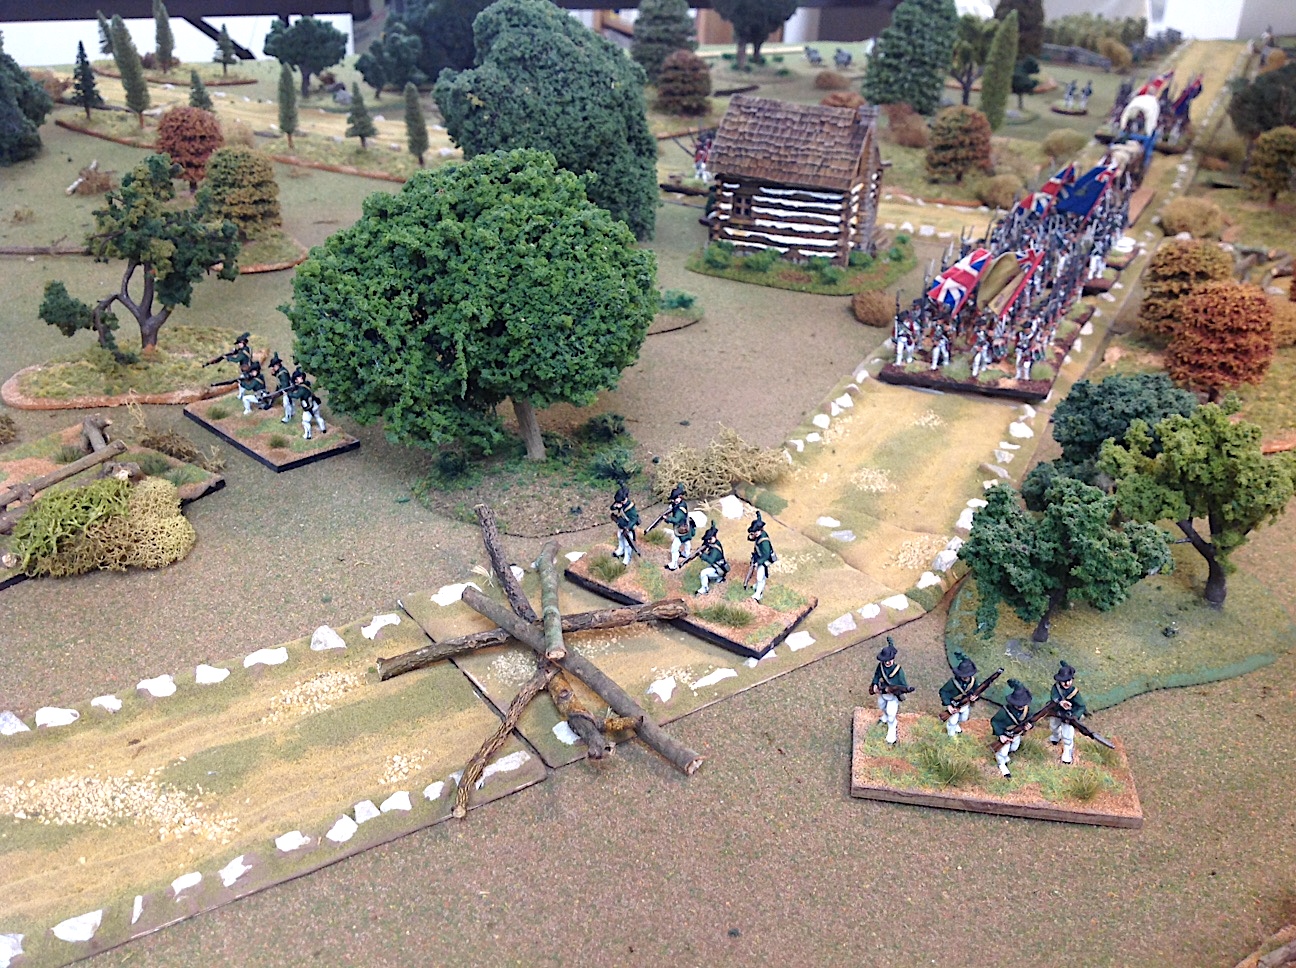
| British light companies (red coats) and Ferguson's Rifles (green coats) chase off one of the American militia units. The intense firefight at the crossroads can be seen in the background, in the clouds of smoke from the musketry. All figures are from Fife & Drum Miniatures and the log cabins are from In The Grand Manner buildings. |
Click on all pictures to enlarge.
Monday evening I played a solo wargame featuring the ambush of Lord Rawdon's supply column by Francis Marion's parrtisans. The game lasted 9 Turns before I decided that a reasonable conclusion was reached. Marion's partisans achieved their objective of reducing the British force from 4SPs (strength points) to 3SPs or less.
British Forces - Lord Rawdon commanding
2 regiments of British regulars
1 regiment of Loyalists
1 composite unit of light infantry
Patriot Forces - Francis Marion commanding
1 regiment of Marion's Mounted Militia (3rd)
3 regiments of militia
Objectives
The Patriots need to destroy at least one strength point (SP) of British/Loyalist troops. Extra points for capturing any of the supply wagons in the British wagon train.
Brtish objective is to escort their wagon train across the table and off the table edge.
The side that achieves its objective first wins the game.
Table Top Terrain and Ground Rules
The game was played on a 12ft by 6ft table, running the long axis (length) of the table. There are two roads that criss-cross in an "X" pattern on the table. Any part of the table that is neither a road nor surrounded by snake rail fencing is considered to be in the woods. The wooded areas restrict movement to half speed for formed troops and three-quarters speed for unformed troops. Wagons must always stay on the road.
The ambusher (in this case the Patriot army) gets to select where he will position his hidden forces. These are denoted on the bottom side of a poker chip and placed on the table. To provide some uncertainty, the ambusher may also place some blank chips on the table that contain no units. The column commander (the British in this case) does not know if there are hostiles under the various chips. His troops must move up to within 6-inches of the poker chip in order to sight potential ambushers and spring the ambush trap.
Rules
I used my own "Fife & Drum Rules for the AWI" which you can download for free from the Fife and Drum Miniatures webstore site.
Free Fife & Drum rules
Scenario Location
Lord Rawdon is marching a force of 4SPs from Charleston, SC to the British stronghold at Camden. On the previous turn, Rawdon's force marched from Charleston to Nelson's Ferry. On this turn, Rawdon intended to march from Nelson's Ferry to Camden. Brigadier Francis Marion's partisans (3SPs) intercepted and ambushed the British column. Dice rolls added one more unit of militia to Marion's army, thus giving both sides 4SPs (although the British troops were of higher quality). To compensate for the British advantage in quality, I gave all Patriot militia rifles to give them extended range with their firearms.
 |
| Map of South Carolina illustrating the location of the action at the Westbury Plantation, on the road between Nelson's Ferry and the British fortified depot at Camden. Click or double click the map to enlarge the view. |
The historical map of the area is from the James Cook Map of South Carolina in 1773. The locations of Westbury Plantation and Camden are annotated with red arrows.
After Action Game Report
gg
 |
| The British column of march on the road to Camden. Green Loyalist regiment in the lead followed by the 5th Regiment. Light troops cover the front and flanks of the column |
 |
| Another view of the British column. Westbury Plantation is represented by the white clapboard buildings in the background. A more common backcountry log cabin farmstead is in the foreground. |
 |
| Ferguson's Rifles light infantry lead the column towards the Westbury Crossroads. |
 |
| All appears quiet at the Westbury Crossroads. (the gold poker chips represent potential ambush sites) |
The first ambush at the Westbury Crossroads
 |
| British light company (in red) springs the first ambush of the game. The militia fire on the British column after they are discovered. |
 |
| Firing erupts on both flanks of the column! Note the roadblock of felled trees across the road leading off to the right. |
 |
| The first militia unit that started the whole shebang takes a lot of casualties and routs down the road and into the safety of the woods. Routed units get two attempts to try to rally. If they fail then the unit is removed from the game. |
 |
| The threat on the left has been driven off, so the Loyalist regiment faces to its left to fire at the second militia unit on the righthand side of this picture. |
 |
| Lord Rawdon reorganizes his column and places the 5th Foot at the head of the column, replacing the Loyalists who have taken a lot of casualties and are now a very fragile regiment. Leaving them at the head of the column would be risky as they are more likely to fail morale and run away. |
The second ambush
The ambush at the Westbury Crossroads was quickly driven off. The Rebels on the left side routed after taking six casualties from the 5th Regiment and light companies, while the rebels at the road barricade on the right did a "fire and retire" move and they sauntered back towards Westbury Plantation. This regiment would eventually circle around the British column so that it could attack the rear of the column... but that happens much later.
The column moved on with the 5th Regiment replacing the Loyalist Regiment at the head of the column. Ferguson's Riflemen cover the front and flanks of the column to detect any more rebels. They encounter a barricade of felled trees in the roadway. Rawdon suspects that another ambush is in the offing (do you think?)
 |
| The Patriots block the road with felled trees. It takes a full turn stationed in front of the barrier to remove the logs. |
The riflemen inspect some rifle pits off to the left. These have been abandoned and would have provided perfect cover for another ambush at the barricade. All seems well when suddenly another militia unit, on the hillside on the right, pops up and fires into the flank of the 5th Regiment. Both the 5th Regiment and the Loyalist Regiment turn and form line facing the new threat.
 |
| Light troops spot more militia on top of the hill, springing the second ambush at the road block. |
 |
| The Rebels fire and fall back, allowing the wagon train to continue down the road, passing the crossroads. |
 |
| Suddenly, Marion's mounted militia, now dismounted, emerge from the woods to fire into the rear of the Loyalist and 5th Regiments. They pull off a "fire and retire" move so that the British have no targets when they attempt to fire back at the threat. |
 |
| Overhead view of the second ambush as it developed. The 5th Regiment had just cleared the road barrier when firing erupted from the top of the hill. Both the 5th and the Loyalists turned to their right, into line, and faced the new threat from atop the hill. Facing such a large collection of muskets, the rebels wisely retired from the crest of the hill. |
The third ambush
The British column continued on down the Camden road when they came across yet another blockade of felled trees in the road. Expecting another ambush, Rawdon sent the Ferguson Rifles ahead of the column to clear the trees from the road. While this work was going on, musket fire suddenly was heard towards the back of the column!
 |
| Ferguson's Riflemen clear the logs from the road. The 5th Regiment awaits behind and light companies delve into the woods to detect any rebels laying in ambush. |
A few pot shots at the Loyalists scores one more casualty hit on the regiment. It takes its morale test and fails, routing to the rear and right into the 4th Regiment that was bringing up the rear of the column. This caused the 4th Regiment to automatically go into Shaken (similar to Disordered) status.
 |
| The Loyalist regiment routs - it had taken lots of casualties earlier in the game and its morale was already on the edge of shaky, so one more casualty caused the Loyalists to rout, running smack dab into the the 4th Regiment which was bringing up the rear of the column. |
The Loyalists had another attempt to rally and they failed, so they continued to rout and ran right into the welcoming arms of the rebel mounted militia. The Loyalists had no choice but to surrender or get a little taste of Tarleton's Quarter. They chose wisely and surrendered.
 |
| The stalwart veterans of the British 4th Regiment quickly recover and hurry on down the Camden road so that they can catch up with the rest of the column. They jeer at the Loyalist regiment which they watch running away. Marion's mounted militia (currently dismounted) can be seen next to the log cabins at the intersection. |
The game had gone nine turns up to the point where the Loyalist Regiment routed and surrendered. Since this achieved the victory condition of the Patriots, Francis Marion decided that there was no more profit to continuing the fight, so he ordered his army to retire back into the woods and let the remaining British forces march away to Camden.
Conclusion
This was a fun little scenario that was easy to play and only took a couple of hours to finish - all this was done as a solo game so it would have concluded much faster with two players in the game moving and firing their troops.
The British had 4SPs of troops and this took up a lot of space in the road column. Therefore, I gave the British three units of infantry and exchanged the fourth unit for a collection of light troops. The light troops are more flexible in what they can do, take up less space on the table, and are well-needed for a game that has wooded terrain.
The Patriot army started the game with a campaign strength of 3SPs. On each turn, prior to a battle, dice are rolled to determine whether or not the local militia takes to arms and comes to the aid of the Patriot army. In this case, one home militia regiment was added to Francis Marion's army, so both sides started the game with 4SPs.
One militia regiment routed off the table early in the game and was removed from the game. This happens when a unit fails on two rally attempts. After that, it is just assumed that nothing is going to bring them back if they haven't rallied after two attempts.
The ambush at Westbury Plantation was an American victory. A small victory, but a victory none the less. It will help the Americans in the overall campaign because it reduced the total number of British SPs in South Carolina by 1 SP.
This comment has been removed by the author.
ReplyDeleteThree ambuscades in one day would be at least two too many in my playbook! A little like Goundhog's Day.
DeleteExquisite layout, Jim!
Wonderful looking game and a nice scenario. My gut feeling is that the scenario felt a little too much in favour of the Americans, with it pretty hard for the British to exit the table. I'm not familiar with your rules, so I could be completely wrong, and if so, unreservedly apologise.
ReplyDeleteOut of interest, how has the loss of the Militia unit affected the Americans going forward in the campaign?
1) Routed units are removed from the campaign roster.
Delete2) American militia cannot stand up to British regulars in close combat so that gives the British one advantage; their morale is better so they are less prone to rout; British light troops are elite.
3) I maybe should have had only one rifle armed militia unit, although based on past performance, I felt that they needed rifles to have a chance.
4) Marion had good luck with dice rolling: he was able to raise a local militia battalion to bring his numbers up to 4SPs - same as Rawdon. Marion also had a run of initiative dice wins.
5) ambush locations were purely random. I marked the back of 4 pokere chips, mixed them in with some blanks, and then randomly scattered the poker chips aroung the table. So I did not know where an ambush site was initially located. I did allow the Rebels to map move units that were out of line of sight for the British, thus after Turn 1, the Rebels could establish better ambush sites.
6) I would give the British a full SP of Light Companies (24-30 figures) in a rematch and use them to chase the militia out of the underbrush while the column moves down the road.
Wonderfull narrative Jim!
ReplyDeleteThat Dastard Marion! His uppance will come!
ReplyDeleteGreat looking game. A couple of questions. We tried your rules last Sunday and liked them a lot.
ReplyDelete1.If you declare a charge do you get to fire in the fire Phase?
2. What is a "fire & retire" move? Didn't see that in the rules except for Skirmisher Units and Marion's mounted militia above seem more than the six figures allowed for a skirmish unit.
The Militia Fire and Retire Rule is a recent addition that I made to,the AWI rules to simulate militia tactics at. Cowpens and Guilford CH. the entire unit may fire in the fire phase and then fall back a half move.
DeleteMarion's mounted militia are 18 figures mounted 2 figures per round stand. I use them as a standard unit so the one D10 per four figures firing convention is used rather than the skirmisher firing method do one D10 per figure. .
Here are some recent rules changes that I posted on the F&D Forum last week:
ReplyDeleteBased on my recent Fontenoy game, I found some things that I didn't like so here are some changes that I'm proposing (without the need to change any of the charts).
1. Melees last only one round, the attacker must win the melee or else it must fall back one full move and becomes Shaken.
2. Infantry will no longer get to fire at the charger prior to the melee. The charger will test morale to see if he goes in. If so, then the two units go straight to melee.
3.. Battalion guns are allocated one per every two battalions in the game, you can have fewer at your option. The battalion gun is removed from the table after it loses a full infantry stand from the attached infantry battalion.
4. Battalion guns add two D10 to the infantry musket fire dice roll. So if the musketeer unit needs a 4 to hit, then add two dice to the infantry roll and they need to get the same 4 roll as the infantry. I'm adding 2 dice because I put two artillery crewmen on my battalion gun stands.
5. Units that are charged in the flank or rear are considered to have been cut down and so they are automatically removed from the game.
Grand table, fine troops, lovely photos and a super AAR, what’s not to like?
ReplyDeleteIf Infantry no longer get to fire at the charger prior to the melee, I assume the charger doesn't fire either. Didn't see anything in the rules that precluded charging and firing, hence my question.
ReplyDeletePer #2 in my previous comment, the charger will now check morale first, if he passes, then the defender checks a morale and either is OK, goes Shaken = fall back a full move, or Routs = rout backs to enemy.
ReplyDeleteThis is an optional change that I made for my own games to speed up the whole meleee process. My thinking was that it places the onus on the defender to hold its position when charge, assuming that the charger is up to the task of closing in the first place. It also creates a definitive outcome for the melee on one turn.
Whoever takes the most casualties checks morale first. If passing, then the other side checks morale. If both sides pass, then the charger is considered to have been repulsed since he couldn't budge the defender out of his position. Assuming the charger lost but did not rout, you would move his unit backwards, facing the enemy, a full move.