Showing posts with label British Colonials. Show all posts

Saturday, September 5, 2020

Gate Tower Construction Tutorial

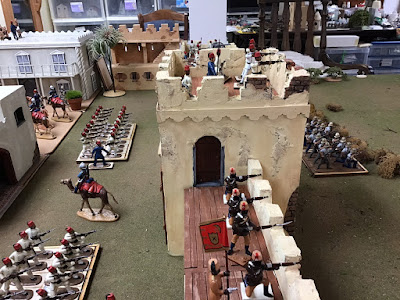
Khartoum gate tower for 54mm figures.

A view of the walls, corner pieces and gate tower models.

Over the past month I have been building the city walls of Khartoum, gradually replacing the commercially made King & Country Desert Village walls with those of my own construction. Why? Because it is gratifying to have your own purpose built terrain on your game table.  

I have been knocking out 12-inch wall sections at a rate of about one every three days and as a result I now have enough wall to cover the width of a six foot wide table. Whereas the first wall sections were made one at a time, I learned enough about their construction that I started making them two at a time. Now I cut out the pieces (from 1/2 inch thick foam core board) for two or three models at a time and glue the shells together at the same time. Then I add details such doors and windows to individualize each wall section.

Gate Tower Tutorial

Today I completed the center piece of the wall defense- the gateway tower. It really adds a sense of completeness to the appearance of my Khartoum model city. The gateway is basically an 8-inch square box with a 10-inch height. I use half-inch thick black foam core board for my walls and three-eights thick foam core for floors. I use a metal T-Square measuring stick that I bought at Home Depot in their wall board section of the store. This tool is about three feet long. You will need this to cut up small pieces from the larger boards that you purchase at the store. I also have a smaller 12 inch long T Square that I use to cut smaller pieces of board material.

I measure out the dimensions for cutting using the T-Square to ensure straight cuts on the boards. The actual cutting is done using an Exacto knife with Number 2 blade (for the walls) and a box cutter blade for the thinner floor boards. Do not try to make one cut of the material, but rather, make several light cuts of the material, going deeper and deeper with each cut. This improves your odds of getting a straight cut of the foam core material. The cuts are made against the edge of the metal T Square.

Crenellations were cut into the crown of the roof, placed at one-inch intervals. A removable floor was built into the top of the model at a depth of 1.5 inches from the top of the wall. This makes it easy to access the ground floor of the passageway between the front and rear gates. I suppose that I could later add an interior floor and cut a couple of small windows in the front wall of the tower, but I probably won’t. I attached some doll house trim, turning it upside down, around the perimeter of the tower on the upper portion of the structure. This breaks up the surface of the tower by providing a bit of architectural detail to the tower.

From the sublime to the ridiculous, I decided to put hinge on the doors of the front gates. I found some doll house door hinges at Michael’s Stores and thought that it would be nice to trick out the doors so that they could open and close. After about 2-3 hours of fiddling with the extremely tiny hinge nails, the doors were hinged. In retrospect, it was a waste of time to put hinges on the door and I doubt that I would do it again on future models. The rear gates were constructed in the open position and simply glues onto the tower wall. I cut the gates from a length of balsa I and then scored some door planks with a BIC pen. A pair of doors were added at the deck level of the parapets to allow access into the

 Now I create some exposed brick or stone by tearing off some of the paper surface of the foam core that exposes the black foam center. I take my trusty BIC pen and score stone or brick patterns into the foam., making sure that the space between the ends of the individual bricks has a long stretcher brick  layer above them. A flat stretcher brick prevents water from running through the cracks of adjoining bricks.

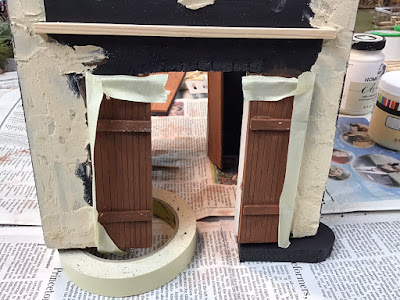
Once the doors, windows and other decorative bits are glued to the walls it is time to prep the model for painting. I apply household masking tape to the joins of the four wall pieces. The tape is covered, in turn, by wallboard paste mixed with tan colored paint. I use the Red Devil brand of premixed spackle compound paste. Mix the color of paint that you want to use for your walls into the spackle paste and create a goop that you can use again and again. 

I apply the spackle to the joins and also slather some  clumps of the paste in random places on the walls. This creates some raised relief that breaks up the flat appearance of the wall. Let the spackle dry overnight. You can now paint the exposed brick sections of the wall with a light brown color for middle eastern buildings.


The tower model after the spackle past has been applied.
Note the dollhouse trim attached just below the crenalations of the tower.
Next, take a piece of fine sandpaper and smooth over the areas where you applied the spackle. Now your model is ready to be painted.

Smooth down the spackle with fine sandpaper.

I use a matte chalk finish paint for my walls, either something on the creamy yellow spectrum or the white grey linen color. Mask off any woodwork etc. that you don't want painted by the wall color. Paint your walls, but try not to paint over the raised wall relief that you created with the spackle. It will take 2-3 coats of paint to cover the black foam core board, but fortunately the chalk paint dries quickly. Doors are now painted brown. 

Matte finish chalk paint from Michael's Stores. I used the cream color paint on the left as my base coat
and the linen white color for highlights.


Use masking tape to cover the doors so that you don’t get cream colored paint on them.
The next step is to apply a brown wash to the surface of the walls. I use one or two ounces of tap water, add a couple of drops of dishwashing soap to the water, some brown paint, and then mix it all up. Use an old paint brush to apply the wash to the walls. This tones down the color of the walls and gives them a more natural appearance.

A view of the front of the gate tower.

A view of the interior that shows the individual appearance of each wall section.

A door was added to both sides of the gate tower to allow soldiers to enter the tower form the parapet decks.

Finally, dry brush the surface of the walls with a color that is lighter than the wall color. I find that white paint, used sparingly, works well with either the cream or linen colors. Now your model is ready for gaming!



Saturday, August 15, 2020

Sudan Buildings No. 4 and No. 5 Finished


The central market place in Khartoum.
General Gordon (on camel) watches a beggar who is trying to squeeze a few piasters out of some European ex-pats.
The Governor's Palace (left) is unfinished. The city walls loom in the background.


My architect in Khartoum, Mr. Christopher Wren-Pasha, has been very busy of late churning out more houses for the town to use in my 54mm toy soldier Sudan Project. Last weekend I finished my fourth Sudan building and I quickly followed on with a fifth building.

This afternoon I resumed work on the Governor's Palace, shown partially made in the first picture at the top of this post.

Some Background on the Sudan Project

Major General Pettygree and his wife were accompanied by Colonel Sinclair and his wife on a holiday tour of ancient archeology in Egypt and the Sudan. There current stop finds them in Khartoum. The actual purpose of their trip is to gather intelligence about a possible uprising of the Mahdi and his followers. The travelers have arranged to meet with General Gordon in Khartoum to receive a briefing about the lay of the land.

Building No. 3
General & Mrs. Pettygree on the  balcony (right) and Colonel & Mrs. Sinclair (left).
Time has gone rather amok in this 19th Century Imaginations world. The British are firmly in control of Egypt and parts of the Sudan. Major General Charles Gordon is already the Governor of the Sudan well before the Mahdi unpleasantness has begun. There is a small contingent of British infantry and Camel Corps garrisoned in Khartoum, but the Egyptian army bears the brunt of the work in the field.


My thinking is that the political situation heats up rather quickly after Gordon goes into retirement back in Cairo for a spell. The new Sudan Governor will likely make a muck of things and then all Hell will break loose as the Mahdi increases his number of followers. There will probably be a Hicks-like expedition disaster that will draw Gordon out of retirement, forcing him to return to Khartoum in order to right the ship.

The Dervish will close in from the south and cut off communications between Kartoum and Cairo, while Osman Digna will be whipping up the Bega in the eastern Sudan around Suakin. With Khartoum now cut off from the friendlies, there will be a rescue expedition headed by Major General Pettygree and friends.


Architectural Details

All of my Sudan buildings are made with half-inch thick black foamcore board. Thinner quarter-inch and eighth-inch foamcore is also used along with liberal amounts of balsa wood, cardboard and basswood. Building details for things such as cornices and columns are sourced from Home Depot (trim decoration pieces for stairs). I also take weekly excursions through Hobby Lobby, Michael's Stores, Joann Fabrics, Home Depot and my local hardware store for various finds that will one day make their way into a building model.

I switched to a darker wall color for Buildings 4 and 5 so as not to have everything in cream-yellow. As with the other buildings, these new models use a chalk paint which has a nice matte finish. The walls and the architectural bits are then dry brushed to complete the painting of the model.

Here is a picture of Buildings 4 (left) and 5 (right) looking down High Street in Khartoum. A squadron of British Camel Corps are on parade through the town.

Building No. 4 (left) and No. 5 (right)


A view of the main thoroughfare in Khartoum.

Building Number 4

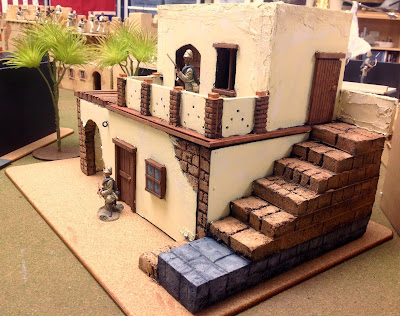
This model was inspired, a bit, by Building No. 2 which had a two-story house with an outside staircase leading to the top floor. I wanted a similar building, but with the staircase between two house. This is the first model that adds extra details such as mesh screen on the windows, wood balconies, and arched windows.

The front view of Building No. 4

The rear view of the house. The wood balaconies are a new feature in my Sudan models.


A view of the pair of arched windows on the front and side of one of the buildings.

Building No. 5 - A Merchent's House

I had pulled a picture off of Pinterest showing some buildings in a nativity scene and I liked the look of the open air archways connected to a house. I would imagine that a grain merchant might live here and sell his wares in the arched half of the building.

Building No. 5
Merchent's House

Building No. 3 (left), No. 5 (center) and No. 4 (right)

Building Number 2, 3, 4 and 5 are shown in this picture.
No. 3 is partially shown (with the 3 civilians on the roof at the right)


I hope that you have enjoyed my tour of the growing city of Khartoum. In recent days, I have started looking for 54mm and 60mm civilian figures to populate the town and other remote villages in the Sudan. King & Country's "The Life of Jesus " toy soldier figure range provides a fair number of civilians that can easily pass as 19th Century middle eastern civilians. I also use Europen civilians from Trophy Miniatures, Imperial Miniatures and Tradition of London. These are all 54mm toy soldier figure ranges. I have also had some discussions with a gentleman about commissioning some special Sudan civilian figures. Stay tuned on this one.

I have returned to the work on the Governor's Palace this week. It is time to finish it. I have gained more modeling skills over the course of the last three houses and I am ready to apply what I have learned to the Palace and a mosque in the town.

Thursday, August 6, 2020

Sudan Building Number Three Is Competed


Another building added to Khartoum (center building with staircase and balcony).

I have been on a heavy duty construction binge over the past several days, five to be exact, and I just finished my third 54mm (or 1/32 scale) Sudan building. This one is more complicated than the previous two buildings plus I added a bit more detail to the model.

I finished the construction portion of the model last evening (or more accurately, this morning at around 1AM) and started in on the painting. I painted all of the wood work bits last night and used some wallboard paste to cover the various holes and joins. This all dried by the morning and so I was able to finish the painting of the stucco walls and the exposed brick work.

Here is a view of the front of the newest building in Khartoum:


Front view. Some 54mm Britain's figures are shown for context.

I use half-inch foamcore board for the walls and one of the benefits of foamcore is that you can peel back some of the paper covering to expose some of the foam. Then the foam can be scored with a pen or pencil to create stones or bricks. These get painted a terra cota color atop the black material. The walls are painted with chalk paint.


Here is a view of the left side of the building:

Side view of the outside staircase.
The staircase is made by stacking up layers of foamcore board, one layer for each step/riser. This is much easier than cutting out the stairs individually and affixing them to a a stair fram.


Here is a view of the right side of the building:

The other side view of the pergola.

I had fun making this portico with a pergola style roof, made from wooden coffee stirrers that Lady Emma Cuddleston-Smythe sourced for me. The stuccoed walls are made from foamcore and are slathered with some wallboard paste (Spackle) mixed in with a light tan paint.


The Inspiration for my model:

You will see two pictures of two different models that served as the inspiration for my model. The model is largely based on the first picture below. However, the half dome part of the building made the overall height to large relative to the size of my other buildings, so I made the upper floor part of the building a one-story affair to reduce the overall height of the building. As you can see, the staircase and the balcony are similar to those in the picture.


This model was the inspiration for my model.

Because I was modifying the original model, I decided to change the front door opening from a rectangular shape to an arched doorway. Then, drawing on the image from another model, shown below, I added the pergola roof supported by stone/brick coloumns. 

I incorporated this pergola into my version of the model.
Here is a little scene that I set up for the camera, featuring British Camel Corps clopping down the street in front of the new building.

Camels on parade pass in front of the newest building in Khartoum.

My next blog post will feature more pictures of the Camel Parade.

Wednesday, August 28, 2019

Charge of the 21st Lancers Redux


Painting by Stanley Berkeley (Source: ASKB)


The Charge recreated with Trophy Miniatures toy soldiers.


I thought that it would be interesting to compare a famous painting of the charge of the 21st Lancers at Omdurman to the portrayal that I recently presented with toy soldiers.

Some New Toys Arrive

I was fortunate to acquire this Nile River gunboat, suitable for 54mm toy soldiers, just in time for our upcoming Sudan toy soldier game in September 2019. Kitchener employed a fleet of shallow draft gunboats to support his advance up the Nile towards Omdurman. The fleet included older paddle wheel boats as well as some new twin-screw driven boats. There were ten such boats in the fleet, one of which, the flagship boat Sultana, blew up before the campaign even got started.

The gunboats were equipped with artillery pieces and Maxim and Nodenfelt machine guns. My model is armed with a Maxim MG and is manned by Camel Corps gunners. Some brown-uniformed Soudanese infantry also provide protection to the boat.


Nile River Gunboat recently added to the 54mm toy soldier fleet.


The Egyptian-Soudanese regiments form a battle line and await the outcome of the cavalry charge by the 21st Lancers.

September's Game: The Battle of Firket (June 7, 1896)

For our first toy soldier game of the season, I chose to run a battle loosely based on the Battle of Firket. The unique aspect of this battle is that the Imperial army was made up of mostly Egyptian infantry and cavalry. The Egyptians were officered and trained by British officers and NCOs. I thought that it would be more interesting to have a battle comprised of only non-British troops. The army was commanded by Major General Sir Herbert Kitchener

We will have a brigade of Egyptian infantry and one of Soudanese infantry, supported by a regiment of Egyptian lancers and two light Krupp cannon The gunboat will provide additional support with its Maxim MGs. Each infantry brigade has approximately 60 figures and the three squadrons of cavalry will number 36 horse in total. With the artillery crew and other support troops, the Egyptian army will have approximately 170 figures.

While the Egytian army outnumbered the Dervish by 9,000 men to about 3,000 men , our game will have more even numbers of Mahdists so as to make more of a game of it. So I am thinking of having 250 to 350 Mahdists in the game.

Comments Make the Blog World Go Around
Long time bloggers (like me) enjoy posting articles and content, otherwise why would we do it? I've been blogging since about 2007 and there are no signs of letting up. The one thing that puzzles me though, is the lack of comments that this blog draws. I read other blogs and see another blogger saying something like "I walked my dog today" and he garners 20 comments, and yet I am lucky to get 3 to 5 comments in most cases.

Comments and feedback are very much appreciated by bloggers and they, at least for me, make us feel like there are actually people out there who read and are interested in the content that I post several times each week. If a person can get so excited about dog walks and gardening on wargaming blogs, wouldn't you think that wargame articles and some military history would also merit comment?

It puzzles me, is all that I can say.

Saturday, August 17, 2019

The Charge of the 21st Lancers at Omdurman With 54mm Toy Soldiers


The 21st Lancers are surprised to find a hoard of Dervish warriors hidden in a donga.


Several days ago I decided to take several hundred of my Trophy Miniatures 54mm Sudan toy soldiers and set up a diorama of the Charge of the 21st Lancers at the Battle of Omdurman. I had received a batch of six new lancers that I had won in an auction in the UK and wanted to put them on display for awhile. Having 10 other of the lancers, I now have 16 of them, which gives me suitable "mass" to make a really good display.

I used a standard 6ft by 2.5ft table and covered it with an off-white muslin material that passes somewhat for desert scenery. I then added small bits of brown lichen and a little bit of dark green lichen to represent desert scrub bushes and to break up the all-white look of the table cloth. Finally, I added a couple of King & Country Egypt-Sudan buildings, large rocks and some Acacia trees (made from offcuts from plastic floral arrangements).

All of the toy soldiers are Trophy of Wales Miniatures. Unfortunately, the owner passed away and so too did his toy soldier business. The figures are no longer in production. However, there is an active marketplace for the figures on eBay.

I will let the picture captions tell the story of the battle:


Egyptian and Sudanese soldiers nervously await the outcome of the British cavalry charge.
Their backs are to the Nile River, so they have nowhere to retreat.

A battery of Egpytian guns support the infantry.
British officers command the Egytian-Sudanese troops and provide a calming presence.
An Egyptian colonel provides a report of the battle.


A view of the cavalry charge from the perspective of the British and their allies.
Off in the distance you can see the town of Omdurman.

Where did all of those Dervish come from? It's as if they sprung up from the ground!

Undeterred, the 21st Lancers charge forward to meet their fate.


The Khalifa views the developing battle from the safety of a building roof top in Omdurman.

A view of the battle from the Khalifa's point of view.
The Khalifa orders his cavalry to counterattack.
The Khalifa's Black Banner leads the way.

The Dervish cavalry surge forward...

...as do the Dervish warriors on foot.

The Colonel leads the charge, but his horse goes down, hamstrung by the warriors.

One of the lancers spurs forward to rescue his Colonel.

A young subaltern named Winston Churchill, seeks fame and glory.

Young Winston Church, young man in a hurry, also rides to rescue his Colonel.

A Dervish warrior rises up unexpectedly from the brush and attempts
to hamstring Young Winston's horse to bring him down.

Two more Dervish close in on Churchill, who dispatches one of them with his Mauser pistol.


Sir Harry Flashman's horse is stung by a wasp and bounds forward, out of control, but this places him in the right place at the right time as he is positioned to skewer on of Churchill's assailants. Flashman will receive the Order of the British Empire for his, ahem, "bravery".

The history books tell us that there was a happy ending to this little episode
that was part of the greater Battle of Omdurman.
It was fun setting up this diorama in my Man Cave. I will probably keep it on display for several more weeks and then either move it to a side table, or pick up the figures and store them away. My Trophy collection includes Zulus and Pathans and even a few Boers, so there is plenty of grist for more dioramas in the future.