Showing posts with label Boats. Show all posts

Sunday, December 11, 2022

Roman Playmobile Galley Conversion


Converted Playmobile ship, adding the artillery tower and corvus.


I have a bee in my bonnet to do an Ancients naval game with my 54mm Republican Romans and Carthaginians. To that end, I have been collecting an assortment of Playmobile Roman and Greek galley boats for this game.

The Greek boats are okay "as is", but I plan on painting them myself, rather than play with them in their original plastic colors. The Roman boats need a "Corvus" which is a boarding ramp that they developed for ship to ship and hand to hand melees. The corvus looks like a long bridge with a large spike at the front underside. As the Roman boat would draw near to the Carthaginian boat, the Romans would lower the corvus with a winch and the iron spike would embed itself into the deck of the enemy ship. Then the Roman legionaries would cross over the corvus bridge and engage the enemy in hand to hand combat.


Conversion (left) and Original (right)
The corvus has been lowered from the ship on the left onto the ship on the right.


In theory, the Carthaginians were better sailors than the Romans and so the Romans invented the corvus so that they could take advantage of their superior skills in hand to hand combat, on the deck of the ships. In practice though, the Roman navy was very skilled and they often got the better of the Carthaginian ships in naval battles. Furthermore, the Romans' advantage in financial wherewithal meant that they could crank out hundreds of new warships to replace and outnumber the Carthaginian fleet.

So for my Roman galleys I needed to add a corvus to the deck. I would also need to add a wooden tower onto the deck from which to fire their "artillery" (large bolts of flaming arrows).

Here are some pictures of my new Roman galley. As always, click on the picture to enlarge the view.


The tower is made from Balsa wood, painted light grey, and the stones were painted onto the surface.
These towers were made from wood and  painted to look like stone. There would be archers stationed in the tower
where they would have a good line of sight on the opposing ship.


Comparison of the converted model (left) with the original model (right).


The corvus has been lowered onto the ship on the right.
The plank has to be wide enough to accommodate my 40mm round bases.

The corvus is made from a 3/8-diameter dowel rod which I fit through a hole in the deck. Below deck, there is a plastic bottle cap with a hole in it into which sits the dowel rod. This allows the dowel rod to pivot on the deck.  Another bottle cap is placed on the deck to provide stability to the corvus, which can get fairly top heavy so it needs some sort of support.

The plank portion of the corvus is sized long enough to reach the other vessel. It also had to be wide enough to hold my individual figures that I mount on 40mm round bases. If you look at the first picture above, you can see that I made a cut out on the plank so that it fits around the dowel rod. I then drilled holes through the dowel and through the plank and inserted a piece of brass rod. This allows the plank to swivel up and down. A piece of chain connects from the dowel rod to the end of the plank so that the plank can be raised or lowered as needed.

Once I figured out how to engineer the manufacturing of the corvus, the construction and assembly was relatively easy. Now that I know how to do this, the other three Roman galleys should be easier to build. Even if one were hesitant to do this extra conversion work, the simple matter of painting the ship with your own paints makes a world of difference in the appearance of the galley. Thus, all of my ships will be primed and painted.

I had briefly considered adding some balsa wood planking to the deck, but this would have added a level of complexity that I was not ready to take on. Besides, the deck looks fine with a dry brushing of the plastic planks. In several areas, I had to cut off and file down the round plastic pegs on the deck that are used to support the Playmobile figures. This was not a big deal.

I probably won't use any of the decals that come with the galley because they don't look right with the painting and conversion work. I still have to paint an "eye" on each side of the bow and maybe do some red highlighting on the hull before I consider the model finished.


Monday, November 7, 2022

Paddle Wheel Boat Update


Yesterday I worked on the paddle wheel mechanism of my second Nile River paddle wheel boat and this pretty much brings the model to completion, save for a little bit of painting of the paddle wheel and several other bits and pieces.

The day before, I figured out a way to add actual brass handrails around both decks. I found some 1/16 brass tube at Hobby Lobby that was the perfect size to pair up with posts made from wood kabob skewers. It was tedious trying to drill holes into ten pillars and then grinding out the diameter of the whole with a rat tail file. Then I was fishing through my box of drill bits and I found a 1/16 drill bit which meant that I only had to drill one hole in the post and do it rather quickly. Next I threaded the brass tube through the post holes and this worked to perfection. I did run out of tubing and so I had to substitute some brass wire for the back end of the boat. It looks ok but I think another trip to Hobby Lobby will give me the small amount of brass tube that I need to finish the job.


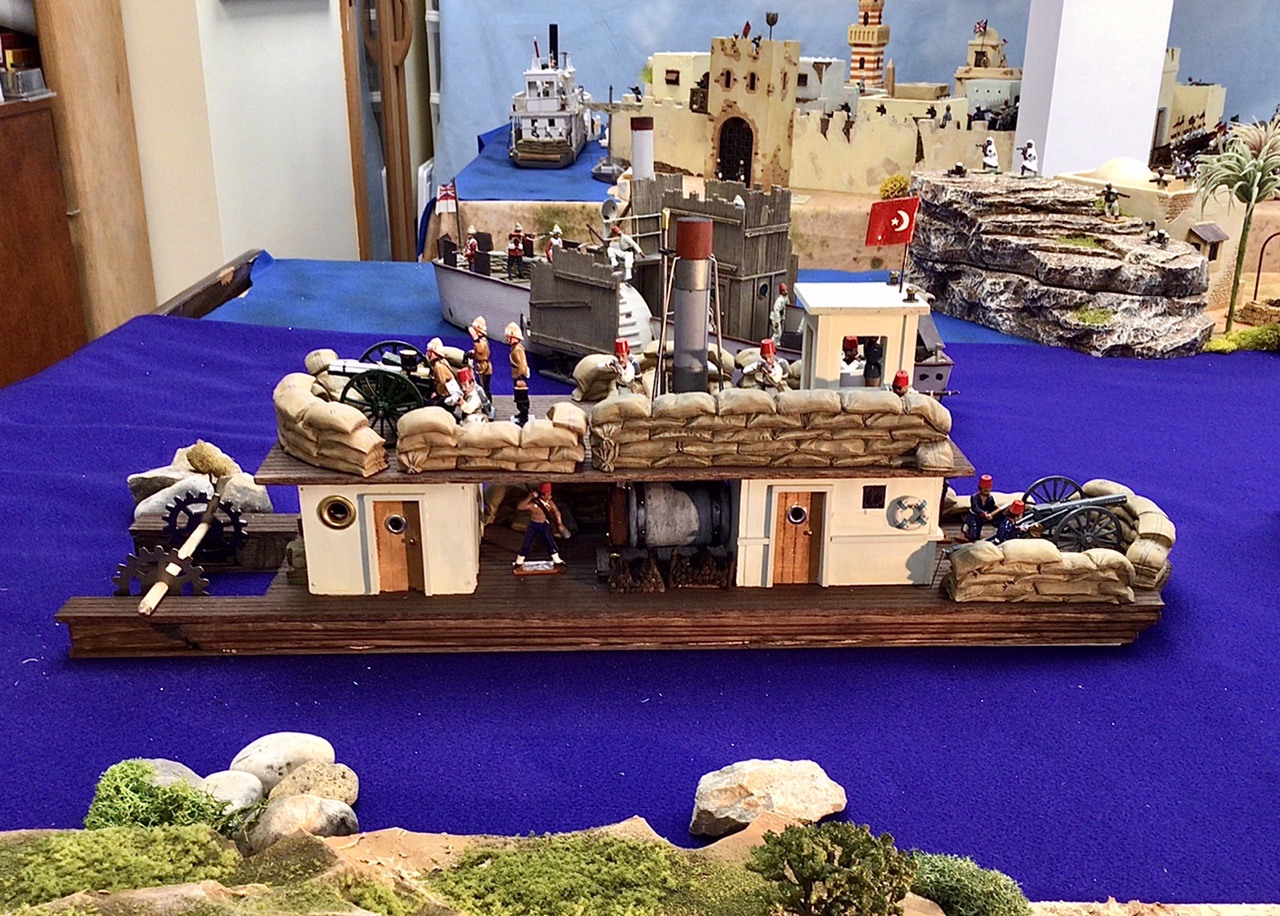
I have left the boiler exposed so that it can be seen. The assumption is that this is how the boat would look before the war began. I also have some Britains mealie bags that I can place in front on the boiler to protect it from projectiles. The mealie bags are removable, of course.

Next up: three more dhows for the Dervish side.


cc

Friday, November 4, 2022

Time to Boiler Up!


Lately I’ve been working on the construction of a new Nile River paddle wheel boat. I wanted it to look a little different from the first boat, so I decided to have the boiler exposed and visible. The two pictures below show the work in progress of the boat and you can see the location of the boiler midship. The boat isn’t as finished as it looks in the pictures; I have to add column supports for the upper deck and handrails around the perimeters of the first and second decks. I added some Britains mealie bag walls and figures to give me an idea of what the finished ship will look like.


I’ve had a lot of fun building this boat, especially the boiler and smoke stack parts of it. The boiler is made from a pharmaceutical meds bottle and a couple of small gears that I found at Hobby Lobby. I found a few other brass bits and dodads from the local hardware store. I don’t shop at the big box hardware stores unless my local family owned hardware store doesn’t have what I’m looking for.

The two metal bands around the boiler are made from strips of paper and the rivets are simple sewing pins that I pushed through the plastic bottle. A brass necklace magnet was placed on top of the door just because it was shiny and looked good. The smoke stack was made from a 3/4-inch dowel rod.


I like the steampunk look of the boiler and I had a lot of fun making it. The base was made from balsa wood because it is easy to cut and shape. Two brass grommets were pushed into the base to add some more shiny bling to the boiler base.

The final step was to prime the boiler black (save for the brass bits and gears which are attached after the boiler is painted. The boiler was then painted with a base shade color of dark grey and then a highlight color of a lighter shade of grey (but not a whiter shade of pale).

I wasn’t going to make a second paddle wheel boat, but on one of my shopping trips to Hobby Lobby I found a wooden blank sign that reminded me of a ship’s hull.


I hope to finish the boat over the weekend, but the handrails and paddle wheel are more complicated to make and so finishing the boat may take more time than expected. However, the finished product should look pretty damn good.

Friday, October 28, 2022

Nile River Table Top Battle


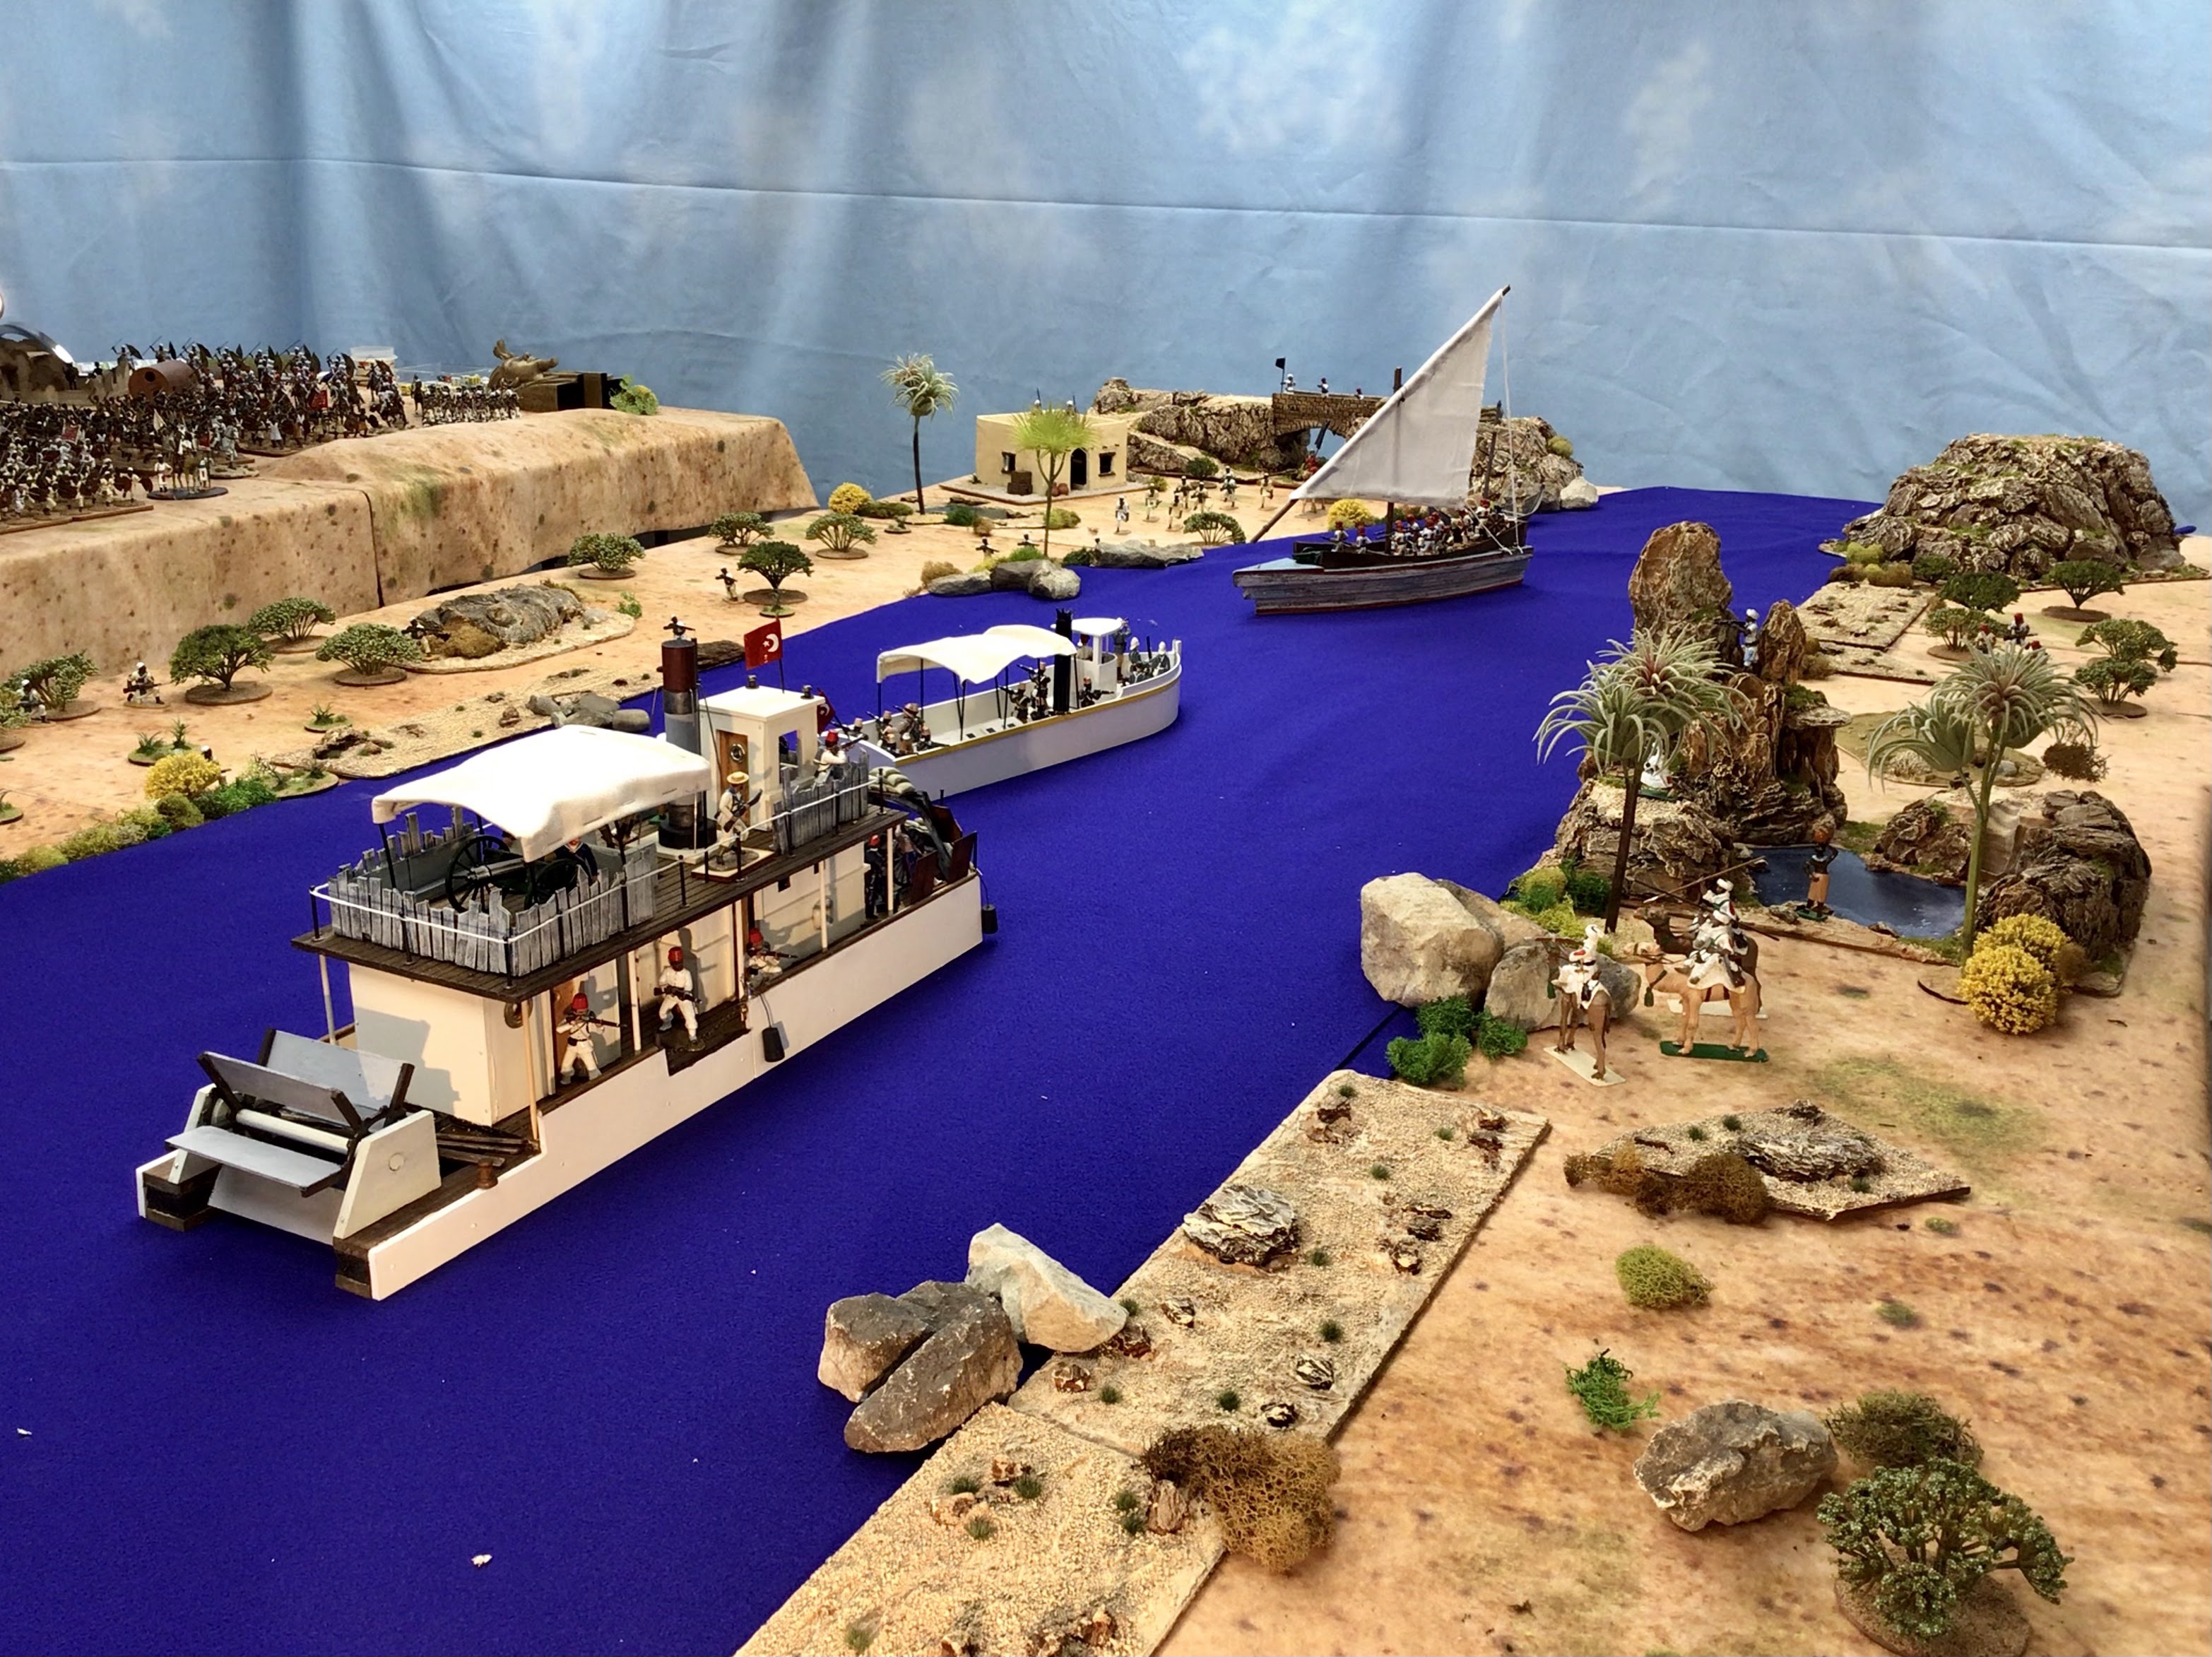
Nile River gunboats attempt to run the Dervish blockade.

CLICK ON ALL PICTURES TO SEE THEM IN THEIR FULL SPLENDOR


Every so often I clear all of the terrain off of my wargame table and set up new terrain, or more accurately, a new diorama. I had the desert terrain on the table for a couple of months and I decided that it was time for something new. Since I'm in the midst of constructing 54mm boats for my Khartoum Project, I thought that a stretch of the Nile River would look nice.

I already finished a paddle wheel steamer for the British/Egyptians and a dhow for the Dervish, but then I decided "in for a penny, in for a pound" and opted to make another steamer and three more dhows. This will give me a good sized flotilla of boats with which to play a Limeys & Slimeys in the Sudan type of naval game.

One of the advantages of laying out your terrain ahead of a battle is that you get a better idea of the table spacing as well as it revealing some of the terrain items that you could/need to enhance the overall look of the scenery. I will likely leave all of this river terrain up on the game table for at least the whole month of November or as long as it takes me to complete the build of the other boats that I intend to build. The terrain provides the inspiration to work on the new boats.

After I set up the river terrain that is shown in the pictures below, I started taking photos but found that the cluttered background made it difficult to get a good picture. So I bought 8 yards of sky blue felt cloth and suspended it from the ceiling tiles to give me a sky photo background. I then took a can of white primer and sprayed some random cloud patterns. I would recommend doing the spray painting outdoors. I didn't follow my own advise I am sad to say.

I ordered some dark blue felt (5 yards) to use as the Nile River water. I folded the six feet wide cloth into three feet width and placed it down the middle of the table. I wanted to keep my Cigar Box Battle Mats desert terrain visible as the shoreline on both sides of the river. My table is currently set up for 12 feet in length, but I have enough felt and Cigar Box mats to extend the river out to 20 feet for a convention game. Hopefully I will get enough players in this game if I run it at Historicon 2023.

I have to say that I think this is one of the best table top set ups that I have ever done. One obvious thing that I spotted was the need to make some riverbank pieces to lay along the sides where the felt meets the game mat. I had previously made some dry wadi sections (12" by 5") and so I placed these alongside the river to give me an idea of what some similar riverbank pieces might look like. 

I could also lay pieces of clear shower curtain on top of the felt to get a reflection on the water.


Britain's Nile River boat (left) and my scratch built boat (right).

Note the placement of the wadi modules on the riverbank on the right.
My proposed riverbank
 sections would be curvy and irregular looking.

A Dervish dhow contests the river passage with a smaller British boat.


I placed the three ship hulls from Hobby Lobby on the river to give me
an idea of how the full Dervish flotilla of dhows will look. I still have 
to build decks, mast/yardarms and lateen sails for the other three boats.


Here are a few more random photos of the river boats and the shore terrain:


Trophy of Wales made the smaller screw-driven Nile River boat.


A view of an oasis on the right bank of the river.


Some curious Dervish watch the infidels' boats pass them by.


Nile River boat made by Britain's for the collectors market.


A Dervish held village along the Nile.


A great overhead view of the table top.


Last night, after setting everything up, I stayed up way too late just admiring my handy work and I'm now paying the price of insufficient sleep. I foresee an afternoon nap coming up.

Keep coming back for updates as I build the planned boats. They shouldn't take too long to build.

Tuesday, October 25, 2022

Tutorial: The Great Dhow Project Begins!


A typical Dhow boat used throughout the Mediterranean, Middle East and India areas of the world.
(I didn't make this model)


It was inevitable that once I built one boat that I would want to build some more. I decided to build a Arabic river dhow for two reasons: (1) I already had an available hull and (2) the Dervish needed some boats too. Actually, maybe there is a third reason: I foresee some sort of "Limeys & Slimeys On The Nile" type of game in my future. Oh, and a fourth reason is that dhows are relatively easy to build compared to a paddle wheel boat. More on that later.

So I was kind of in between projects in my overall Khartoum Project for Historicon 2023 and I was looking for something to do, one that did not involve a lot of preparation work. I remembered that I had a boat hull sitting around that I intended to convert into a dhow one day. Well Pilgrim, today is that day.


The shabby looking, weathered and beat up boat was an item that I bought at Hobby Lobby two or three years ago. It's one of those things that you see in a store or flea market and think "I could use that for something one day." When you see these things you must buy them right there on the spot because if you hesitate and walk away, you will surely change your mind and then the item will not be available when you decide that you want to buy it after all.

You can see a close up of the hull in the picture below:


FYI, I found the boat in Hobby Lobby's "Home Decor" section of the store. If you can't find one at the store, they are also available online through HL's web site. They are currently on sale at only $9.99 each which is quite a bargain.

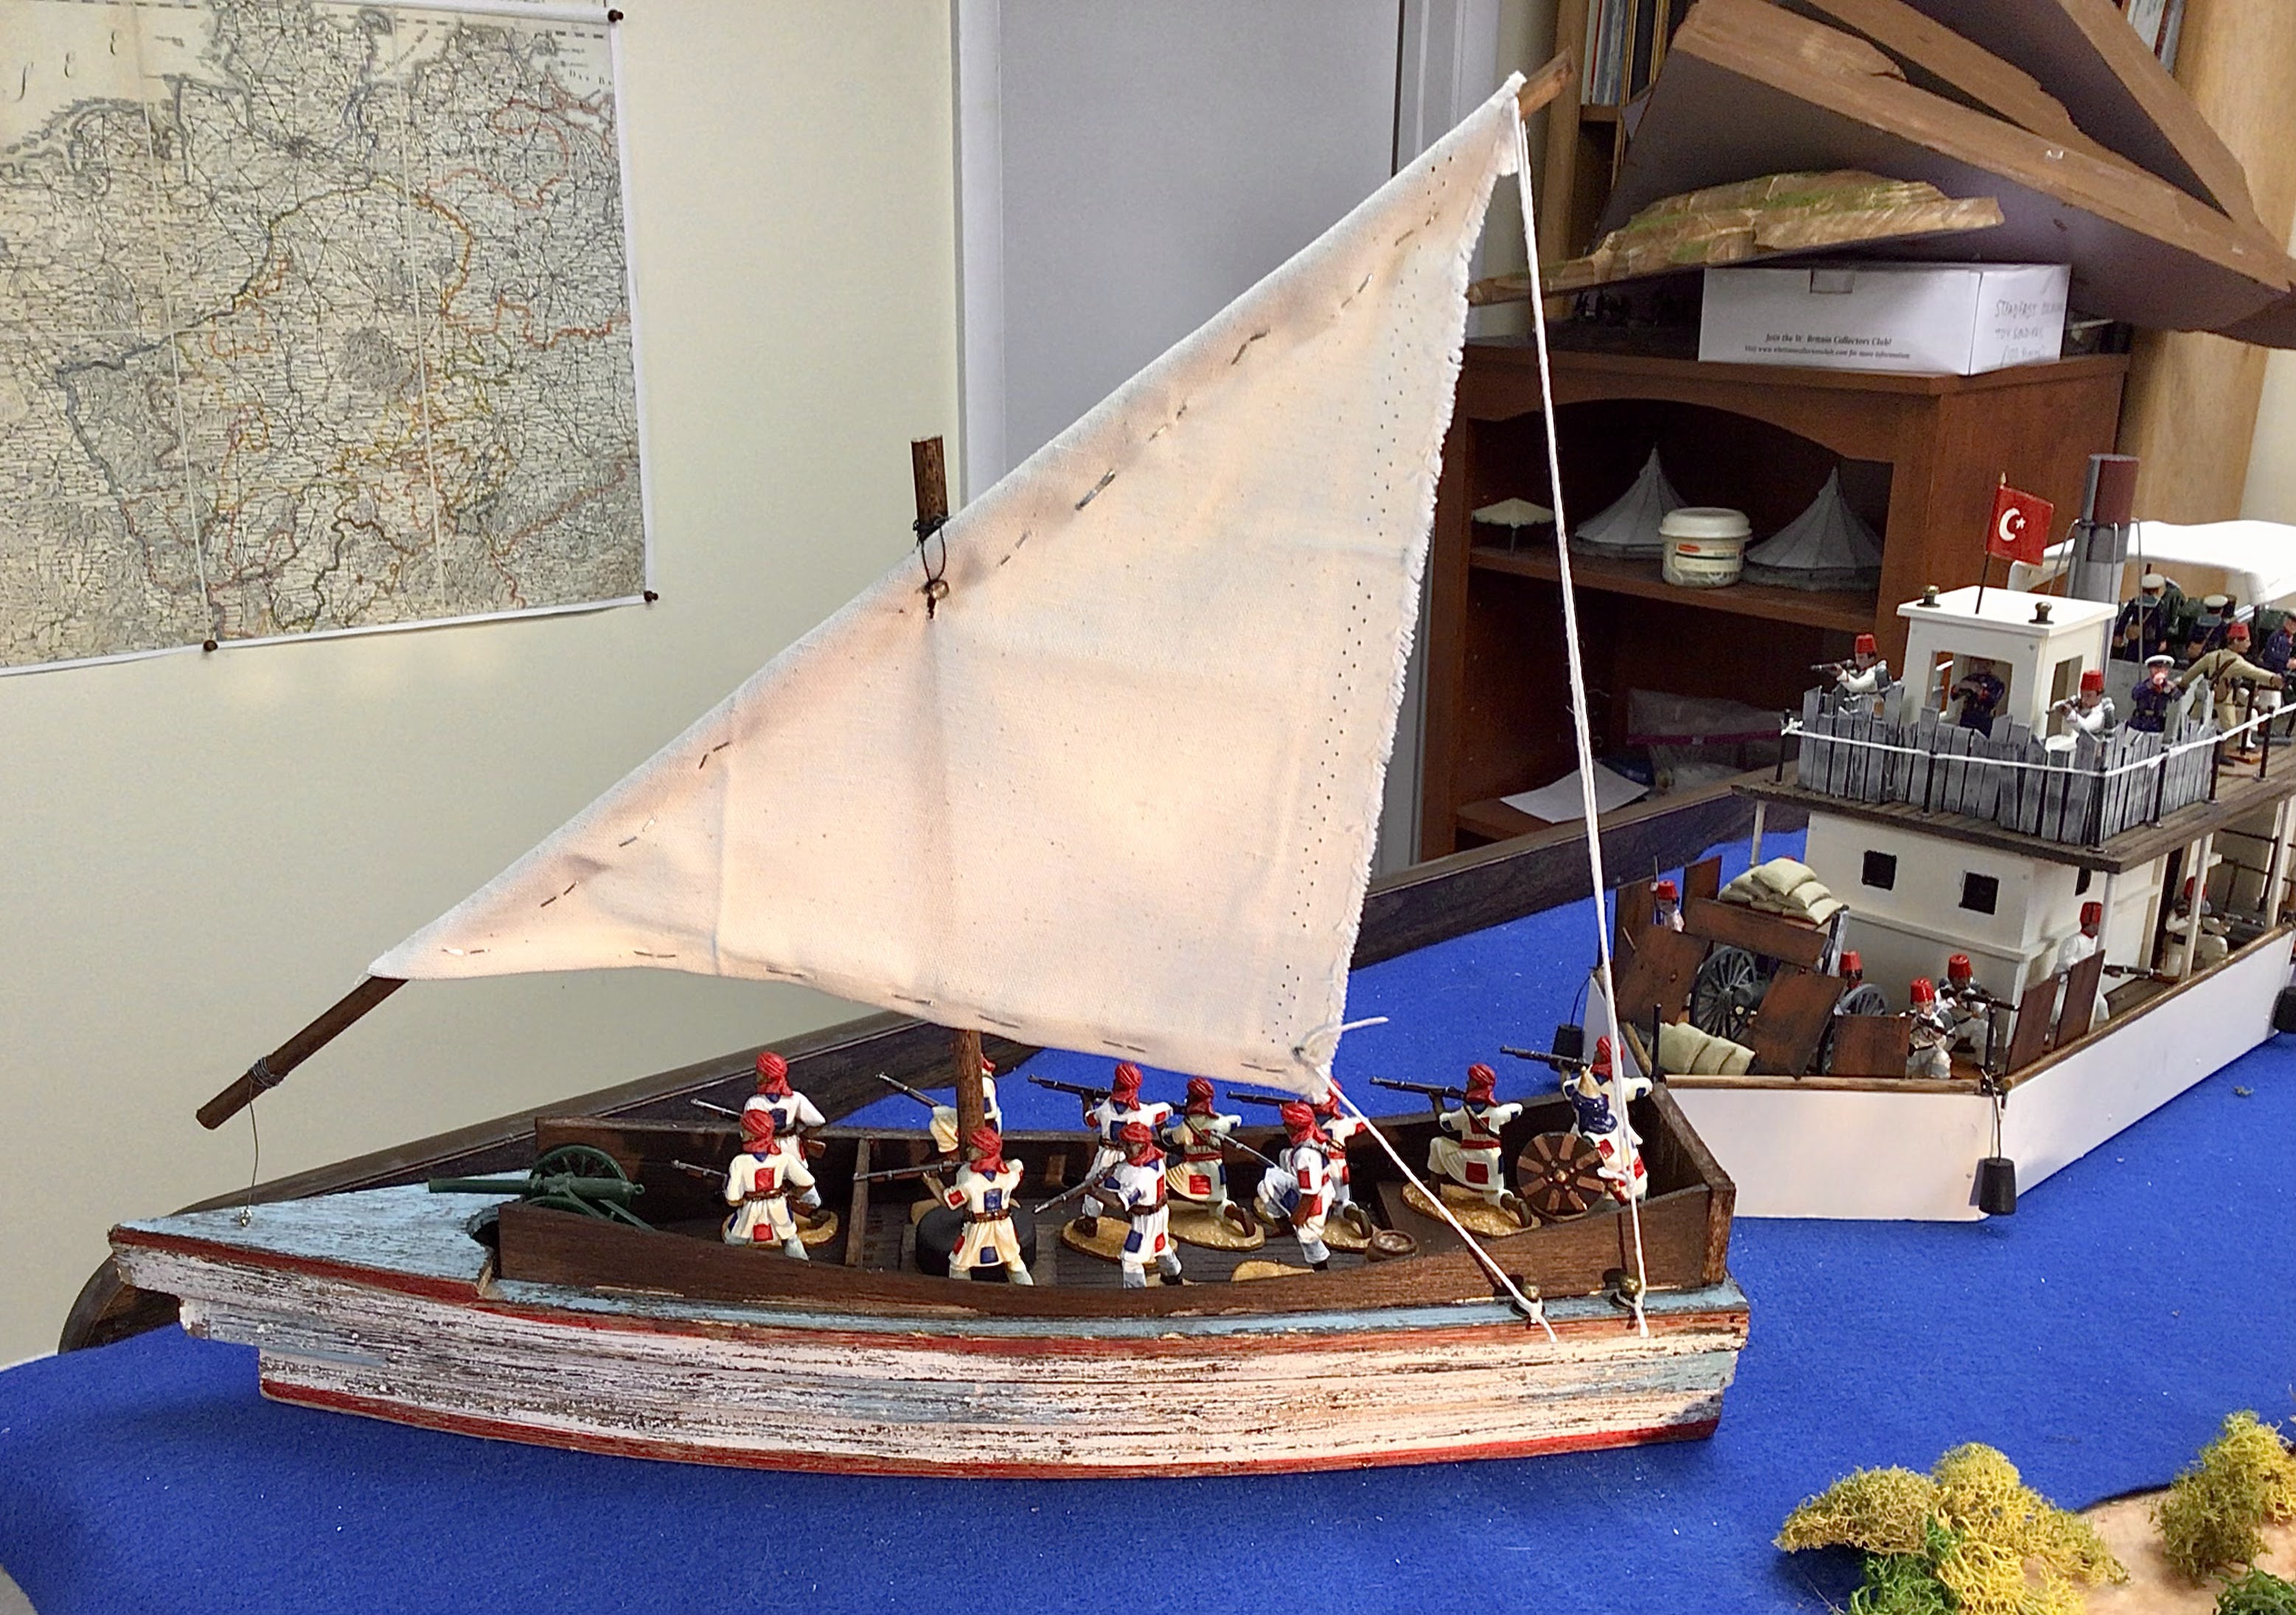
I really like the weathering that the model comes with. It is primarily white in color but also has some red and light blue bits on it. The weathering gives the hull a nice "beat up" appearance which I also like.

Here are some pictures of the finished model:


Constructing the deck

I built a floor base out of foam core board and cut it to fit snuggly inside the hull. Then I cut out a deck using 1/4-inch balsa wood. The balsa was scored with the sharp end of a shish kebob skewer to suggest deck planking. Then the balsa was stained with Minwax Walnut color stain.

In the process of cutting out the shape of the balsa wood deck, I placed the hull on top of a piece of 4-inch wide balsa wood and traced the outline of the boat onto the wood. Since I was cutting the wood in the direction of the wood grain, it was very easy to cut out the shape with a No.2 Exacto knife blade. I looked at the two off cut pieces of balsa and envisioned them as sidewalls on the deck of the boat.

The side walls were fitted to the inside dimensions of the deck and I cut out some shims to place between the two sides of the hull to hold the pieces in place. I ran a bead of Liquid Nails paste on the inside wall, placed the offcut on the wall, and inserted the shims to hold the curve of the wood in place. I also pressed the pieces together with my fingers and counted to 60. The glue join was good and would likely not come undone. However, just to make sure, I used some tacks and hammered them into the interior sides for more strength. I left the shims inside the boat overnight and removed them the next day.


Making a mast

The main mast was made from a piece of round dowel rod. I think that it was a 3/4-inch diameter rod. It looked ok for the mast, but was probably too big around for the yard arm, so I used a 5/16 diameter dowel rod for the long yard arm (is this the correct term? I don't know for certain). In the future, I will use the smaller 5/16ths diameter dowel rod for both pieces.

I drilled holes into the foam core board and the balsa wood deck to accommodate the mast, making sure not to make the hole too large because I want a snug fit of the dowel into the hole. I also placed a ring grommet underneath the deck, on the floor of the hull, to use as a guide for when the mast is inserted into the holes on the deck and foam core board. My original intent was for the mast to be removable, but I changed my mind about this later.

The yard arm for a lateen sail (the triangular sail on a dhow) appears to be approximately the same length as the hull of the boat and the mast looks to be about half the length of the yard arm. I couldn't find any information to confirm this, but this is what eye-balling it informed me.

The final bit of mast support was to make a 1.5-inch square piece of balsa that I glued to the deck (with an appropriately sized hole in the middle of the square) and then I placed a plastic bottle cap from a water bottle on top of the square balsa piece. The bottle cap has a hole drilled through it and then I coated it with black spray on primer. The sum of the snug hole in the deck, the grommet seating in the bottom, and the square balsa/round bottle cap on the deck create enough support so that the mast does not tip over once the sail and yard arm are attached.


Making the sail

This proved to be the most difficult part of the model to make. Again, I could not find anything online that would indicate the relative proportion of the sail to the mast etc. Some basic high school geometry probably solves the size of the sail problem. You already know the length of the yard arm (13" in my model) and you know the height of the mast, so you have two sides of a right triangle and so the geometry should yield the answer to the length of the sail. I was having some problems with the calculations, so I resorted to the not so great "eyeballing it" method. It all worked out ok in the end, but the maths took me longer than they should have.

Another thing to consider is the type of material that you will use for your sail. I used some natural color canvas that I bought at Michael's Stores or Hobby Lobby. However, when you cut the cloth, the cloth will eventually start to unravel unless you hem the edges. This would be easy peasy if you owned a sewing machine, but I don't have one so I had to resort to other methods. My method is to fold the edges of the cloth over by half an inch, staple the hem in place, and then add super glue to fix the hem. After the glue dries, the staples can be removed because the super glue has hardened and cured.

So I cut the sail one half inch larger on all three sides so that I can fold the edges over to hem the cloth. On the yard arm side of the sail, I made sure that I let enough space to thread the dowel rod through the sail.

Attaching the yard arm and sail to the mast

This was a bit of a challenge, attaching the yard arm to the mast. As you can see in the picture below (someone else's model, not mine) a lot of rope is used to attach the parts. This was not a level of detail that I wanted to get into. After all, this is supposed to be a simply model for war gaming purposes, not a work of nautical art.

I solved the problem of having to use rope cords to attach the sail to the mast, by pushing the dowel rod through the hem of the sail (sort of like on a curtain rod). Next, I hammered a small tack to the mast to use as a sort of coat hook on which to hang the sail. I cut a hole in the sail so that it could hook onto the tack on the mast. Next, I cut pieces of white cord to make rigging that ties down the fore and aft ends of the yard arm to the deck. Another short piece of rigging attached the third corner of the sail to the boat deck. I used small push pins (pushed into the hull) to provide a place to attach the rigging to the boat.

Now all three corners of the sail are tied down to the boat in some manner. This is why I gave up on the idea of having the mast removable. With all three corners of the mast secured, the sail is securely in place and nicely stretched out. We don't like to have droopy sails now, do we?


A professional model illustrates how the sails are connected to the mast and yard arms.


Here's a view of my rigging system


Well that is about it on how I made my dhow. I have three more hulls on order from Hobby Lobby and so hopefully I will have a larger Dervish fleet in another week or two. Dhows are so much easier to make than other types of boats. Once you have the mast and sail techniques nailed down, and you have a ready made hull from Hobby Lobby, then it doesn't take much time to replicate the technique over several more boats.

As I said earlier, it is inevitable that there will be a Sudan naval battle game. This could be one of the games that I run at Historicon 2023.

Oh, did I forget to mention that this whole Khartoum in 54mm Project will be seen at Historicon in July 2023? (Just making sure).

Friday, October 21, 2022

My Nile River Boat Is Finished


CLICK ON ALL PICTURES TO ENLARGE


Well I finished my first ever "build a boat" project today as I finished off the Nile River paddle boat with the assembly of the rear paddle wheel mechanism. I was saving the "hardest for last" element of the ship, but it turned out that the paddle wheel was not as hard as I thought that it would be.

This last sentence pretty much sums things up: building terrain in general and boats in particular turn out to be not as hard to do as expected.

I started the construction on October 4th and finished it today, October 20th.


The only thing left to do is to figure out a name for the boat. Any ideas? Leave them in the comment section at the bottom of this post.


The boat is armed with a Krupp artillery piece in the bow and a Gatling Gun in the stern. There is room in the middle to add another machine gun, if needed. (If needed!!!????)

Midsection: there is space to place a second Gatling Gun on the main deck.


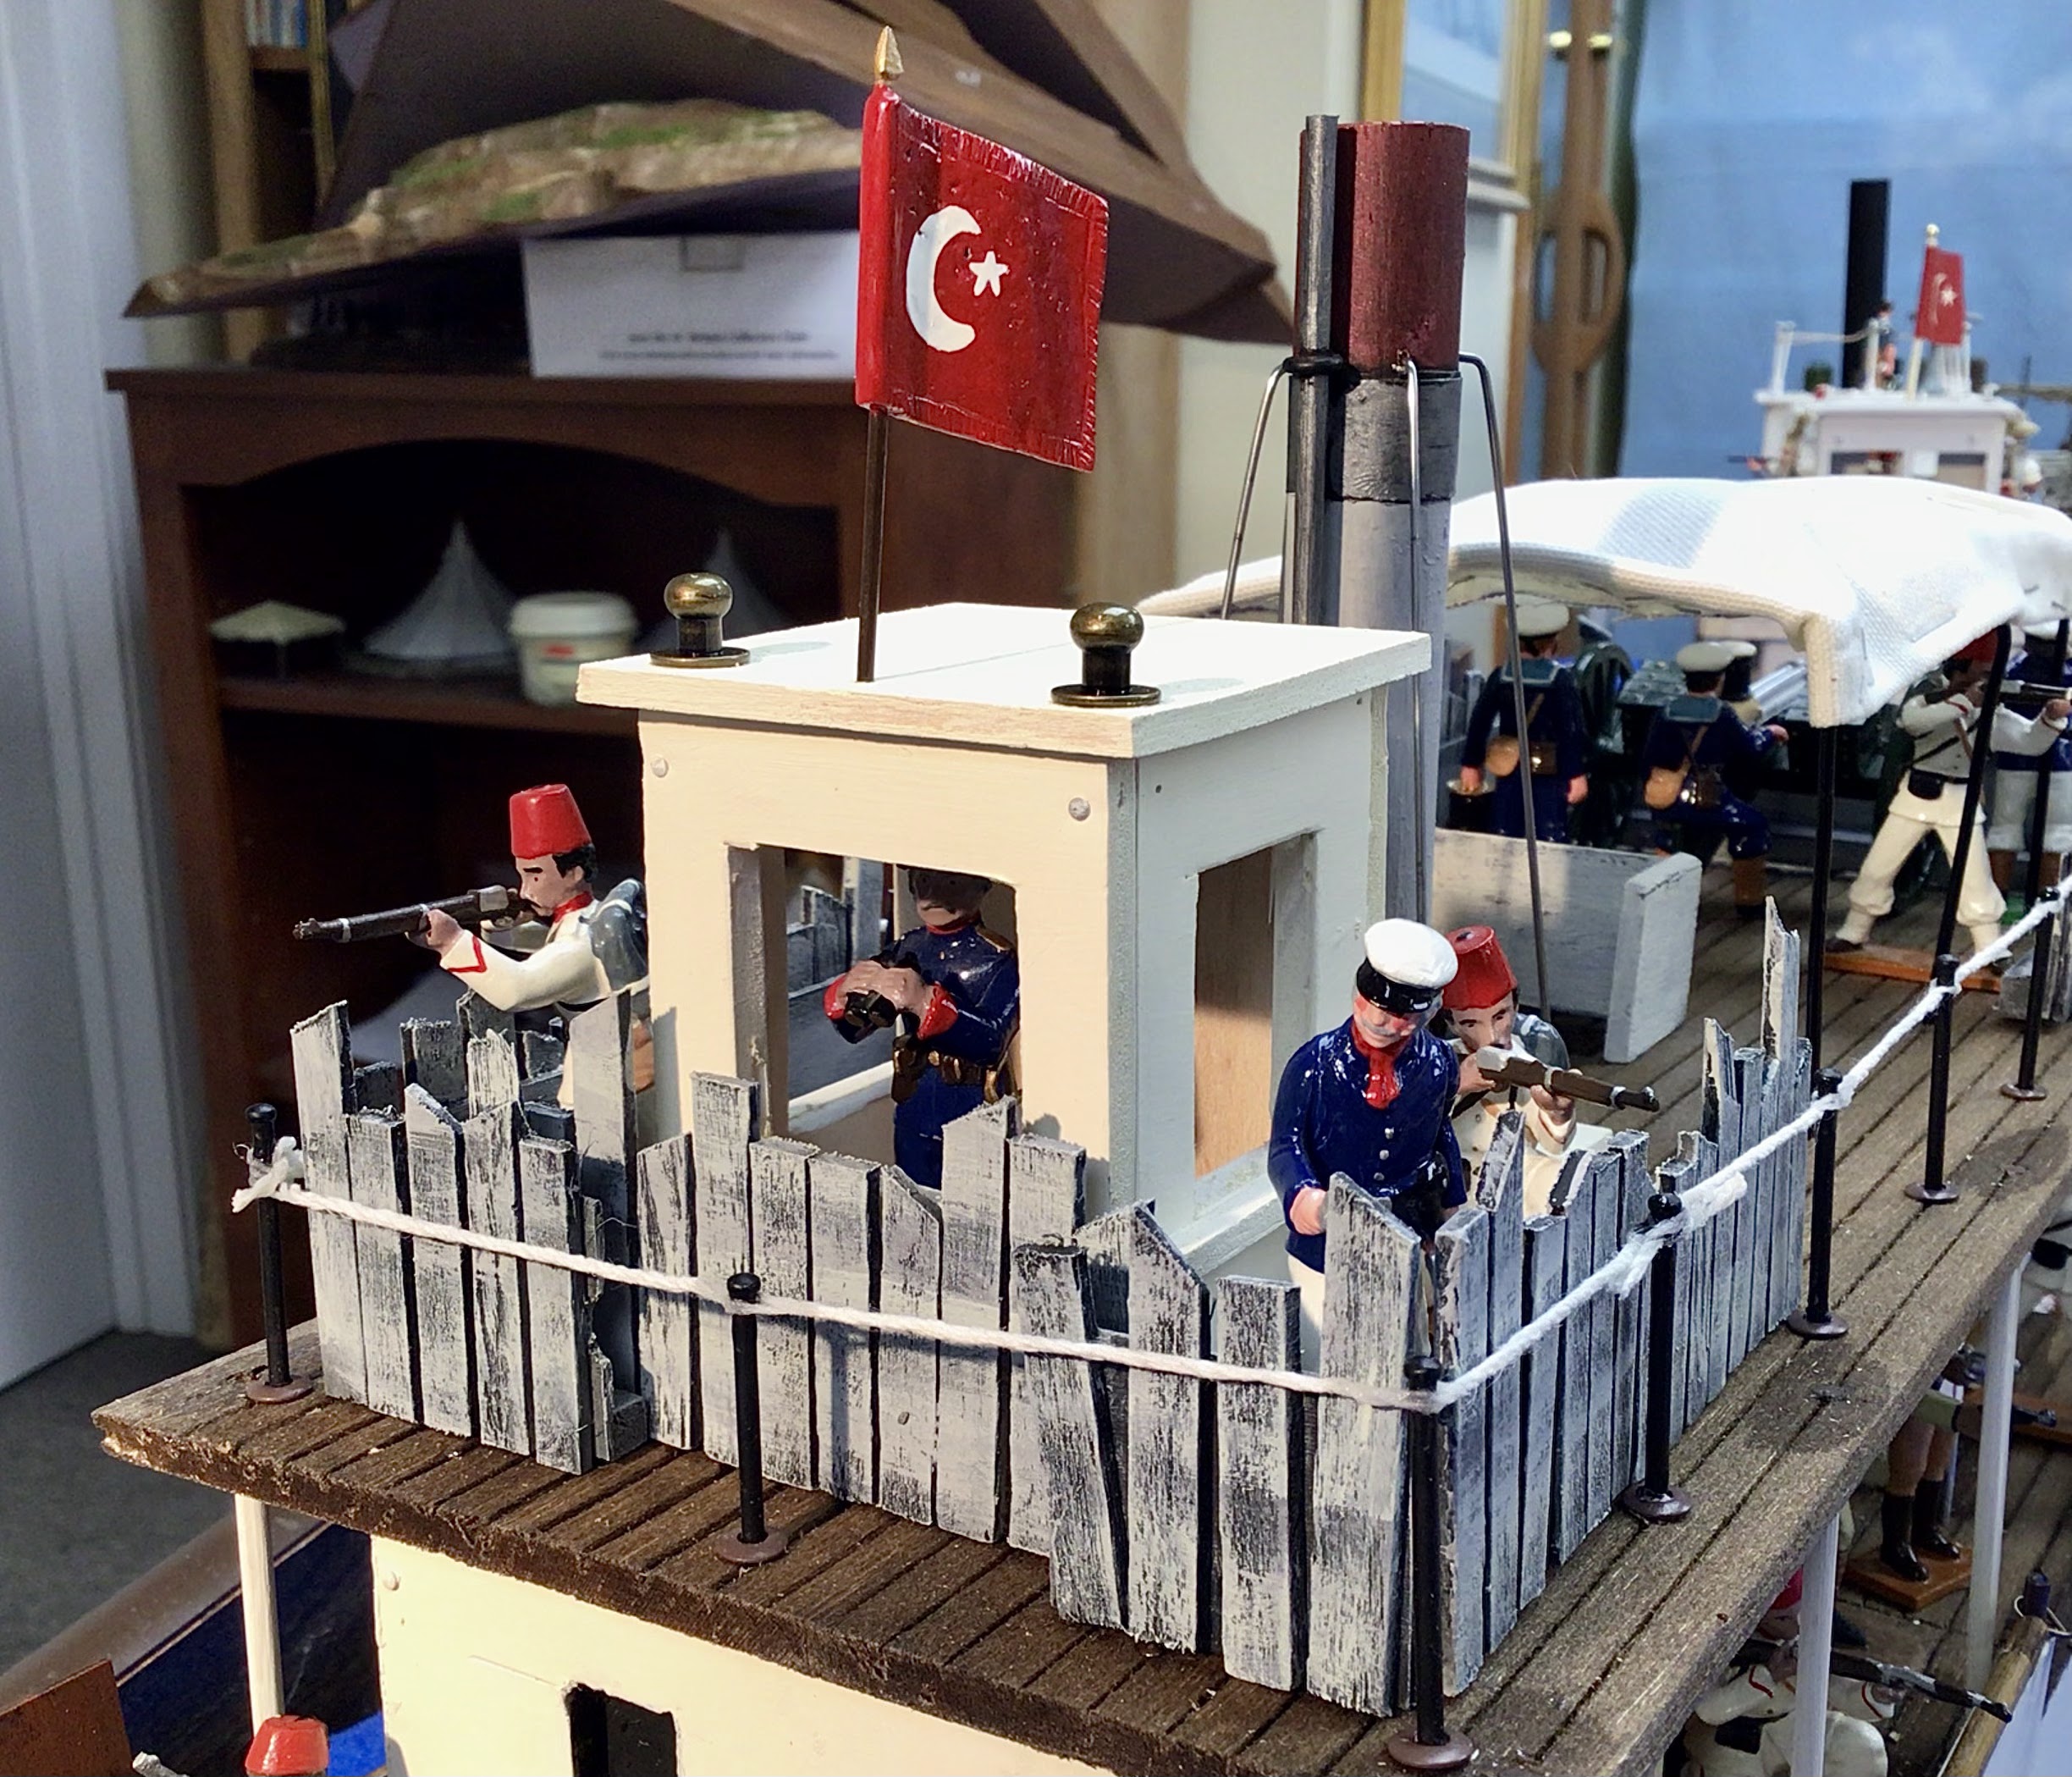
The metal boiler plates and the wood planks are removable in case I want to use the boat in times of peace. The canopy is also removable as is the smoke stack (for storage or transportation purposes). After making the armored plating for the gun crew in the bow I decided that other parts of the boat needed some protective cladding as well. I cut pieces of coffee stirrer sticks into random lengths and glued them to a frame that I made out of rectangular bass wood. I glued a 1" by 2" thin base from Litko, sideways, onto the basswood frame. Then I glued the planks atop the Litko base. The piece was then primed in black and then dry brushed from dark grey to medium grey to light grey and then some white highlights on the boards.


Krupp Gun and crew in the bow with boiler plate metal protection.


Upper deck of the stern showing a Gatling Gun and crew.


The Bridge


The paddle wheel mechanism was the last part of the boat that I constructed. I found a pack of decorative gears in the bead and jewelry section at Hobby Lobby. The largest gear was the perfect size for the paddle wheel frame. I attached 1.5" pieces of coffee stirrer sticks to the spokes of the gear so as to extend the diameter of the wheel frame. The paddles were made from balsa wood.


Midship: room for another Gatling Gun if needed.


What's next? There might be another paddle boat in the future, maybe a side wheeler, or some small dhows to be manned by the Dervish. There could be some potential river battles with boats.


Monday, October 17, 2022

Eight Hours of Life That I'll Never Recover


Following up on my previous post about progress on the Nile River paddle wheel boat, I decided that I will make removable protective plates for the bow and a removable canopy on the top deck. Thus on Saturday evening I went down into the Man Cave, turned on some Joe Walsh music (best guitarist, eval!), looked for some of those little used tools from high school geometry class (compass, protractor and right angle square) and set to work making the frame for the front plates of the boat.

I spent about four hours on Saturday and another four hours on Sunday to build just the frame for the bow plates. It is a lot more complicated than it looks, more like the roof trusses on Notre Dame Cathedral in Paris. Some of the angles killed off a few of my brain cells, particularly when working with the four upper struts.

Here are some pictures of the basic frame for the protective mantel for the bow of the boat.


The basic "V" shape of the base was easy enough to do as all that was required was to measure and follow the dimensions of the bow of the boat. The base was made out of basswood.

The two forward struts that attach to the base were made of balsa wood, knowing that it is easier to drill holes into balsa rather than bass wood. These were set at a 60-degree angle to the base and had the support of the cross piece on the base. I clipped off some sewing pins to make pins to help hold the parts together. The parts were glued together primarily with super glue, but I also used some white Tacky Glue in certain areas.

The two struts in the back were the brain killers because I could not use a conventional 45-degree or 60-degree angle to join the two pieces of wood.  I used a 60-degree angle to attach the strut to the V part of the base, but the strut did not butt up flat against the forward struts. I had to cut a notch out of the forward struts and drill holes through the two pieces so that I could insert a pin to strengthen the join.

Anytime I had to drill into the balsa wood I was afraid that the drill might split the wood and then I'd have to start all over again. Fortunately there was no breakage, but it took another four hours on sunday to work out all of the angles and positions of the pins.

Then I started attaching the front plates (no pictures today) to the front of the frame and the sides, but for some reason it took forever to work out a snug fit for the plates. I hope to finish up this part of the job and get it painted by tomorrow.

I also began work on the paddle wheel, but it will be a few more days before I can finish it. I went to Hobby Lobby and found some decorative gears in the bead/necklace department, from which I made the basic shape of the wheel.  Pieces of bass wood where glued to the gear to extend the spokes of the wheel. I used a 3/4 inch dowel rod as the axel. The picture below provides a mock up of how the paddle wheel might look when the project is finished.

Mock up of the paddle wheel shown in the picture above.

It looks like the canopy will be the last item that I make on this model. The canopy shown in the picture is borrowed from another boat model and it is "for show" on my model.

All of these seemingly simple tasks take lots and lots of time.