 |
| Zorndorf - before |
The other day I was taking a look at the terrain setup for Zorndorf that is currently on my game table and thought that something seemed to be missing (see picture above).
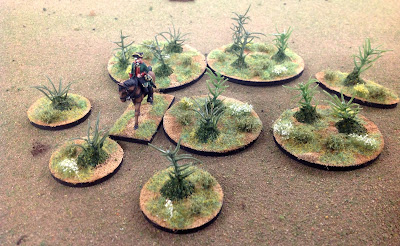
There were large areas where there was nothing on the ground and to my eye seemed to be calling for something to fill the space. So I took a few round discs of various size from my box of MDF bases and terrained them in much the same way as I do with my miniatures. You can see the results below:
 |
| The tabletop showing how things look with a few terrain bits added. |
You can see a close up view of the terrain discs in the picture below. A Minden officer on horse is shown to provide some comparison of the discs to the size of the figures.
 |
| Close up view of the terrain discs. A Minden Russian officer stands in for comparison. |
I use a game mat that was made by a company called The Terrain Guy (now sadly out of business). It measures 6ft wide by 12ft long. If I need a longer or deeper table, then I have to add some terrain squares (2ft x 2ft) that I made many years ago for one of my Kolin games.
When I purchased the game mat, my thought was to use it as a flat surface and then to lay all of the terrain (hills, roads, streams and wooded areas) on top of the mat. I haven't made very many hills or elevation pieces, so I have resorted to the time honored method of sliding some books, telephone books and pieces of wood underneath the mat in order to create undulations in the table terrain.
One of the visual problems that has vexed me over the years is the look of emptyness that certain parts of game table can have after all of the major terrain pieces have been set up on the table. You can see how this looks in the picture at the top of this page and compared it to the second picture which has the terrain discs that I made.
The discs are simple to make. I start with a round disc made out of MDF wood and glue down any large bits of grass or weeds that I want to use. I bought a pack of "weeds" somewhere in my past and figured that one day they would come in handy. Today was that day. So the small 1-inch diameter discs had one weed glued to it, the 1.5-inch diameter disc had two weeds, and the large 2-inch diameter disc received three of the weeds.
The next step in the terraining process is to mix up some brown paint into a can of Red Devil Premixed Spackle Compound (used for covering up the joins in wall board) and just stir in the paint until it looks like chocolate pudding. You can add a tiny bit of water to reduce the viscosity (there's a big word that I don't get to use very often) and make the goop flow easier on the base.
Next, I dip the wet base into a pot of extra fine railroad ballast material (you can use fine sand too) and shake off the excess material around the rim of the disc. It takes about 4 hours for the goop to dry really hard, at least hard enough to accept paint without dissolving again. So I usually let the bases sit overnight and I finish them off the next day.
Once the bases are dry, I use a light brown color (Geo Hex Brown - no longer produced) and stipple the paint onto the base using a wide paint brush. This gives the ground work a little more visual depth.
Now the bases are ready to have tufts and static grass applied to them. I use Woodlands Scenics or Army Painter products for my tufts. Any brand of static grass will do as well. So it is a matter of dabbing some white glue to the tuft and sticking it onto the disc. I let this dry for about ten minutes and then glue a random pattern of white glue onto the disc, then sprinkle static grass onto the base and shake off the excess static grass. At first, you can see the white glue through the grass, but this look will go away once the glue has dried and becomes colorless.
The final step is to give the discs a spritz of matte finish - I use Testor's Dull Cote, but there are a number of similar products on the market. You could probably eliminate the coating step because it doesn't really protect the finish of the materials. I do it for peace of mind that the static grass will contiue to stick to the disc.
Now that I have completed this project, in retrospect I probably would have left off the plastic weeds and just gone with the terraining process using the tufts and static grass. Use of the white and yellow field flowers tufts adds a little bit of POP to the disc.
The finished discs are now scattered around the table and nicely fill in some of the open spaces on the table surface.


That is a good idea!
ReplyDeleteIt's a great idea! I like how it breaks up all that open space.
ReplyDeletevery effective!
ReplyDeleteNice, very nice!
ReplyDeleteI adore everything you do, Frtiz! That said... I do actually rather like the "flatness" of your open fields... feels very clean and proper, if that makes sense?
ReplyDeleteVery effective Jim and I certainly couldn’t agree more in terms of breaking up the open space with purely aesthetic pieces with no punitive or beneficial terrain effects. I have started using single trees on a round base for just such a reason.
ReplyDeleteThe Terrain Guy stuff was great. I have a mat, road set and some hills. I went to buy more and he was already out of business. Your terrain always looks great.
ReplyDeleteFound that extra hold hair spray works well (from dollar store), your grass or other small bits will never come off. Flat finish spray after will give the dull finish
ReplyDelete