


 |
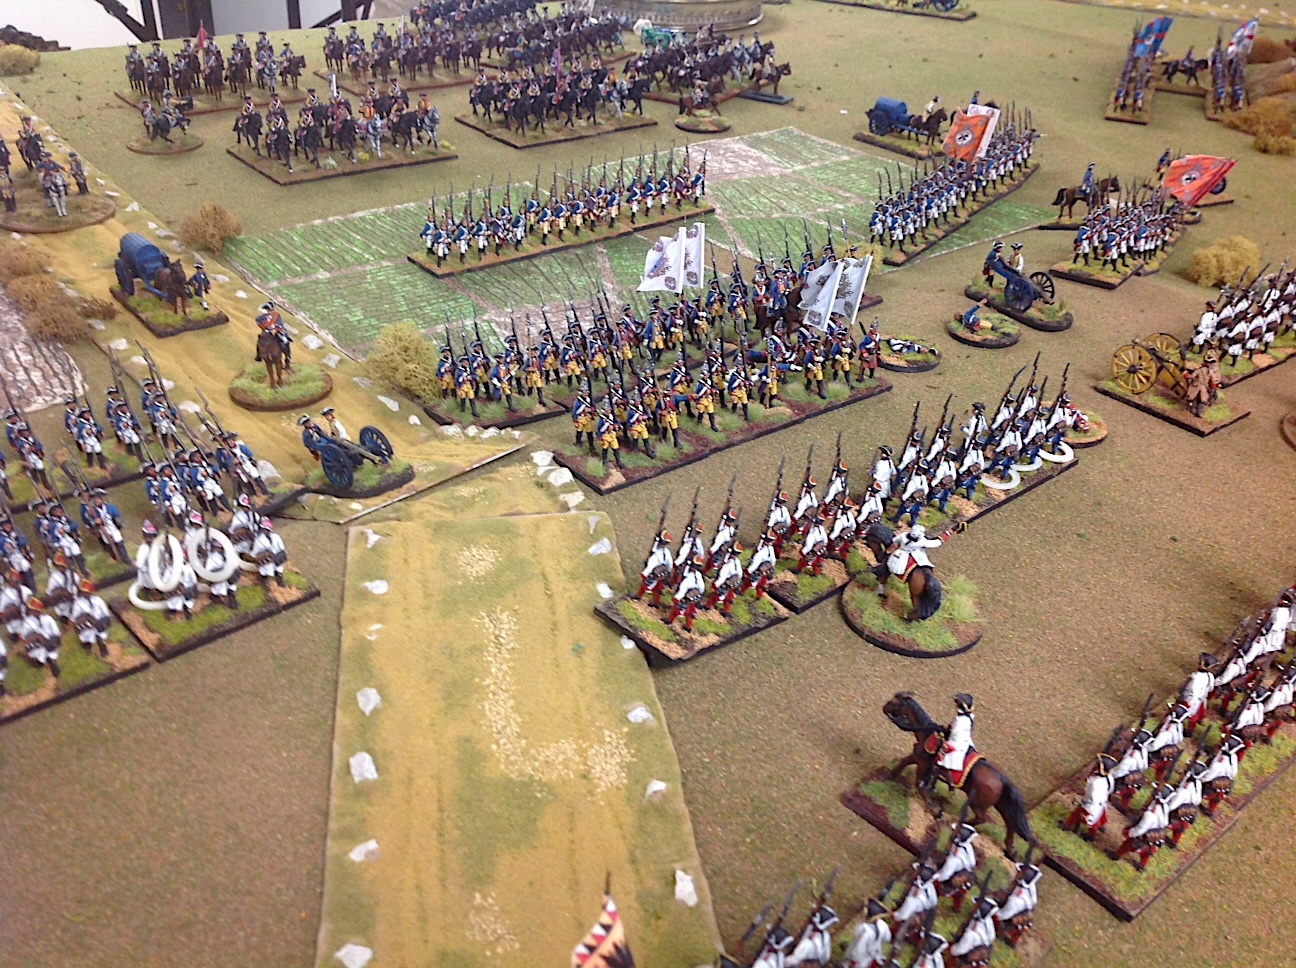
| Prussians (left) attack the Austrians deployed on the ridge between the town of Fontenoy (top middle of the picture) and the Bois du Berri woods (you can just see a little bit of it in the lower left corner, where the red Croats are). |
I fought the battle of Fontenoy over the weekend using my 30mm Minden Austrians and Prussians standing in for the French and the British, respectively. I used my own one-page Der Alte Fritz rules which you can download for free on the Fife & Drum Miniatures web site Here .
The after action report will be divided into two posts so that I can show more pictures without one excessively large post showing everything. It will be easier to read and follow if I break things down into Part 1 - The Attack in the Center or The Infernal Column; and Part 2 - The action on the flanks in Fontenoy and in the Bois du Barri.
For a description of the table top setup, please refer to my earlier post Here .
 |
| The picture map above indicates the key terrain elements of the Battle of Fontenoy. Please click and double click all pictures to see the enlarged full size view. |
I played the battle as a solo wargame starting on Friday night (2-3 hours) and finishing the game on Saturday (4 hours). Normally such a game would run for 5-6 hours, but since I had to move all the figures myself, roll dice for both sides, etc., it took an extra hour or two to play Fontenoy as a solo wargame.
How to Play a Solo Wargame
You may ask, "how do you play a solo game without any built in bias for one side?" The answer is simple: each turn I ask myself, "what are the most advantageous moves that I can make for Side A, and then I do the same for Side B. So I'm not going to pass on the opportunity to charge into the flank of one side's infantry. Likewise, I don't let the knowledge of what I may plan to do for one side get in the way of the other side's tactics. Afterall, if I am making a move that offers the greatest advantage to one side, then it shouldn't affect the tactics that I am using "in the moment" for the other side. I have used this methodology for years in playing a number of solo games, with great success.
The Battle of Fontenoy - a potted history
In the actual battle of Fontenoy, fought during the War of Austrian Succession in 1745, the Duke of Cumberland's Pragmatic Army of British, Hanoverians, Dutch and Austrians attempted to relieve the besieged town of Tournai, which was invested by Marshal de Saxe's French army. De Saxe intercepted the Allies on favorable round of his own selection and awaited the likely assualt by Cumberland. T
he British contingent of the army had the tough assignment of attacking through the center of the French battle line. Each flank of the British attack was enfiladed by French fire from the town of Fontenoy (on the British left) and the Bois du Berri woods. The British doggedly advanced through the hail of musketry and cannon and encountered the first French battle line, comprised of its vaunted French and Swiss Guards. The French Guards were mowed down by the British fire and the redcoats continued to advance deep into the French center.
However, the galling fire on their flanks caused the British regiments to bunch in together and inadvertantly form a massive column of battalions. The French called this 'The Infernal Column" because it came on and on despite all efforts to stop it. Finally, a desperate French cavalry attack put a halt to the British attack and Cumberland ordered a retreat, which was conducted with great skill and fortitude - no panic for these redcoats.
Let our Battle Begin
The Prussians: The Prussian attack was organized into three brigades:
Right hand brigade - two battalions of the Itzenplitz Musketeer Regiment (IR13) supporting the center brigade's right flank. Also a battalion of Jagers and a battalion of Diericke Fusiliers (IR49) traipsed through the Bois du Berri looking for the French - they seek them here, they seek them there, they seek them in the woods.
Center brigade - two battalions of guards (IR15) and one battalion of grenadiers.
Left hand brigade - two battalion of the Winterfeld Regiment (IR1) supporting the guards brigade's left flank, and two battalions of the Anhalt Dessau Regiment (IR22) assigned to attack the town of Fontenoy as a diversion.
The Prussian heavy cavalry (5 squadrons of cuirassiers and 2 squadrons of dragoons) brigade commanded by von Seydlitz was held in reserve, ready to exploit any break through by the Prussian infantry.
 |
| The Prussian Infernal Column bull dogs its way towards the Austrian battle line. |
The Austrians: Marshal de Saxe's Austrian army held a strong position on the ridge that connected the town of Fontenoy, on their right, and the Bois du Berri woods on their left. The left was also anchored by an earthen redoubt called the Redoubt d'Eu, named after the French regiment that occuppied the Redoubt in the actual battle. Artillery was placed in both town and Redoubt that was positioned to enfilade any attack in the center.
Front Line of Infantry: two battalions of elite Austrian grenadiers and two battalions of musketeers,
Second Line of Infantry: two battalions of musketeers
Third Line: ten squadrons of heavy cavalry
Fontenoy garrison: four battalions of musketeers
Woods and Redoubt: two Croat light infantry and a battalion of musketeers, plus a 12-pound cannon in the Redoubtg.
The annotated picture below gives one an idea of the types of troops that were deployed in the center.
 |
| Troop positions for the initial clash of front lines of battle. |
Not surprisingly, the game began with the three Prussian infantry brigades moving forward at a smart pace. The jagers quickly jumped into the woods and prevented the Croats from peppering the Itzenplitz musketeers with musket fire. The Diericke Fusiliers also waded into the trees, but they could only move at half speed in the rough terrain.
My rules require an initiative die roll on a D10 die at the beginning of each turn. The higher die roll wins the initiative and gets to choose between moving first/firing second or moving second/firing first. The Austrians won the initiative on the first four consecutive game turns, so they were able to put some hurt on the advancing Prussians. There was no musketry until Turn 3, when the two sides finally closed within the fire zone.
 |
| The Prussian column of battalions moves into musket range with the Austrians. |
On Turn 4, the Austrian first fire proved to be effective as the 3rd Battalion of the Prussian Guards lost 8 figures at one go! The Guards needed to roll a "3" or less on each of two D10 dice, and they actually did it! Now it was the Prussians' turn to return the fire, and both Austrian grenadier battalions were staggered into "Shaken" status. (it reminds me a bit of the Fish Slap Dance in Monty Python).
 |
| The Prussian Guards Brigade, in the center, begin to push back the elite Austrian grenadiers. |
 |
| Prince Charles of Lorraine observes the Prussian on rush, perhaps a little bit too close for comfort. |
Now the advantage shifted over to the Prussians as they would win the initiative, and first fire, for the next four game turns. It is very rare for both sides to have a run of four consecutive initiative wins in my games. First fire is very important when both armies are in close musket range, and this began to whittle down the Austrian infantry over the course of the next 3 or 4 game turns.
 |
| Austrian grenadiers versus Prussian guards in the center. Who will break first? |
 |
| One of the Austrian grenadier battalions in the first line breaks! |
Once the Austrian front line was vanquished, the Prussians turned their attention on the second line of Austrian musketeers and gave them the same rough treatment that the Austrian grenadiers received. This would inevitably break the Austrians' second line of infantry, leaving only the cavalry in the center to try to stop the Prussian infantry onslaught.
 |
| The Prussians attack the second line of Austrians. Regiments are identified in the picture map above. |
 |
| Another overhead view of the action as the Prussian engage the second Austrian line of infantry. |
 |
| On the right hand side of the Prussian column, the two battalions of the Itzenplitz Regiment (IR13) engage a battalion of converged Austrian grenadier companies. The supporting second line of musketeer infantry can be seen on the righthand side of the picture. |
 |
| Marshal de Saxe watches the battle unfold (and a battalion of grenadiers routing in front of him) from the comfort of his wicker chariot. His personal Uhlans de Saxe provide protection for the marshal. |
 |
| Itzenplitz takes care of the Austrian grenadiers and now pushes up the ridge to engage the second Austrian line. |
 |
| Von Seydlitz holds his heavy cavalry in reserve, waiting to exploit any success by the infantry in the front lines. |
Marshal de Saxe ordered his infantry to retire from the ridge so as to open up lanes for his cavalry to charge the depleted Prussian infantry. This should have worked to the Austrians' advantage, but it didn't. First the cuirassiers attacked Winterfeld's brigade on the Prussian left. Then the Saxon Guard Cavalry charged into the Prussian guard infantry. Both charges were repulsed by the infantry. Finally, de Saxe even sent in his personal escort of uhlans into a charge, and they too came tumbling back.
Why did the Austrian cavalry fail to break Prussian infantry units that were all shot up? It was clear that something wasn't working the way it should in my rules. I had previously reorganized all of my cavalry from regiments of 24 riders into squadrons of 12 riders, with two squadrons making up a cavalry regiment. So when a single squadron of 12 horse charged into a Prussian battalion of 18-24 figures, the firepower of the muskets stopped the cavalry dead in its tracks.
Now my perception of 18th Century warfare is that this is probably what happened to the cavalry when they charged formed and steady infantry. Think of the British infantry at Dettingen and Minden, for example.
So one solution would be to organize a cavalry charge such that 2 to 3 squadrons were hitting the infantry battalion instead of 1 squadron. So a change in tactics might produced a more favorable outcome for the cavalry.
Another solution is to even up the odds a bit by eliminating the "fire on the chargers" part of the infantry versus cavalry melee. In other words, just let them pitch into it and start the melee and eliminate the infantry firing at the cavalry/the cavalry checks its morale, it passes and continues the charge and then the infantry tests its morale, and if it passes, then we finally get to the melee, which is the whole point of the exercise.
In my next game, I will try the "eliminate the musketry and get to the fightin' " method of melee and see how that works. I think that it will work better.
My principal aim in my rules is to have a fast game and quick results. So I like to pare the game down to its basics. It may not be your cup of tea, but I'm focused on rules that can be used at game conventions that are fast play and easy to learn.
 |
| Austrian cavalry backstops the second infantry line. |
 |
| Prussian Infernal Column has broken through the second Austrian line of musketeer regiments. |
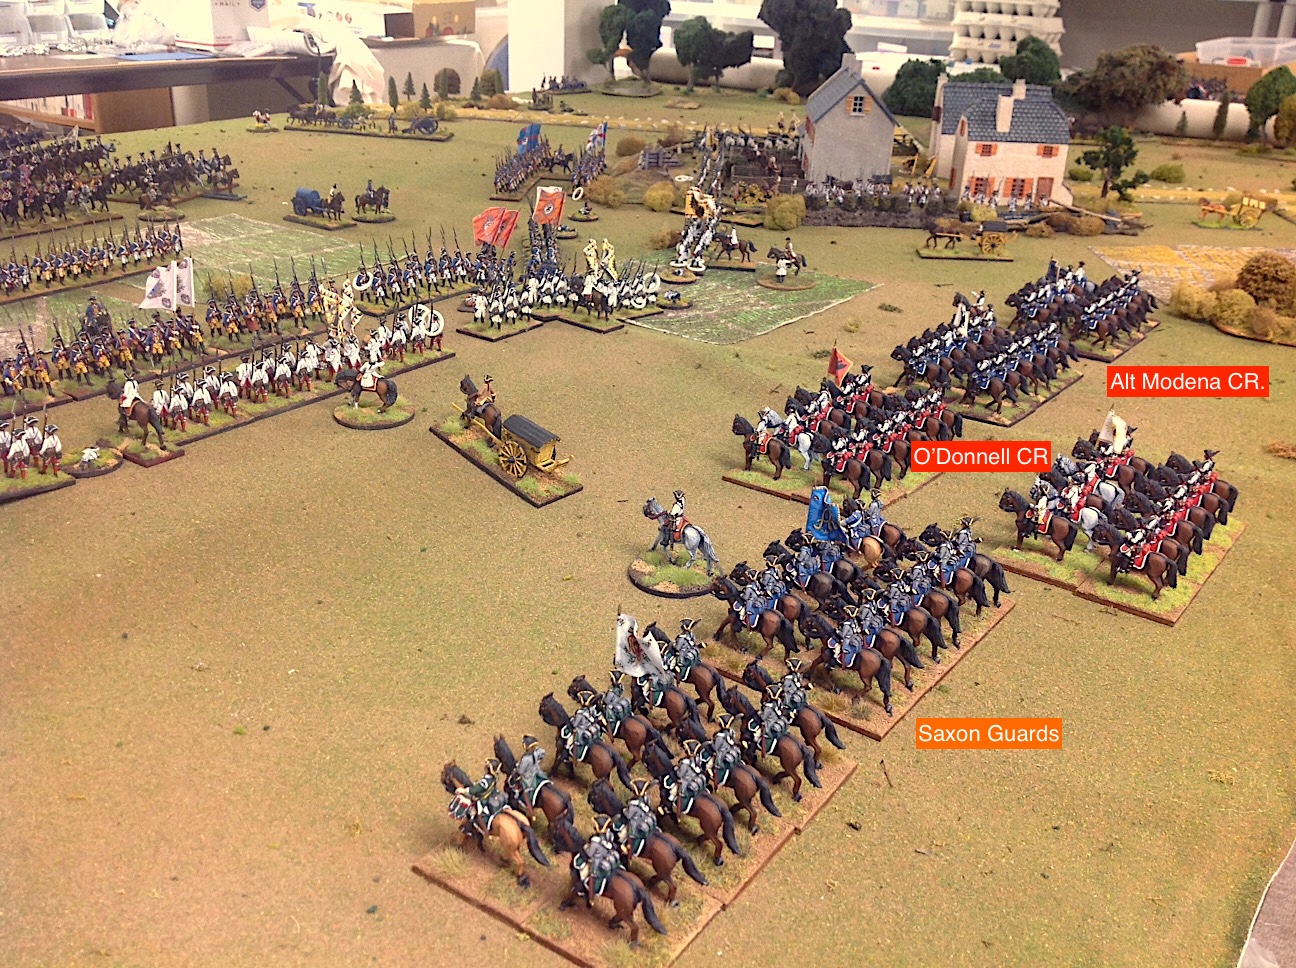
On the Prussian right, the Winterfeld regiment slaughtered two Austrian musketeer battalions, taking advantage of its run of first fires. Then on came the Austrian cavalry. I thought that the Winterfeld lads were doomed, but somehow they fended off two squadrons of Alt Modena cuirassiers and might have done some more had they not been charged in the flank by the O'Donnell Austrian cuirassiers. In my rules, if infantry gets smacked in the flank or rear by cavalry, they are toast and so they are immediately removed from the table.
Fortunatley for the Prussians, their cuirassiers were coming up to support the infantry and so a squadron of Prinz von Preussen cuirassiers smacked O'Donnell, in turn, in their flank.
 |
| On the lefthand side of the Prussian column, the Prussian Winterfeld Regiment (IR1) presses forward near Fontenoy and devestates the Austrian MacGuire regiment with musketry and cannister. The dead markers indicate where a stand of Austrians or Prussians were removed from the table, as all six figures on the stand were casualties. |
 |
| The Austrian Alt Modena cuirassiers (blue facings and shabraques) charge into the Prussian Winterfeld musketeers. |
 |
| Like fierce and noble lions, the Winterfeld regiment repulses the charge of the Alt Modena cuirassiers. The red discs indicate "Shaken" morale status adversely attained from bad dice rolls for morale, or in this case, automatically given at the conclusion of a melee to indicate a state of disorder. |
 |
| Thank you sir, may I have another?
The Austrian O'Donnell cuirassiers see an opportunity to charge into the flank of the first battalion of the Winterfeld Regiment. The Prussian Prinz von Preussen cuirassiers counter-charge into the O'Donnell cuirassiers. Note that Prussian first battalions have both a white and a colored flag, whereas the second battalion has all colored flags.
|
 |
| The Prussian Garde du Corps (left) and the Prinz von Preussen, 1st squadron (right) move towards the right to counter an expected threat from the Austrian cavalry. |
 |
| Overhead view showing the Prussian break through in the center ridge. The Austrians only have cavalry left to deal with the problem. |
 |
| With the Austrian center broken open, the battle rests on the outcome of a cavalry charge by the Guard Saxon Horse into the second battalion of the Prussian Guards. |
 |
| Alas, it is bad news for the Saxon Guard Horse as they too are repulsed by the Prussian foot guards. |
After three failed cavalry charges versus infantry, the Austrian commander decided that it was pointless to throw away more of his cavalry, so with no more infantry in his center, Marshal Saxe ordered a retreat from Fontenoy -- a Prussian victory. An overwhelming one at that.
Within the next couple of days, I will post a report on the fighting on the flanks in the town of Fontenoy and in the Bois du Berri and Redoubt d'Eu.
 |
| Jagers and Croats fight it out in the woods. More on this fighting coming soon to this blog. |
Just the thing for a Monday morning! I especially enjoy how the relatively neat and tidy initial positions soon became a rather more tangled and confused affair.
ReplyDeleteBest Regards,
Stokes
Most impresive report, spectacular lines of troops!
ReplyDeleteVery dignified looking game, Jim. Your long lines of opposing troops in perfect step make for an elegant spectacle.
ReplyDeleteWith four consecutive "First Fires" the balance tipped towards the Prussians, for sure.
All in all, a terrific visual treat.
Well done!