Friday, February 22, 2008

Der Alte Fritz is back


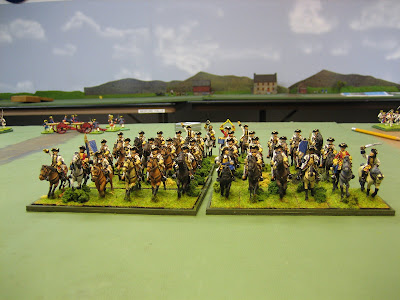
French Commissaire-General heavy cavalry from the collection of Bill Protz (Elite Miniatures). They concentrate one's mind wonderfully.

I have felt a bit blogged out after the sudden flurry of Sudan activity a couple of weeks ago and so I've been taking a bit of a respite from the hobby to recharge my batteries, spend more time with the family, and generally try to get things back into balance. Another factor to my malaise may have been the extensive amount of 1806 Napoleonics that I have been painting during the first two months of 2008. They look nice, but Napoleonics seem to drain one's spirit away. Getting back to painting SYW figures ought to do wonders to improving my outlook.

We received another six inches of snow here in Hesse Seewald. I think that the latest delivery brings our total up to 60 inches for the year. I cannot wait until Spring! The usual remedy for cabin fever is to retreat to the basement and paint myself into a stupor until the snows begin to melt and the weather becomes tolerable.

To that end, I recently completed another 12 figure squadron of the Garde du Corps (CR13) in the Prussian army. The figures are Elite Miniatures Prussian cuirassiers and include one Foundry standard bearer carrying the Garde du Corps' distinctive vexilum style banner. I will post some pictures within a few days, after I get the bases terrained. They do look nice though and they are strong enough to handle that hoard of French cavalry pictured at the top of this page.

It now looks like I will be able to attend the Seven Years War Association Convention on both the friday and the saturday game days. Therefore, I have decided to run my own BAR game on friday, featuring my Austrians against my Prussians in a stylized version of the battle of Reichenberg in 1757. The prospect of a game may be the tonic for finally getting some more Austrian cavalry added to the army. I primed and black coated 12 Crusader Austrain cuirassiers this evening and should have these figures done in about a week (it helps to have the weekend coming up with respect to painting time).

I have another game coming up on March 8, 2008 at Brown Deer, WI - Chez Protz, if you will, and I suspect that the Garde du Corps will see some serious action in that game. I also ordered 36 Stadden AWI artillery crew - or enough for 5 or 6 crews. I intend to gradually replace my Foundry Prussian artillery crew with the taller and sleeker Stadden figures. Please refer to my earlier posting about the Stadden figures, back in January, for pictures of the same.

Sunday, February 10, 2008

Sudan Battle Report


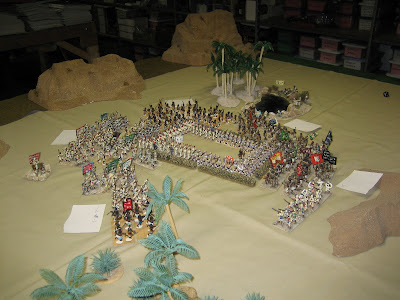
The initial table set-up, before the arrival of the Dervish.

February 9, 1884 (Eastern Sudan, near Tofrek). Mr. Henry Newton, correspondant for The London Times, reports of a bloody action in the eastern Sudan between Her Majesty's forces under the command of Lt. General Sir Albert Ponsonby, of the Third Column, and the Dervish army of Osman Digna. Our correspondant reports that the second (Colonel Pettygree) and third (Colonel Atherton) brigades of the Third Column were on the march to relieve the battered first brigade (Colonel Wilmington-Smythe), encamped at the oasis of Dur Es El Bubba.


Wilmington-Smythe's (Randy Frye) brigade in their zariba near the oasis.

Colonel Wilmington-Smyth's brigade had been under attack for three days, and its brigade strength was down to the equivalent of two regiments (1 Egyptian and the Royal Lancashires). Wilmington-Smythe had constructed a stout zariba near the oasis, and had successfully fought off numerous Dervish attacks, but ammunition was running low and the brigade could not hold out much longer. Accordingly, Lt. General Ponsonby despatched the second and third brigades to relieve the Wilmington-Smythe expedition. The relief column traveled light, without artillery or Gardner guns and included four regiments of Her Majesty's infantry and two Egyptian regiments. Each brigade had two squadrons of cavarly attached for scouting purposes.

Report of Colonel Pettygree's Advance Brigade


Second Brigade commanded by Colonel Pettygree (Bill Protz) deploys in the center third of the table to start the game.

Colonel Pettygree's orders read "You will take your command and proceed to the Oasis of Dur Es El Bubba and support the 1st Brigade in control of the oasis. Heavy enemy forces are known to be in the area. Colonel Atherton's third brigade will march behind you in support." He had a regiment of the Black Watch, the Royal Berkshires , an Egyptian battalion, and 2 squadrons of the 10th Hussars.


Dervish cavalry attack the Third Brigade of Colonel Atherton (Alte Fritz himself), which is providing the rear guard for the relief column. Note how some of the Bengal Lancers have taken cover inside the square.

The third column under the command of Colonel Atherton (me) was bringing up the rear, several miles behind the second brigade of Colonel Pettygree. Atherton's force consisted of the Gordon Highlanders, the Royal Marines, and the 2nd Sudanese Regiment, plus two squadrons of Bengal Lancers. Almost immediately, a rub of 400 Dervish riflemen popped out from behind a ridge in an attempt to ambush Atherton's column. Another 200 Dervish cavalry also attack Atherton, who quickly formed a brigade square. Fortunately, an intervening wadi held up the Dervish cavalry in time for the brigade to form square. A couple of volleys at medium range drove off the Dervish horsemen, while their companions on foot declined to advance on the strong square.


Pettygree's brigade advance towards the zariba. The wadi to his front would cause considerable difficulties for the British as they tried to cross it. Note the 10th Hussars out on the flank trying to spring any ambushes. Dervish could pop up anywhere there was a terrain feature, such as a collection of scrub, a wadi, or a small ridge. The referee diced for a reaction on each turn to see if any Dervish appeared.


Pettygree' s brigade attempted to negotiate a particularly wide and deep wadi to their front. As the Egyptian regiment cleared the wadi, it was attacked by two units of Dervish: one a rifle armed mob, and the other a ferocious band of Hadendowa Fuzzies. These units were successfully driven off by rifle fire. Just when things began to look promising, anothe band of Camelry charged the Egptians, and this gave encouragement to the Fuzzies, who turned around and decided to join in on the attack.


Pettygree's second melee in two turns -- a combined group of Dervish foot and Camelry charge across the wadi, where they are repulsed by the Egyptians and the supporting Black Watch regiment.

The Black Watch moved up to the rim of the wadi and lent their support to the Egyptians' defense, and this provided sufficient firepower to fend off the second attack. On Pettygree's left flank, the 10th Hussars flushed another band of Hadendowa from the scrub and drove them off. This band would later join up with another Dervish unit and attack Wilmington-Smythe's zariba.


Two Dervish mobs link up together and head for the nearest enemy (Wilmington-Smythe's brigade at the oasis). Often the Dervish will not attack, but instead roll a reaction of "join the nearest friend" (which they are doing above) or "shadow the enemy outside of rifle range".

So far so good, thought Colonel Pettygree. He had successfully driven off two major attacks to his front, had negotiated across the difficult wadi, and now Wilmington-Smythe's brigade was clearly visible to his front. It began to look like the mission would be accomplished. It seemed like everytime Colonel Pettygree opened his mouth and declared that everything was going all tickety-boo, something dire would happen to his brigade. The other British commanders strongly advised Pettygree not to opine on the state of affairs for awhile. Things were not all right, for now another band of Fuzzies appeared at the rear of Pettygree's brigade. Fortunately, the Royal Berkshires were deployed in the rear of the brigade to handle such an attack from the rear.

Colonel Pettygree's third major melee. The Royal Berkshires are trapped on the wrong side of the big wadi, with no support available from the rest of the brigade, which has already crossed the terrain hazzard.

The Berkshires had a rough go of it, having to fend off a mob of 800 Fuzzies on their own. A squadron of the 10th Hussars rode over to help, but even so, the Berkshires lost almost half of their regiment fighting off the Fuzzies. In the Gilder Sudan rules, the Imperialist troops have a relatively easy time fending off any attacks. But if they don't win the first round of melee (i.e. score more casualties on the enemy than they receive) then the odds begin to favor the Dervish. During the first round of melee, only those figures in the front rank can fight. In the second round, the Imperial troops can fight with both ranks, but the Dervish get to fight with all of their troops. So the weight of numbers favors the Dervish after the first round. As the Berkshires found out, you must defeat Fuzzy right away or else he can really ruin your day.

After this attack from the rear was repulsed, Colonel Pettygree advanced the Black Watch towards the zariba, while the Egyptian regiment hastened the flight of the Dervish with a steady advance. This would prove to be as far as Pettygree could advance before Wilmington-Smythe met his fate.

Atherton's 3rd Brigade - Rear Guard

Colonel Atherton's rear guard had a few anxious moments at the beginning of the battle, what with the sudden appearance of Dervish to his front whilst the brigade was still in column. Thereafter, the rear guard advanced at a tortoise-like pace in brigade square (the square can move at line formation speed of 6-inches, whereas changing into column (9-0nches) costs you half a movement rate, so it was almost better to continue the advance in square rather than waste a turn changing formation. That and the fact that the square was impervious to attack were considerations that crossed Atherton's mind.

The Bengal Lancers were sent out to the left flank on a scouting mission and they soon ran into a hoard of Hadendowa on the charge. It looked like it was curtains for the Lancers, but miraculously, they won the first round of the melee and the reaction result for the Fuzzies was to withdraw for three turns. Thank you very much.


It looks worse than it actually was. The Bengal Lancers drove off the Hadendowa with considerable ease.

The remainder of Atherton's day was smooth sailiing. Once the Fuzzie attack on the left was stopped, he broke from square and sent the 2nd Sudanese regiment off to the left to support the Bengal Lancers and cover the rest of the brigades crossing of a small wadi to his front. A considerable hoard of Dervish spearmen and riflemen were lurking across the wadi, out of small arms range. The Royal Marines were the first to cross, covered by the Gordans on their right and the Sudanese on their left. Once the Marines were on the other side of the wadi, the Gordons crossed and deployed atop a small ridge on the right flank. The Gordons realized that the Dervish to their front were armed with rifles, so they fell back a few paces behind the crest of the ridge until they could advance in unison with the Royal Marines. Then, two British regiments could concentrate their fire on the one rifle armed Dervish hoard. This proved to be an effective tactic as the combined fire of the two regiments drove off the threat. Atherton faced no more difficulties for the remainder of the day. One never knows what to expect in the sands of the Sudan. Sometimes it's a tough day, and other days it's a piece of cake.

The Attack on Wilmington-Smythe's Zariba

Colonel Wilmington-Smythe seemed to be leading a rather charmed life on this day. He could hear the sound of rifle fire to the south and the west, indicating that the relief column was on its way as promised. He continued to peer at the growing masses of hostiles around three sides of his zariba.


A band of 600 Hadendowa in "shadow mode" watched the zariba for most of the game.

Each turn the referee would roll dice to see if any Dervish would enter the table. If the results of the die roll were positive, then another roll (odd or even on a D6 die) would determine which side of the table received the reinforcements. Then a final die roll determined which of the three sectors of the table the Dervish would appear. After that, all Dervish units on the table took a reaction roll to see what they would do on that turn. Results can vary from "go to high ground", "seek nearest friendly unit", "shadow the enemy" or "charge". A different table is used, depending on the relative strenght of the Dervish unit to any enemy in sight. The fact that Wilmington-Smythe's brigade tended to outnumber the individual Dervish units, and the fact that he was in a "prepared cover" defense, also reduced the odds of a Dervish attack on the zariba. Eventually, the Dervish forces would build up to the point where the forces were in their favor, thereby improving their odds of charging.

Towards the end of the alloted game time, the referee (Keith Leidy) began to put larger and larger units on the table near the zariba, so that we could see what would happen. Colonel W-S (Randy Frey) didn't seem to mind considering that he didn't have much to do throughout the game. So he was a good sport about all of this.


The Dervish forces build up around the oasis. You can see the forward elements of Colonel Pettygree's relief column in the upper left clump of trees. Atherton's rear guard is not even in sight.

Wilmington-Smythe peered through his binoculars one more time and exclaimed, "oh my goodness, they are on the move!" The bugles were sounded and all along the line the sargeants barked out orders to their platoons.


"We are doomed!" cried out one of the subalterns as 1200 Dervish close in on the Egyptian half of the zariba. Another hoard to the right also advance. When one unit charges, all units in Shadowing mode also charge. The Black Watch can only look on helplessly.

1,000 Hadendowa charge the zariba. When one goes, they all go.

All of the Dervish close in on the zariba. You thought I was kidding when I said that they ALL go in. A very stirring sight to behold.

At this point, there were more Dervish on the table than I had ever seen in my life, and they were all heading for Randy (Wilmington-Smythe). I could hear a distinguishable "gulp" eminating from Colonel W-S's throat. "Chin up old bean, stand fast and all that," was the best advice that I could think to offer him. Just win the first round of the melee and the rest is a piece of cake. That's easy for me to say.


The Lancashires hold up their end of the deal by repulsing all of the Dervish attacks on the west side of the square. The Egyptians, on the other hand, faced overwhelming odds and couldn't drive off the attack on their side. They were doomed.

The Egyptian side of the square did their best to repel the massive Dervish attack. Each section of the regiment won their part of the melee by inflicting higher casualties on the enemy. Unfortunately, the two sections of Dervish rolled a "4" and a "9" on the reaction chart. These were the only possible outcomes out of 12 that would result in a "continue to melee" result.

The next round of the melee whittled the Egyptians down considerably as now the Dervish could add in more numbers to the fight. We stopped the game at this point, because the end result was inevitable. In the Gilder Sudan rules, the melee continues until there is no more melee. That means that once the Egyptians were chopped up, the likely reaction result would be continue to charge into the Lancashires inside the zariba. They would have no opportunity to turn and face the charging Dervish, and so they too would be chopped to pieces. Pettygree's Black Watch could only standby and watch and wait for the melee to end, as the firing phase comes after the melees are completed.

Dispatch to the London Times
Her Majesty's Government regrets to inform the public that a brigade of Her Imperial forces was wiped out at the Oasis Dur Es El Bubba on February 9, 1884 in eastern Sudan. A relief column, under the command of Lt. General Ponsonby attempted to fight its way through to secour the brigade of British and Egyptian forces, commanded by Colonel Wilmington-Smythe, late of Her Majesty's Royal Lancashire Regiment. Ponsonby's column retreated to the British fort at Tofrek once it became apparent that Wilmington-Smythe's brigade had been anilhilated by some 10,000 Dervish


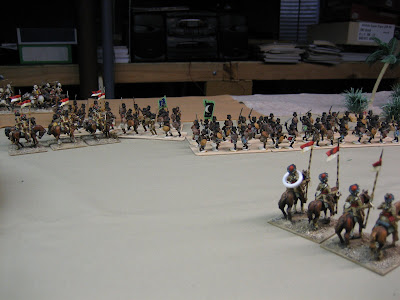
9th Bengal Lancers from Peter Gilder's collection. Note how he painted the lances to resemble bamboo.

Dervish Camelry- Connoisseru figures painted by Peter Gilder


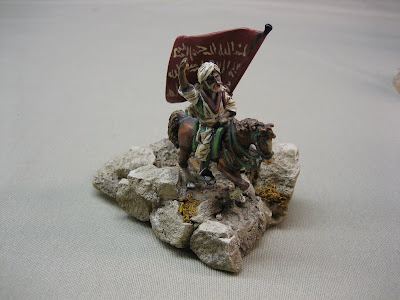
A close-up shot of a Dervish stand. Each stand represents 10 figures (or 100 men), but Peter Gilder often put 7 or 8 figures on the stand and added some rocks and brush to make a little diorama out of the stand. Regardless of the actual number of figures on the stand, it still represents 10 figures. This is a rather creative idea, I think.


Saturday, February 9, 2008

Return to the Sudan


A British and Egyptian square stand fast behind their zariba as they attempt to hold off hoards of Dervish and Hadendawa aherants of The Mahdi. All figures are Connoisseur Miniatures from the collection of Keith Leidy.

On Saturday February 8, 2008 I had the pleasure of taking part in a Sudan game hosted by Keith Leidy. Messers Protz and Frye accompanied me in our trek through the desert as we sought to occupy and protect the oasis at Dur Es El Bubba. We had not played a Sudan game in over a year, so we all felt that it was high time to bring the figures out onto the table and give the Peter Gilder Sudan rules another workout. The rules worked smoothly and our memories of how to work through the "shadowing of the Imperial forces" and the melee procedures were sufficient to make the game run like clockwork.

One of the things that we discovered was that placing the Imperial troops behind prepared defenses (the zariba) made it difficult for the Mahdist forces to build up enough gumption for an attack. They spent a good part of the game "shadowing", i.e. staying within eyesight of the Imperial forces, but outside of small arms range. We also came to the realization that the Queen's forces had to win the first round of melee and repulse the Mahdists, a high probability, or face certain destruction in the subsequent rounds of melee against overwhelming numbers. The native forces fight until they are beaten in a given round of melee. There are no morale checks otherwise.

It was a fun game and quite a treat to be able to push Keith's excellent Connoisseur figures across the desert sands. I will present a detailed battle report tomorrow, but for now, here are a few taster pictures of the action.


Hadendowa warriors (Fuzzies) attack and surprise a squadron of Bengal Lancers. The Lancers prevailed, amazingly enough!


Der Alte Fritz's brigade square forms up to fend off a Dervish cavalry attack early in the game.


A close up picture of the Dervish Emir, depicting the modelling skills of the late Peter Gilder, who sculpted, painted and based the figures. An interesting use of terrain materials.

As always, please click on the pictures for the enlarged view of these fabulous figures. And drop on in tomorrow to read the after action report.

Friday, February 8, 2008

Austrian Battalion Strength in the SYW


Grand Review of the Austrian Army done in early December 2007

Someone on the Old School Wargamers' group was asking about the size of Austrian battalions during the Seven Years War and naturally, I became a bit curious about finding the truth. I have heard everything from a low of some 500 men to as high as 900.

Let's begin by looking at some of the few source books in English, primarily those written by Professor Christopher Duffy, as well as some information from the Pengel & Hurt series. Things are complicated by the fact that the Austrians changed the size of their infantry regiments in 1740, 1748 and again in 1756, just before the outbreak of the SYW. I will focus on the organization as of 1756 since our interest is in the Seven Years War.

Pengel & Hurt
In 1756, an Austrian infantry regiment was comprised of 2 field battalions with 2 grenadier companies, and 1 garrison or depot battalion. The field battalions were comprised of 6 fusilier companies having a strength of 130 to 160 rank and file and 110 grenadiers per company. So doing the math yields a battalion strength of 780 to 960 plus the grenadiers.

The company establishment included 44 other officers, NCOs, corporals, drummers and clerks. This number (44) includes 25 "gefreiten" and I am wondering if this may be a typo. Multiplying these company extras by 6 companies adds another 264 extras to the battalion. So I'm thinking that this number is overstated bigtime, because that would increase the battalion to 1,044 on the low end and 1,224 men on the high end. Then add 23 regimental staff for the two field battalions and you end up with, well... a lot of guys in white coats.

Christopher Duffy - Instrument of War
The most recent study, in any language, on the Austrian army of the SYW was written in 2000 by Christopher Duffy, in his book titled, Instrument of War - Volume I of the Austrian Army in the Seven Years War. This book seems to contain some conflicting information, which I will get to in a moment.

Duffy says that there are 4 different measures of the regimental and battalion strength over the course of the SYW. The first method is called the Completter Stand, or the paper strength as if the regiment was staffed up to its establishment. The second method is called the Effectiver Stand and measures the actual numbers present in a theatre of war overall (presumably deducting the depot battalion and any regimental staff taking up cosy quarters at the depot). The third measure is called the Loco Stand, or the number of men physically present at individual locations, excluding men who are absent for various reasons. And finally, there is the Dienstbarer Stand, or the numbers from the Loco Stand actually capable of doing service (excluding sick and wounded, etc.).

Duffy uses information from the muster lists, which correspond to the Loco Stand, and estimates that the average regiment (German) has 1,734 officers and rank and file. Assuming two battalions, this works out to 867 men of all ranks; or if we deduct the 98 noncombatants per regiment, then it averages out to 1,636 men or 818 per battalion. On the other hand, if Duffy is counting the third battalion back at the depot, then the numbers will be much lower since we are spreading them over 3 battalions instead of 2 battalions. The 1,636 men in 3 battalions becomes 548 men per battalion. Let us keep that number in mind.

Duffy then cites a study of the Austrian army made in the early 1790s by Lt-Colonel Gomez, who was trying to determine the relationship between the size of the army and its need for rations and transportation equipment, so he used statistical information from the SYW from the Austrian archives. Gomez did a Completter Stand analysis for each year of the SYW. For example, in 1758, Gomez estimates that there were 116,116 German fusiliers in 816 fusilier companies, or an average of 142 fusiliers per company in 1758. The average grenadier company was 104 men. The Dienstbarer Stand totals for this period are one-third less than the Completter Stand figures, so if we multiply all of the above numbers by 0.67 (ouch, math!), we derive an estimated field strength of around 570 men per battalion.

Field Marshall Lacy complained to Daun, in a letter dated June 17, 1759, that the authorities in Vienna held an inflated view of the number of actual combat troops in the field and supposed that an Austrian army to rival the size of Xerxes Persians must certainly crush, overwhelm and eradicate the King of Prussia from the face of the earth.

Duffy's Second Estimate
On pages 402 and 403 of Instrument of War, Duffy goes into some detail about the tactical operation of the battalion and its companies in battle. Here Duffy states that the battalion is organized into 4 "divisions" of 128 privates each. Multiplying that figure by 4 generates a rank and file battalion strength of 512 men. I am assuming that this figure excludes the officers, NCOs, etc. So we have to make an estimate of these "extras" and add them back in. Page 403 provides a diagram of a full division including rank and file and extras (of which there are 18 men). So 18 + 128 = 146 men of all ranks per division or 584 men in the whole battalion. I think that it is not unreasonable to add back another 16 officers at the battalion level to cover the senior officers of the battalion such as the Obrist, the Obrist-leutnant, the Obrist-wachtmeister, 2 standard bearers, some kadetten junior officers and a few musicians. The extra officers boosts our tallly up to 600 officers and men.

Duffy's "Army of Maria Theresa (1990 facsimile edition)
In his first book on the Austrian army (long out of print by now), Duffy indicates that the wartime establishment of the company varied from 130 to 160 men. I assume that the size differential relates back to the type of Stand that is being used. So if we use the smallest number, i.e. 130 and multiply it by 6 companies, we generate a battalion strength of 780 officers and men.

Conclusions
I believe that the Pengel & Hurt data is overstated, or at best, represents the Completter Stand or theoretical strength of the regiment and battalions of the German fusilier establishments. Duffy's original estimates in Army of Maria Theresa range from 780 to 960. The numbers are reduced to a low of 570 to 584 as a Dienstbarer Stand in the field while my own estimate brings the number closer to 600 officers and men. I think that it is highly unlikely that a battalion ever had 900 to 1,000 men on the battlefield, so I am more inclined to use 600 men as the estimate that I will use for my own miniature battalions. Hence, my Austrians will have 60 figures at a 1:10 ratio of figures to real men.

Tuesday, February 5, 2008

Stadden 18th Century Artillery Crew


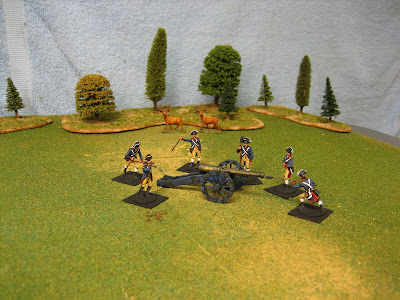
Stadden AWI artillery crew painted as SYW Prussians, manning Elite Miniatures French 12 pdr. (click on picture to enlarge).

As someone who paints and collects a 30mm Seven Years War Prussian army, I have been bemoaning the fact that nobody made suitable artillery crew to use with my 30mm Staddens, Surens and my own Potsdam Miniatures Prussians. I have been using Foundry Prussian artillery crew as a stop gap measure. The Foundry figures have the "chunkiness" that deceives the eye and makes it think that the figures fit in with the taller 30mm figures (which in fact are closer to 34mm in height).

The ideal solution would be to make my own figures, but I do not have the talent to sculpt my own artillery crew, nor can I seem to find a sculptor who has the time to work with me right now. As it turns out, a good solution may be found in the Stadden range itself. I few months ago, I bought some sample AWI Staddens to see how they compare with other figures, and I have to say that they should work fairly well. Stadden made six different artillery crew poses for its AWI 30mm range (also known as the Tradition 30mm range) that are suitable for use as either American Continental artillery or British Royal Artillery. Samples are shown below:


Stadden AWI figures (left to right) XA4 "match", XA5 "lever" and XA3 "ramming" figures painted by Der Alte Fritz.


Stadden AWI figures (left to right) XA2 "standing with rammer", XA6 "ball", and XA1 "officer" figures, painted by Der Alte Fritz.

I painted them as "Prussians" with the straw breeches and waistcoat, blue coat and red turnbacks. The SYW version should be wearing gaiters (easy enough to "convert with paint", i.e. just paint over the stockings as gaiters) instead of the knee breeches and stockings with short "spats" at the ankles. Prussian artillerymen also don't have collars and lapels, but guess what, Hesse Seewald artillery crew do have these features. And they also don't wear the gaiters, apparently. So in my opinion, these figures will work for me, even without any conversion work.

Here are some photos that compare the Stadden, Foundry and RSM artillery crew:


(left to right) Stadden, Foundry and RSM artillery crew

The Stadden crewman measures in at 35mm from the sole of the foot to the top of his head. In comparison, the Foundry Prussian crewman has a height of 31mm and the RSM crewman measures in at 30mm. You can see that while the Stadden and the RSM figures are similar in style, there is an appreciable difference in their respective heights, so I don't think that the two ranges would work together. The Foundry figure is closer to the Stadden, and is definitely shorter and stoughter in stature, but somehow they seem to work together. I guess that chunkiness fools the eye into thinking that the figure is larger than it actually is.


The whole Stadden team in action, with an Elite Miniatures French 12 pdr.

The Stadden AWI range has a lot of interesting figures that are worth the extra look when it comes to finding a figure here or there for SYW usage. Another thought is that anyone creating fictional 18th Century armies could easily use the British, French and Americans in their campaigns. The French uniform had a tighter, almost Prussian-style to its cut and might be suitable as a Prussian stand-in for the SYW. The British light dragoon figures could stand in for the light dragoons at the battle of Emsdorf during the SYW. The French Lauzan Legion hussars could be, well, French SYW or Prussian SYW figures. So grab a Stadden catalog, or click on the link that I have provided on the left hand side of this page, and go visit their web site and see for yourself. There are lots of little surprises in the AWI range.

In all likelihood, I will start replacing my Foundry gun crews with these Stadden AWI crews and just call them Hesse Seewald artillery crew. Who is to say that the uniforms are not correct? Afterall, it is my own fictional country so that gives me a lot of leaway in my uniform and figure selection.


Sunday, February 3, 2008

The Elements of Fredrician Warfare


Frederick II making a personal reconnaissance of the Austrian position, taking advantage of the height offered by a local windmill. Figures are (left to right) Elite, Front Rank, a stand of Old Glory figures and the Suren Frederick atop the windmill (built by Herb Gundt).

The traditional form of warfare, prior to the ascencion of Frederick II to the Prussian throne, was for two armies to line up their forces, parallel to each other, wih cavalry protecting the flanks, and then blazing away with muskets and cannons until one side quit the battlefield. Frederick was looking for something more decisive and economical; some tactical innovation that could take advantage of the Prussian army's superiority in speed and maneuverability. Frederick realized that once the fighting began, effective command and control of the army ceased to exist.

Frederick developed and refined the Oblique Order, which in essence was the tactic of attacking the enemy's flank with overwhelming local forces, while refusing, or holding back, the other wing of his army in order to pin the enemy in place. In theory, the Oblique Order enabled Frederick to fight battles with his smaller army (vis-a-vis the size of the Austrians and Russians) by exploiting his advantage of speed on the march to hit the enemy flank with larger number of Prussian, while negating the overall numbers advantage that his enemies had.


Frederick outlines his battle plan to his senior generals prior to the battle. Usually this was done from an elevated vantage point, such as a hilltop or even the second floor of a building, such as the Gasthaus Alter Fritz (modeled by Herb Gundt after an actual building in the town of Hochkirch).

The elements of the Oblique Order were as follows:

{1} The march to the enemy's flank or rear. Woods (Zorndorf, Kunersdorf, Torgau), hills (Rossbach and Leuthen) or darkness might be used to screen the march from the enemy. At Prague and Kolin, the march was done in full view of the Austrians;

{2} The personal reconnaissance. The King would halt the army within sight of the enemy and make a personal reconnaissance of the enemy's deployment and then form a plan of battle. This was particularly used when the King was not familiar with the terrain. An example of this is recon that Frederick conducted prior to the battle of Kolin in June 1757.

{3} The battle plan is communicated to the senior commanders in the army. After making his recon and formulating a battle plan in his mind, Frederick would gather his senior officers together at some convenient viewpoint, and express his ideas in general terms. He left it up to the generals to develop the details and the execution. The following briefing that was given prior to Kolin serves as an example of how this was done.

"We must confine our attack to the enemy right flank, where they can oppose us on a frontage of only six or eight battalions. We march until our left wing reaches the Kolin stream, and then we proceed to roll up the enemy line and throw their right flank into their left, so that it will either end up in the marsh or they lay down their arms. Our right wing must be held back so that if possible it does not hear a single enemy cannon shot, let alone sustain any casualties.

Look gentlemen, over there on the left you can see that large building or granary! Next to it is a little village and some ponds, and that's where our right wing must come to rest. If for any reason it has to move further to the left, when our left wing attacks, it mus still hold back, as I have just said. Gentlemen, if you do not understand I ask you to say so. I will not take it amiss, and I will be happy to go over the plan again."

{4} An advance force leads the way. An advance guard of light troops and cavalry, or in some cases a division, such as Hulsen's at Kolin, was employed to clear the way, deceive the enemy (ex. Leuthen) or spearhead the attack.

{5} The main attack is launched. The attacking wing of the army had now marched into its designated position to attack one of the enemy's flanks or rear. The advance guard would hit the targeted flank, followed by one or more lines of infantry and cavalry. At Rossbach and Leuthen, Frederick had the attacking wing of the army deployed in a staggered echelon formation with each regiment or battalion some 20 to 50 paces behind its neighboring regiment. This tweak in the Oblique Order was made in order to ensure that elements of the army did not attack across a broad frontage, as had happened at Kolin.

{6} The refused flank. The rest of the army was held back from the battle (Driessen's cavalry wing at Leuthen, Dohna's right wing at Zorndorf, Finck's command at Kunersdorf, etc.) so as to "fix" the enemy in their position and to provide a reserve which Frederick could use to exploit success or cover a retreat in the event of a defeat.

Despite all of the good intentions and the best layed plans for battle, once the army began its minuet of maneuver and engaged the enemy, it was difficult for any general, even Frederick, to exercise command and control over the events that followed. His confidant, Henri de Catt recorded this exchange after the battle of Zorndorf in 1758.

Frederick: That was a hell of a day. Did you understand what was going on?

Catt: Your Majesty, I had a good grasp of the preliminary march and the first arrangements for the battle. But all the rest escapes me. I could make no sense of the various movements.

Frederick: You were not the only one, my dear friend. Console yourself, you were not the only one.